|
|
~MENU~ |
| Home |
| The Concept |
| The Boat |
| Bringing Her Home |
|
Weekly Progress Log |
|
Daysailor Projects |
| The Boat Barn |
| Resources |
| Other Sites |
| Email Tim |
|
|
| Progress Report: 2005 Archives |
|
January February March April May June July August September October November December |
|
Reports from July 2005 7/3/05 7/10/05 7/17/05 7/24/05 7/31/05 |
|
Log for the Week Ending July 3, 2005 The week got off to something of a slow start, as I had an appointment Monday morning that delayed shop work for much of the morning. In the afternoon, however, I attacked several tedious chores that had been looming over my head for some time, including milling up dozens of cypress strips for use in the v-berth ceiling. |
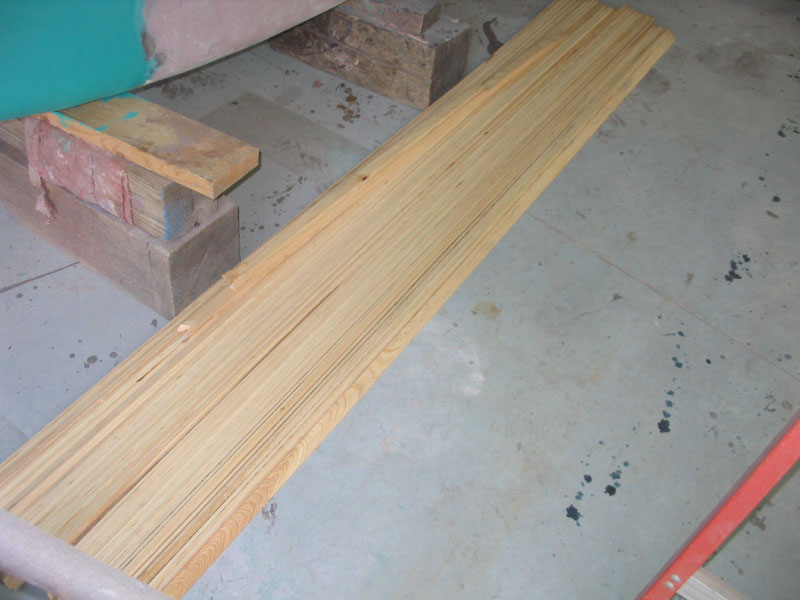 Beginning with some 4" wide boards that I had surface planed previously, I
straightened one edge with a circular saw and straightedge, then milled three
strips about 1-1/8" wide from each board. Finally, I resawed each strip
into three 1/4" pieces suitable for the ceiling. Beginning with some 4" wide boards that I had surface planed previously, I
straightened one edge with a circular saw and straightedge, then milled three
strips about 1-1/8" wide from each board. Finally, I resawed each strip
into three 1/4" pieces suitable for the ceiling. |
|
With that done, I set the strips aside for the time being, and began work on the supports for the cockpit seats. At first, I had hoped to create some laminated arched supports, and after some calculations and measurements, I drew up a design that looked good, and even went as far as to create four laminating molds on a piece of scrap plywood. When I cut a test strip, however, I realized how extreme the curve was, and once again I broke the strip during a test bend. |
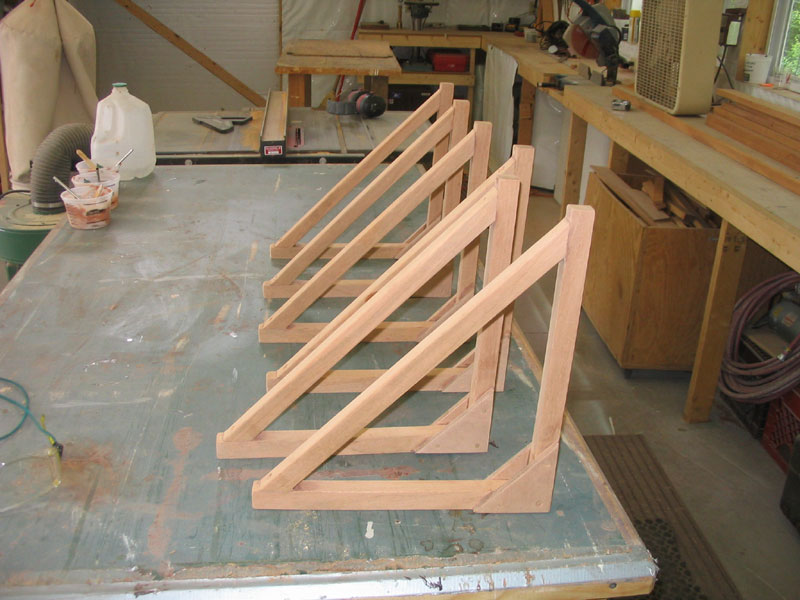 With no inclination--and, more importantly, no time--to deal with a steam box at
this juncture, I regrouped and decided to build the brackets from straight stock
with an angled brace and a plywood gusset at the inside corner to strengthen the
arrangement. With this new plan in mind, I drew a full-scale
representation of the bracket on the plywood, and cut all the pieces of solid
mahogany required for the six braces I needed (three per side). With no inclination--and, more importantly, no time--to deal with a steam box at
this juncture, I regrouped and decided to build the brackets from straight stock
with an angled brace and a plywood gusset at the inside corner to strengthen the
arrangement. With this new plan in mind, I drew a full-scale
representation of the bracket on the plywood, and cut all the pieces of solid
mahogany required for the six braces I needed (three per side).Click here for more detail on the cockpit seat construction progress. |
|
Tuesday, I began by gluing up the cockpit seat braces. I used resorcinol glue on the joints and on the gussets, and secured all the joints with bronze screws for clamping pressure and for additional strength. With all six assemblies complete, I set them aside for the glue to cure.
|
|
I had a meeting later in the afternoon, so I left early so that I could swing in and pick up my new bronze rudder shaft on the way. the new shaft was longer to account for the distance the new tiller head would be above the cockpit sole. Made from 1" Tobin bronze stock, the new shaft appeared to be nicely machined. |
|
Wednesday was an exciting day: my new mast and boom arrived from Metalmast. The spars arrived on an interesting custom trailer with telescoping tubular frame, to accommodate very large masts with ease. The new mast, complete with airfoil spreaders, white LPU finish, jumpers, and tapered upper section, was beautiful, and exhibited outstanding weld quality. I couldn't wait to see it on the boat.
|
|
I spent a fair bit of time Wednesday sanding the ceiling strips. I had milled approximately 60 strips, each 1-1/8" wide, and now they needed to be sanded prior to installation. This was an incredibly boring task, with each strip taking 2-3 minutes to machine sand to an acceptably smooth finish with 120 grit paper. I spent an hour or so on this task before I tired of it and moved on to something else. |
|
I also sanded the cockpit seat braces, now that the glue was cured, and prepared them for a sealer coat of varnish before installation. I also noted a number of fasteners and other supplies that I needed for several jobs, and placed an order so that I would have the materials the next day. |
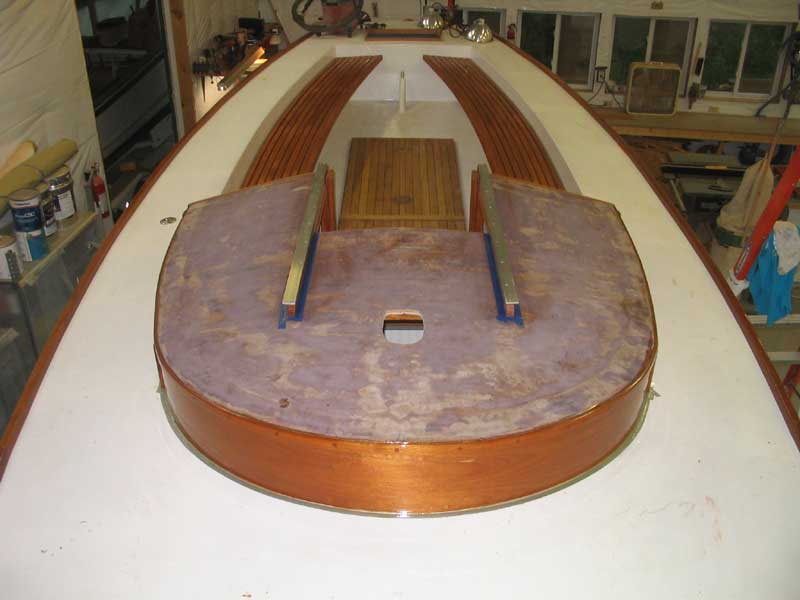
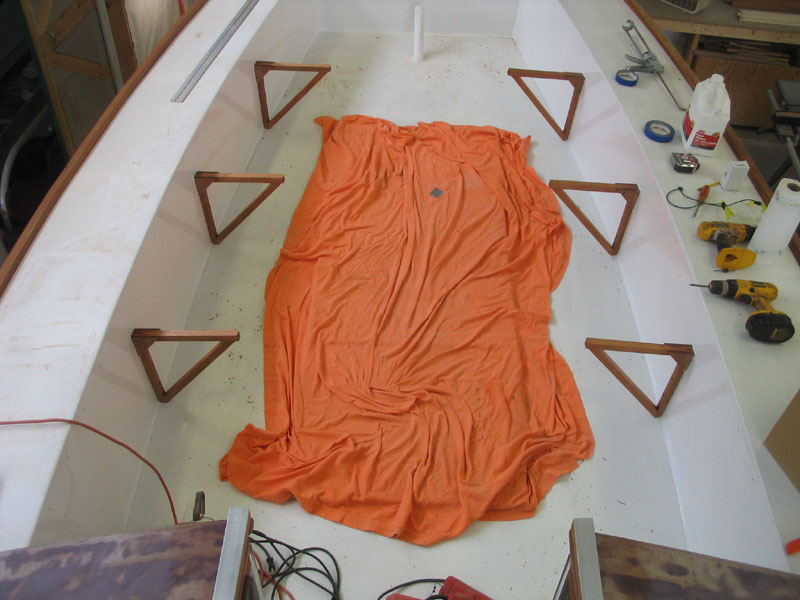 Later in the week, I installed the cockpit seat supports permanently in the
cockpit, three per side, using screws and 5200 adhesive for an eventual
rock-solid basis. I had to make a slight modification to the lower portion
of the braces, as I discovered they ended up slightly too high, but fortunately
there was enough extra material at the bottom to allow me to cut off the amount
needed without any other structural changes. After laying out the
locations, I secured them in place once and for all, and looked forward to
installing the seating areas shortly. Later in the week, I installed the cockpit seat supports permanently in the
cockpit, three per side, using screws and 5200 adhesive for an eventual
rock-solid basis. I had to make a slight modification to the lower portion
of the braces, as I discovered they ended up slightly too high, but fortunately
there was enough extra material at the bottom to allow me to cut off the amount
needed without any other structural changes. After laying out the
locations, I secured them in place once and for all, and looked forward to
installing the seating areas shortly. |
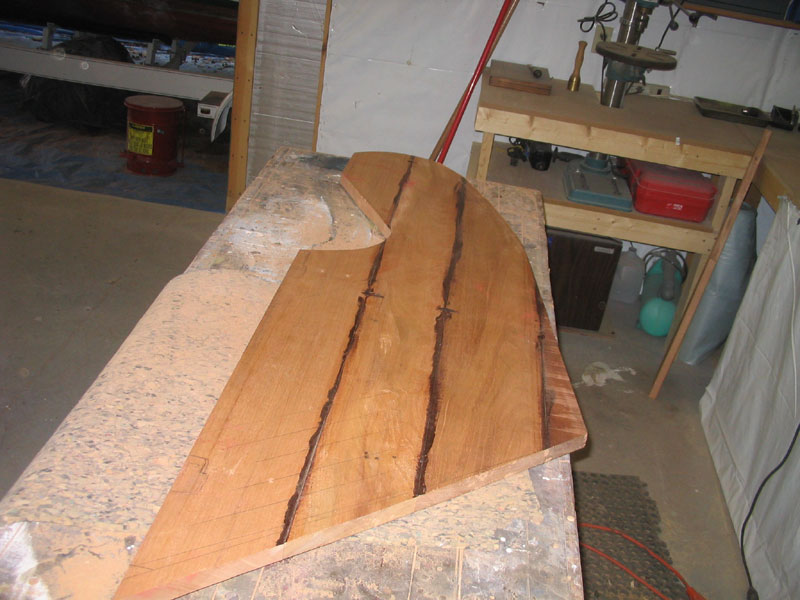 Last week's rudder blank glueup had had adequate cure time, and now that I had
the rudder shaft in stock I began the process of cutting down the blank to the
correct size and shape. Using the original rudder as a template, I roughed
out the shape, but I wanted to modify the lower portion somewhat to create a
more modern design with slightly more area. After some critical assessment
of several iterations of the shape penciled in on the blank, I cut out the basic
rudder shape with a circular saw and jigsaw. Then, after some layout, I
routed a 1" cove in the leading edge to accept the rudder post. Last week's rudder blank glueup had had adequate cure time, and now that I had
the rudder shaft in stock I began the process of cutting down the blank to the
correct size and shape. Using the original rudder as a template, I roughed
out the shape, but I wanted to modify the lower portion somewhat to create a
more modern design with slightly more area. After some critical assessment
of several iterations of the shape penciled in on the blank, I cut out the basic
rudder shape with a circular saw and jigsaw. Then, after some layout, I
routed a 1" cove in the leading edge to accept the rudder post. |
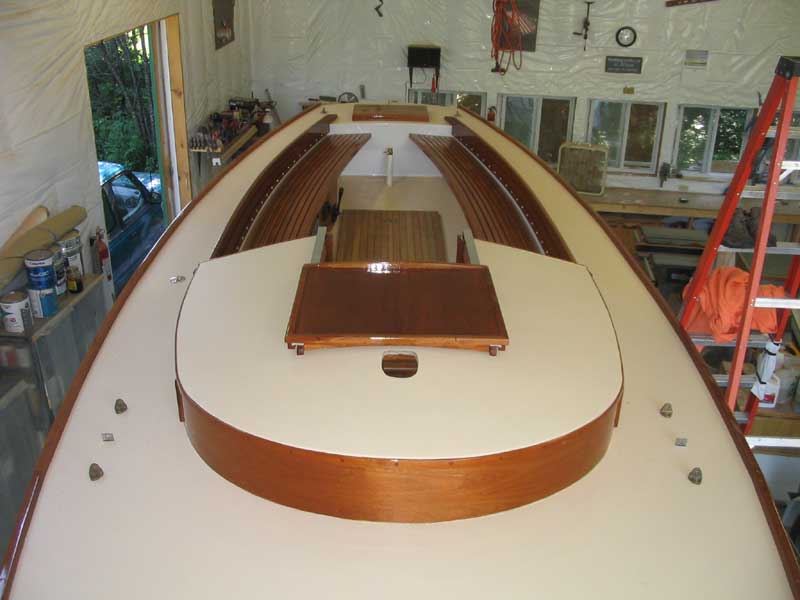
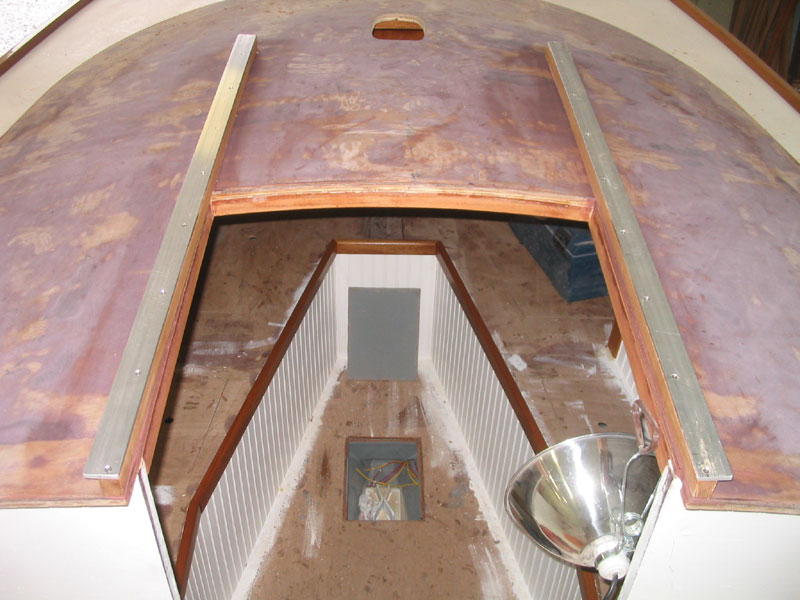 In addition to the cockpit seats, I had a number of final projects on deck,
including the companionway area and the lazarette hatch at the aft end of the
cockpit. Now, I turned my attention to these areas, and began to conceive
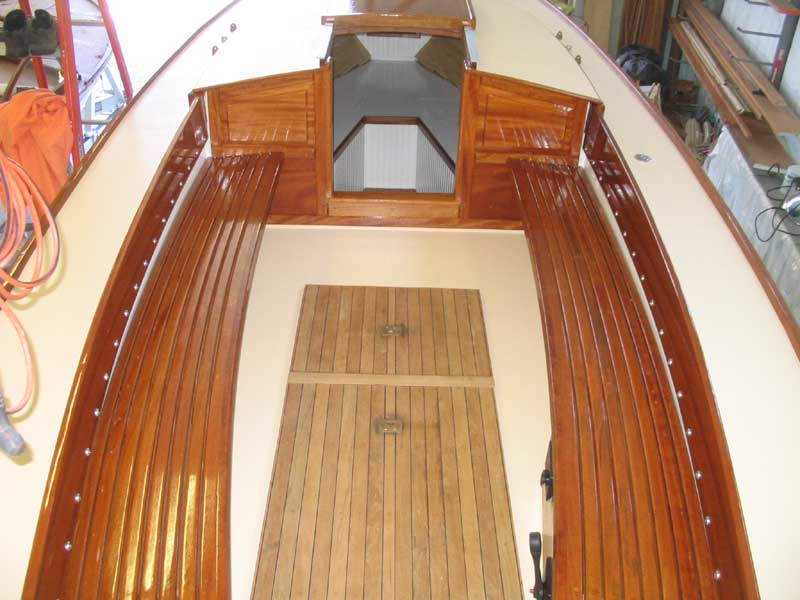
and lay out the companionway hatch and slides. After some consideration, I
elected to use some basic longitudinal rails along the sides of the hatch, with
aluminum slides on top. Over the next few days, I worked on various
aspects of the hatch support system and the hatch itself, coming ever closer to
the completion of this job. In addition to the cockpit seats, I had a number of final projects on deck,
including the companionway area and the lazarette hatch at the aft end of the
cockpit. Now, I turned my attention to these areas, and began to conceive
and lay out the companionway hatch and slides. After some consideration, I
elected to use some basic longitudinal rails along the sides of the hatch, with
aluminum slides on top. Over the next few days, I worked on various
aspects of the hatch support system and the hatch itself, coming ever closer to
the completion of this job. |
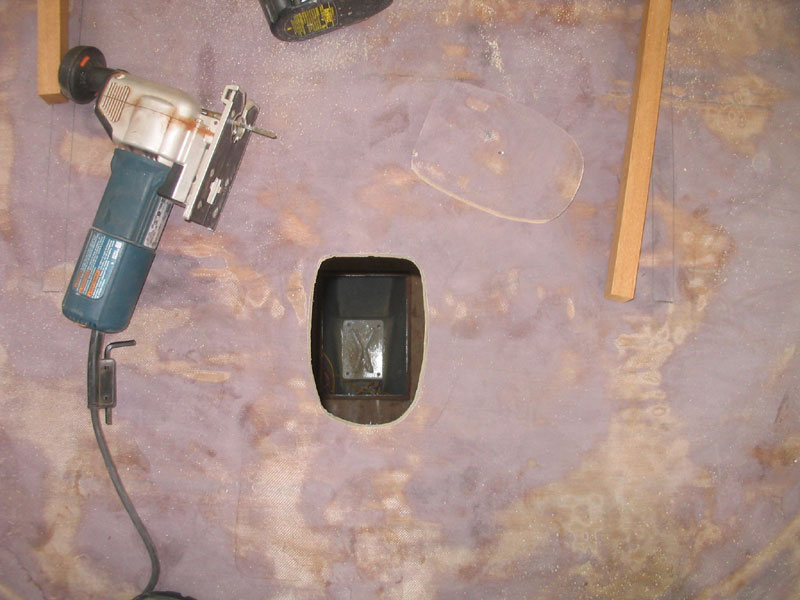
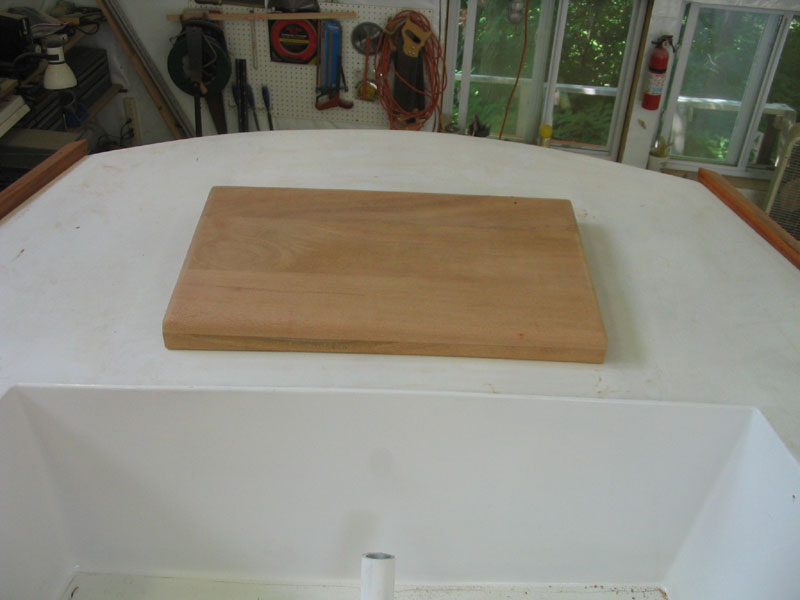 The lazarette required a simple internal coaming, which I built from some scrap
mahogany and glued and screwed into place inside the opening, and a new hatch
cover to fit. Once I had the coaming built, I glued up a simple mahogany
frame, making the basis of the hatch, and a solid mahogany panel to be secured
to the frame. Over the period of a couple days, allowing for gluing time,
I made up the lazarette hatch and prepared it for finishing. The lazarette required a simple internal coaming, which I built from some scrap
mahogany and glued and screwed into place inside the opening, and a new hatch
cover to fit. Once I had the coaming built, I glued up a simple mahogany
frame, making the basis of the hatch, and a solid mahogany panel to be secured
to the frame. Over the period of a couple days, allowing for gluing time,
I made up the lazarette hatch and prepared it for finishing. |
|
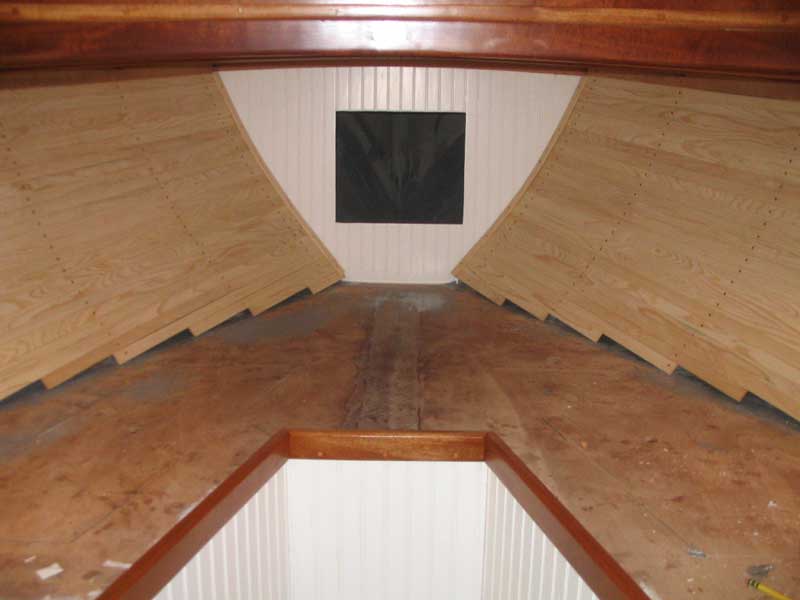
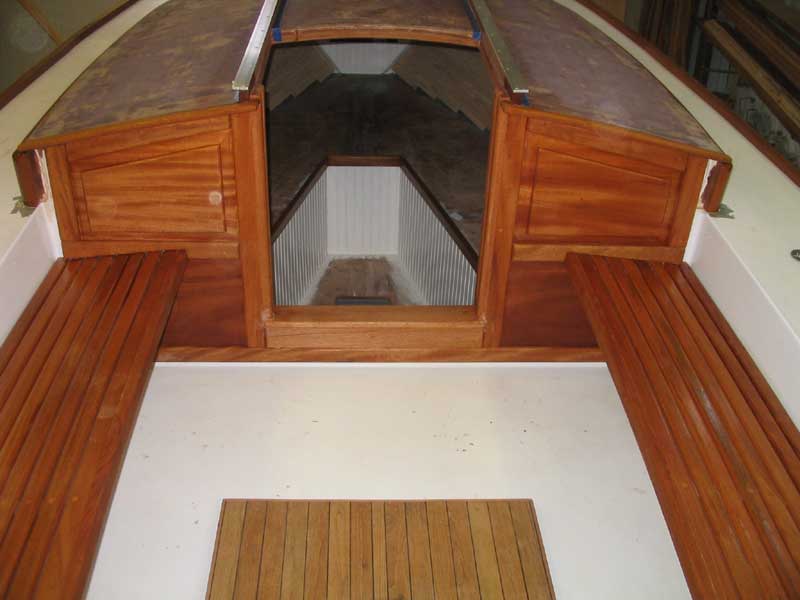
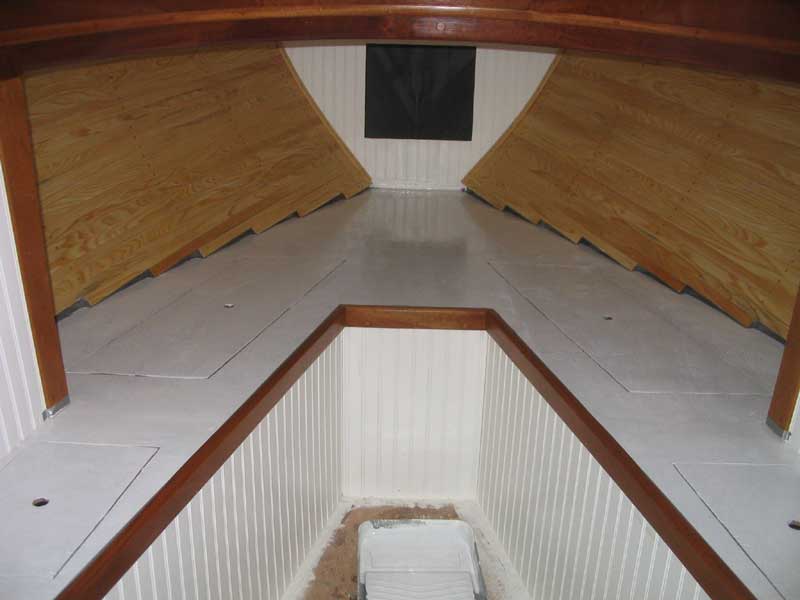
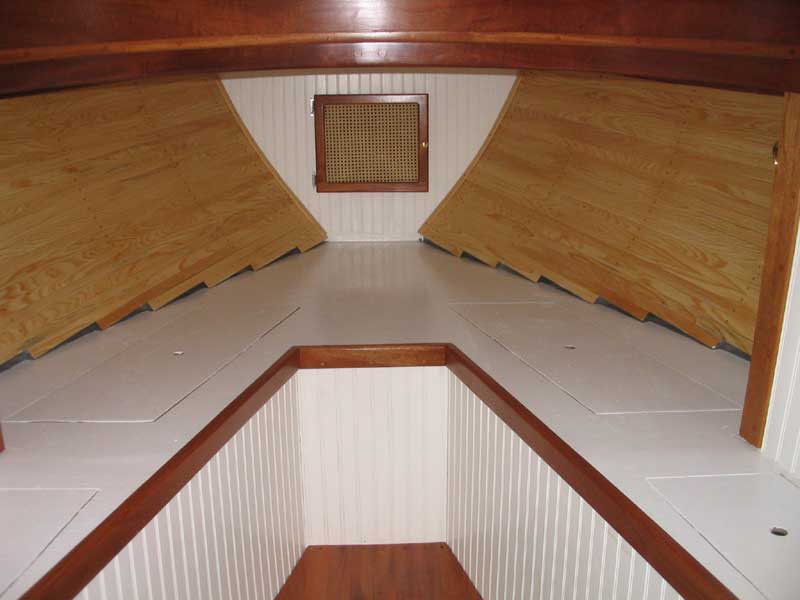
Late Friday afternoon, I found myself staring into space and zoning as I contemplated some project solution or another, and after several minutes of this, I decided to work on something mindless instead, just to keep going. At long last, I thought I would try on the ceiling installation for size, a project I had put off for as long as possible and dreaded the entire time. I made a measurement inside the boat, and even though the length of the ceiling area widened as it went down, I decided I could do three strips at a time of the same length, before increasing the length for a further three. With a number of sanded strips on hand, I cut six pieces to length (three for each side), and contorted myself into the v-berth for installation fun. |
|
I was surprised and pleased to find that the installation wasn't that bad, other than the tight quarters. I installed each strip with five round head bronze screws--one at each support location, and butted the after end of the strips up to the bulkhead as closely as possible. Trim would be required on each end, unless I cared to measure and cut each individual strip separately (which certainly wasn't going to happen). |
 I also surprised
myself with the realization that the strips were wider than I
had thought. Earlier, I had measured the minimum width of the area to be
covered (24" minimum), and, thinking that the strips were 1" wide, had figured
I'd need at least 50 strips total. I had sanded fewer than 30 so far, and
hardly looked forward to sanding an additional 30, but as I installed them,
three at a time on each side, I made better progress than expected, which is
when I realized that the strips were wider than 1"--about 1-1/8".
The relatively rapid progress kept me at the job for a couple hours, during
which I installed 12 strips on each side, covering more than half of the space
in that time. Fortunately, the job was satisfying because the ceiling
looked nice, and made the effort worthwhile. I also surprised
myself with the realization that the strips were wider than I
had thought. Earlier, I had measured the minimum width of the area to be
covered (24" minimum), and, thinking that the strips were 1" wide, had figured
I'd need at least 50 strips total. I had sanded fewer than 30 so far, and
hardly looked forward to sanding an additional 30, but as I installed them,
three at a time on each side, I made better progress than expected, which is
when I realized that the strips were wider than 1"--about 1-1/8".
The relatively rapid progress kept me at the job for a couple hours, during
which I installed 12 strips on each side, covering more than half of the space
in that time. Fortunately, the job was satisfying because the ceiling
looked nice, and made the effort worthwhile.
|
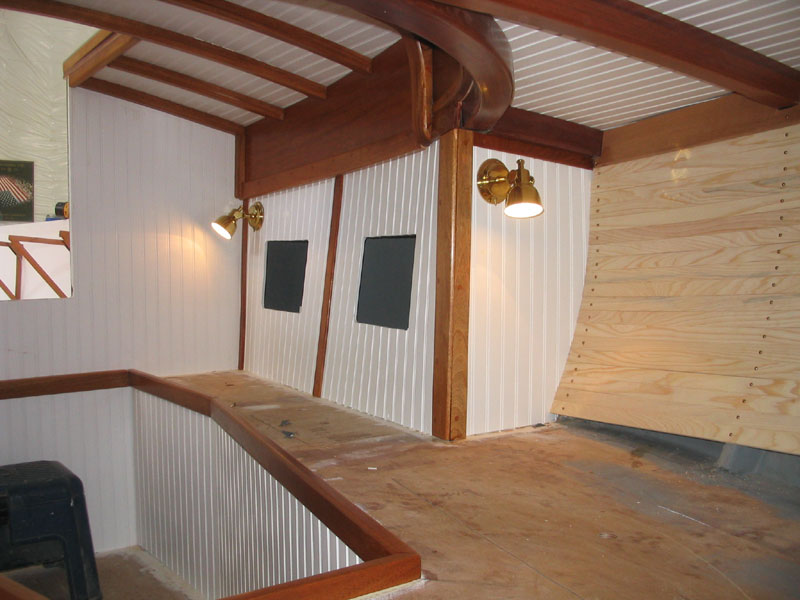
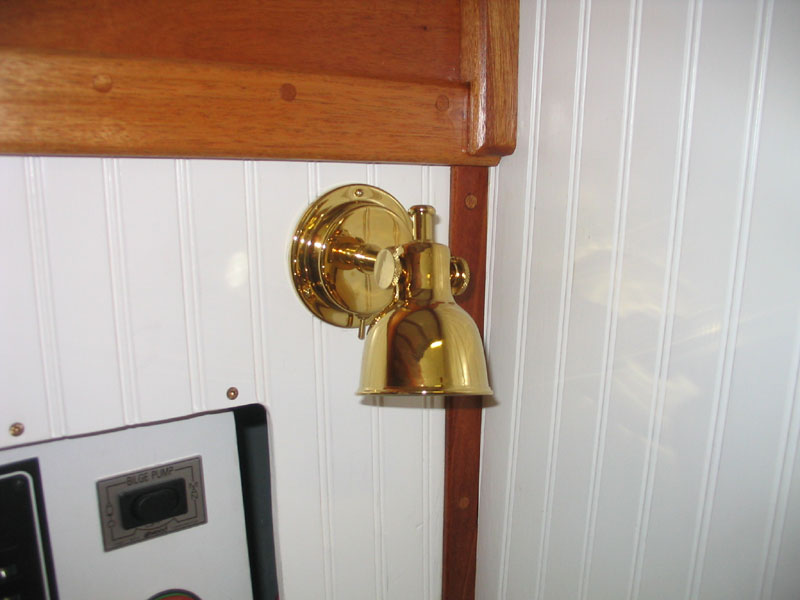 At some point during the week, I installed the four
interior lighting fixtures so that I could have lighting inside (other than the
very hot work lamps) while finishing things up. Small details like this
brought home to me the fact that time was running out on this project, with my
self-imposed completion deadline looming, but also reinforced how close I truly
was to having the major work behind me. The devil is in the details,
though, and the final days and weeks promised to be extremely busy. At some point during the week, I installed the four
interior lighting fixtures so that I could have lighting inside (other than the
very hot work lamps) while finishing things up. Small details like this
brought home to me the fact that time was running out on this project, with my
self-imposed completion deadline looming, but also reinforced how close I truly
was to having the major work behind me. The devil is in the details,
though, and the final days and weeks promised to be extremely busy. |
|
Log for the Week Ending July 10, 2005 With time running out for the completion of the project, it was another very busy week on board, but I made good progress. Please bear with me if I shortcut any of the descriptions, as keeping the logs up to date has been falling by the wayside because of such long days in the shop. |
 Monday,
the holiday, I worked all day, sanding and finishing the cockpit seat slats
before installation and building the companionway hatch slider and some other
wooden pieces. At the end of the day, I applied sealer coats of varnish to
all sides of the seat slats. Monday,
the holiday, I worked all day, sanding and finishing the cockpit seat slats
before installation and building the companionway hatch slider and some other
wooden pieces. At the end of the day, I applied sealer coats of varnish to
all sides of the seat slats. |
 I
also built a small door for the chainlocker bulkhead, to cover the access
opening. I
also built a small door for the chainlocker bulkhead, to cover the access
opening. |
 Tuesday,
after a morning meeting, I was at work by 0900, and continued with final wok on
the companionway hatch. Then, I moved on to the cockpit seats and
installed all of the slats on one side, and one or two on the other before the
end of the day. Tuesday,
after a morning meeting, I was at work by 0900, and continued with final wok on
the companionway hatch. Then, I moved on to the cockpit seats and
installed all of the slats on one side, and one or two on the other before the
end of the day. |
|
I also sanded and shaped the rudder blank and prepared it for installation. My propeller, which I had been waiting for forever, arrived at the prop shop, and with a sort of scattered day on my hands I decided to just bit the bullet and drive up immediately for pickup. I also ordered a series of materials that I'd need for the remainder of the week (a never-ending process, seemingly). |
 Wednesday
morning, I finished up the cockpit seats' installation and installed cleats at
the forward and after ends to support them. This took far longer than
expected. With that done, I moved on to the forward cockpit bulkhead and
milled some mahogany to use for rails, stiles, and raised panels to cover the
raw plywood bulkhead. Wednesday
morning, I finished up the cockpit seats' installation and installed cleats at
the forward and after ends to support them. This took far longer than
expected. With that done, I moved on to the forward cockpit bulkhead and
milled some mahogany to use for rails, stiles, and raised panels to cover the
raw plywood bulkhead.
|
 Thursday,
I finished up work on the bulkhead and installed bungs in all the screwholes of
the bulkhead and the cockpit seats. Then, I moved on to several other
jobs, including fitting the rudder and finishing up the interior ceiling.
I know this was a full day, but I must be missing something here. Thursday,
I finished up work on the bulkhead and installed bungs in all the screwholes of
the bulkhead and the cockpit seats. Then, I moved on to several other
jobs, including fitting the rudder and finishing up the interior ceiling.
I know this was a full day, but I must be missing something here. |
|
Friday morning, I trimmed and sanded all the bungs in the cockpit, and then built the companionway trim and some trim for the after end of the cabin trunk, and sanded and varnished all the new wood on deck. I also applied the final coat (well, as final as they ever are) of varnish to the cabin trunk. |
 Saturday,
I completed the rudder installation by installing the pintles and gudgeons, and
then painted the rudder and the remainder of the bottom to complete that job.
Next, I moved on to the mast step, and permanently installed it in the bilge
with stainless steel lag screws. Saturday,
I completed the rudder installation by installing the pintles and gudgeons, and
then painted the rudder and the remainder of the bottom to complete that job.
Next, I moved on to the mast step, and permanently installed it in the bilge
with stainless steel lag screws.Finally, I turned to work on the cabin sole. I decided to build my own sole from strips of mahogany, and to ease the process I began by cutting a plywood template of the existing sole, and then installed the new mahogany directly on this removable piece. In this way, I could cut and fit the pieces more easily, trim them flush, finish the sole, and then install it in one piece on board. I'll have more details on this process next week. |
 I
also addressed the chainplates, finally, and prepared to install the stainless
steel strap chainplates for the upper shrouds, and the bronze deck fittings for
the lower shrouds. I
also addressed the chainplates, finally, and prepared to install the stainless
steel strap chainplates for the upper shrouds, and the bronze deck fittings for
the lower shrouds.Click here for information on the chainplates. Only two weeks remain until I expect the boat, for all intents and purposes, to be complete and ready for her August launching. The artificial deadline is in place so that I can depart on a much-needed coastal cruise, to which I am looking forward! |
|
Log for the Week Ending July 17, 2005
|
 I next turned my attention to the engine controls and panel. In order to
test run the engine this week, I needed to hook up the controls and electrical
system, and now was as good a time as any for the chore. I admit that
placing the controls and panels was not something that I carefully planned from
day one; the overall look and concept of the boat and cockpit always came first.
As a result, I found myself contemplating how in the world I was going to
install these controls in the cockpit, in a manner that would be convenient to
use but also out of the way. With no solid cockpit sides to work with, my
options seemed limited. I next turned my attention to the engine controls and panel. In order to
test run the engine this week, I needed to hook up the controls and electrical
system, and now was as good a time as any for the chore. I admit that
placing the controls and panels was not something that I carefully planned from
day one; the overall look and concept of the boat and cockpit always came first.
As a result, I found myself contemplating how in the world I was going to
install these controls in the cockpit, in a manner that would be convenient to
use but also out of the way. With no solid cockpit sides to work with, my
options seemed limited. |
|
With the controls and panel installed, there was nothing standing between me and the engine running except adding fluids and a final check. I planned for that later in the week.
|
 I placed yet another in an endless series of orders for fasteners, sealant, and
other parts required for the last stages of the project. Will it ever end?
I also received my new winches, Lewmar 30 self tailers, but was dismayed to
discover that one of the self-tailing mechanisms was shattered thanks to sloppy
packaging, apparently. I got on the phone and straightened it out.
While I was at it, I arranged with my rigger to have a look at the spar so that
he could make up the rigging required for the mast. I placed yet another in an endless series of orders for fasteners, sealant, and
other parts required for the last stages of the project. Will it ever end?
I also received my new winches, Lewmar 30 self tailers, but was dismayed to
discover that one of the self-tailing mechanisms was shattered thanks to sloppy
packaging, apparently. I got on the phone and straightened it out.
While I was at it, I arranged with my rigger to have a look at the spar so that
he could make up the rigging required for the mast. The amount of last-minute gear, all of it fairly expensive, required to finish the boat is astounding, and, frankly, I dread placing more orders. Yet the boat will be incomplete without the additional materials or equipment, so order I must. I cannot wait for that part of the project to be over--enough is enough! Later in the week, I received the replacement winch...only to open it and find the same damage as the one for which it was the replacement! Ridiculous. I called and straightened it out, and hoped that the next replacement--which they said they would send from a different warehouse--would be in the proper condition. |
|
I sanded all the varnish in the cockpit, as well as several other loose pieces, and late in the day applied another coat. I also applied a coat of wipe-on tung oil to the cypress ceiling in the cabin. |
|
I also located and predrilled for several pieces of deck hardware, including three mooring cleats (bow and two stern), and the four bronze chainplates for the lower shrouds. I also cut the slot for the backstay chainplate. All this work was leading up to the pending nonskid painting, which I hoped to do later in the week. |
|
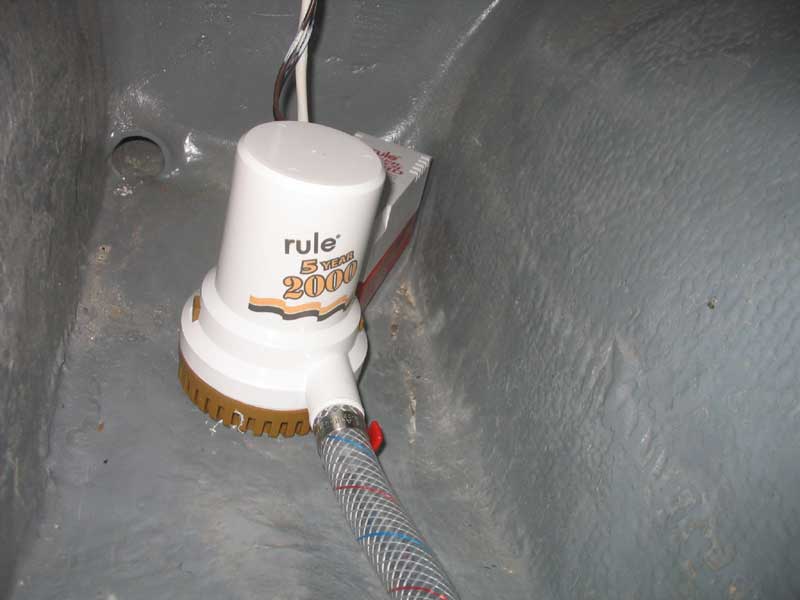
Tuesday, it was a beautiful day and I took a carefully planned day off for some sailing--much needed, I might add.
Eventually, I got the pump secured and wired, and the remainder of the job was much more pleasant. |
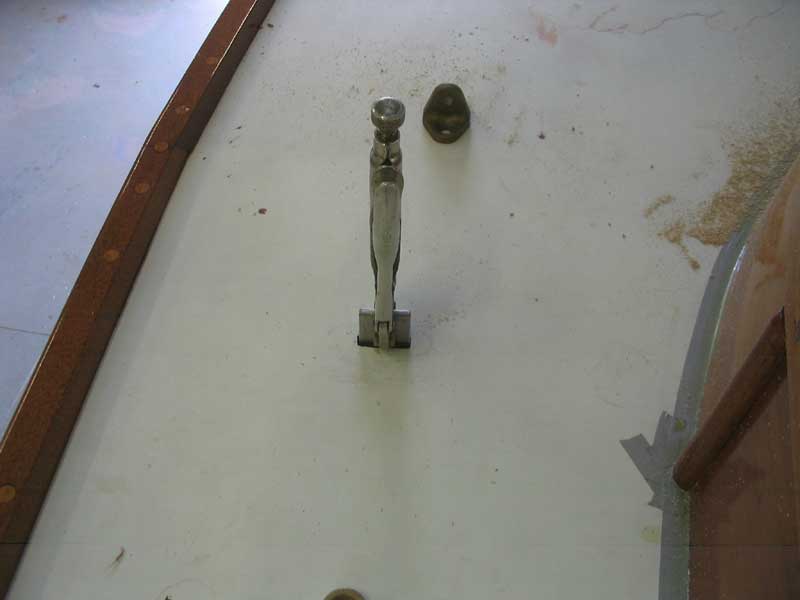
 Next, I took a piece of cardboard up to the cockpit
and, after loosely installing the new bronze tiller head and strap, played
around with a design for the tiller. I was looking for a flowing shape
that curved easily from the angle of the tiller strap forward into the cockpit,
and after several tries--modifying the cardboard template slightly each time--I
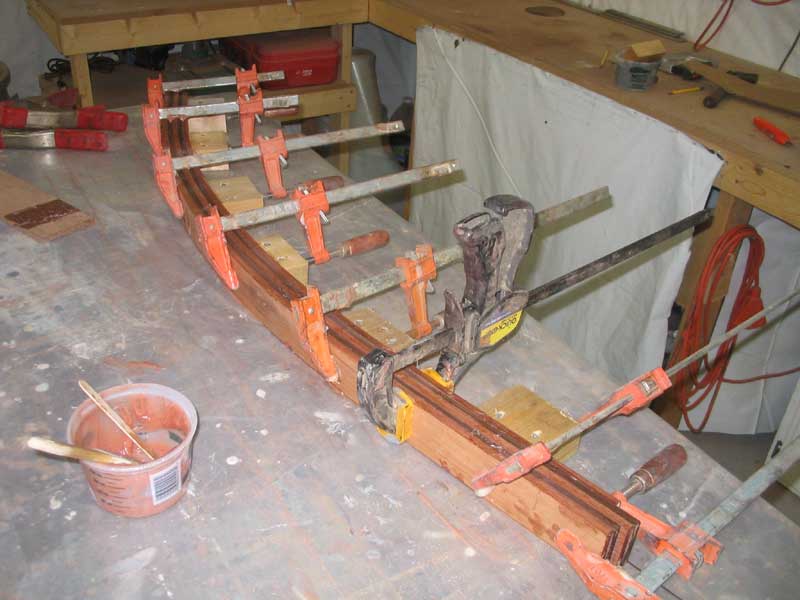
came up with a shape that I thought looked good. Then, I built a simple
laminating mold directly on top of my junky work bench and laminated the tiller
from alternating layers of mahogany and walnut, using 2" wide by 1/4" thick
strips that I had earlier cut from larger material. As of this writing, no
further shaping of the tiller had occurred. Next, I took a piece of cardboard up to the cockpit
and, after loosely installing the new bronze tiller head and strap, played
around with a design for the tiller. I was looking for a flowing shape
that curved easily from the angle of the tiller strap forward into the cockpit,
and after several tries--modifying the cardboard template slightly each time--I
came up with a shape that I thought looked good. Then, I built a simple
laminating mold directly on top of my junky work bench and laminated the tiller
from alternating layers of mahogany and walnut, using 2" wide by 1/4" thick
strips that I had earlier cut from larger material. As of this writing, no
further shaping of the tiller had occurred. |
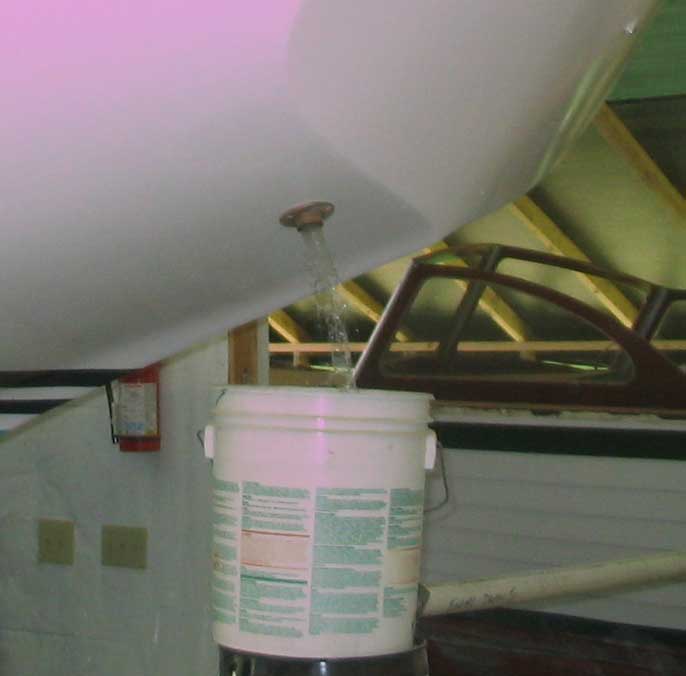 With the bilge pump and tiller gluing complete, I moved on to the engine
commissioning. I had collected all the fluids I needed for the job, and
now prepared to fill the various reservoirs in the engine, and add fuel to the
tank. After checking the fluids a few times to be sure, I prepared to run
the engine for the first time. With the bilge pump and tiller gluing complete, I moved on to the engine
commissioning. I had collected all the fluids I needed for the job, and
now prepared to fill the various reservoirs in the engine, and add fuel to the
tank. After checking the fluids a few times to be sure, I prepared to run
the engine for the first time. |
 After running the engine and cleaning up, I applied a coat of tung oil, the
first of several, to the cypress ceiling in the cabin, just to give it some
protection and a richer look. The oil did not significantly darken the
cypress. After running the engine and cleaning up, I applied a coat of tung oil, the
first of several, to the cypress ceiling in the cabin, just to give it some
protection and a richer look. The oil did not significantly darken the
cypress. |
|
Afterwards, I cleaned up the decks and masked off the toerails, cabin trunk, and other areas as necessary to prepare for applying the nonskid to the decks and coachroof. It was late in the day and I was running out of steam, so for the moment I avoided the cockpit sole, which would require more tedious taping. Plus, I needed (or at least it would be more convenient) to stand in the cockpit while painting other parts of the deck, so I decided to leave the sole for a separate operation in a couple days.
|
|
All throughout the week, nearly every day, I continued with varnish work on the cockpit benches and bulkhead, and on a variety of loose wooden parts. By the end of the week, most areas had enough varnish coverage, and were looking good enough, to almost consider them complete. Whether or not to continue applying varnish is a decision that was pending as of this writing. |
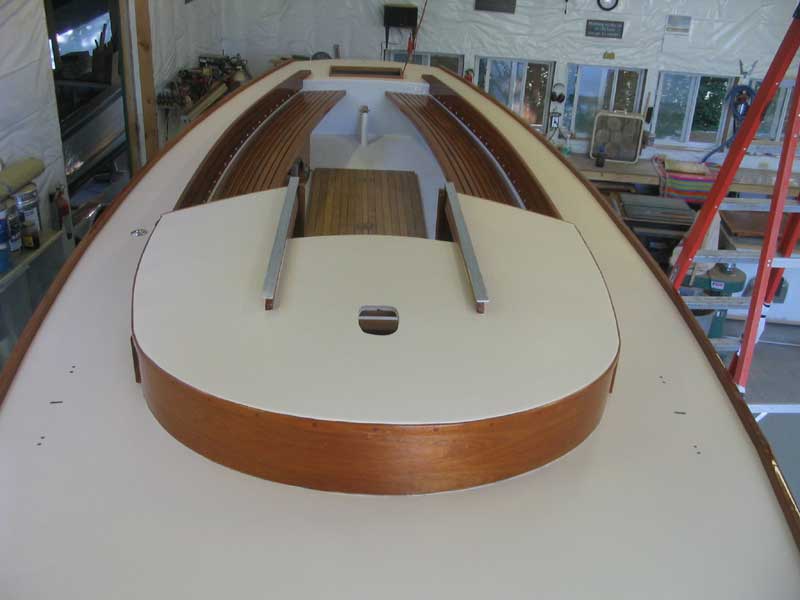
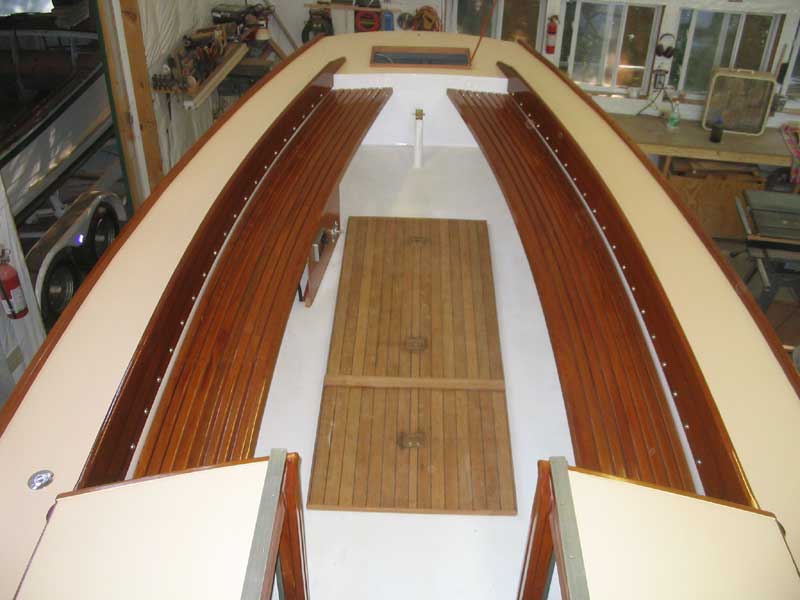
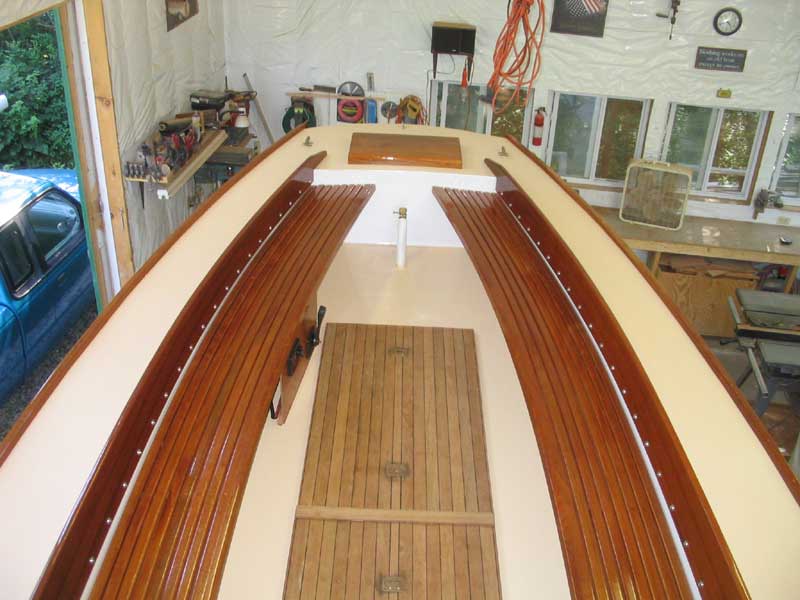
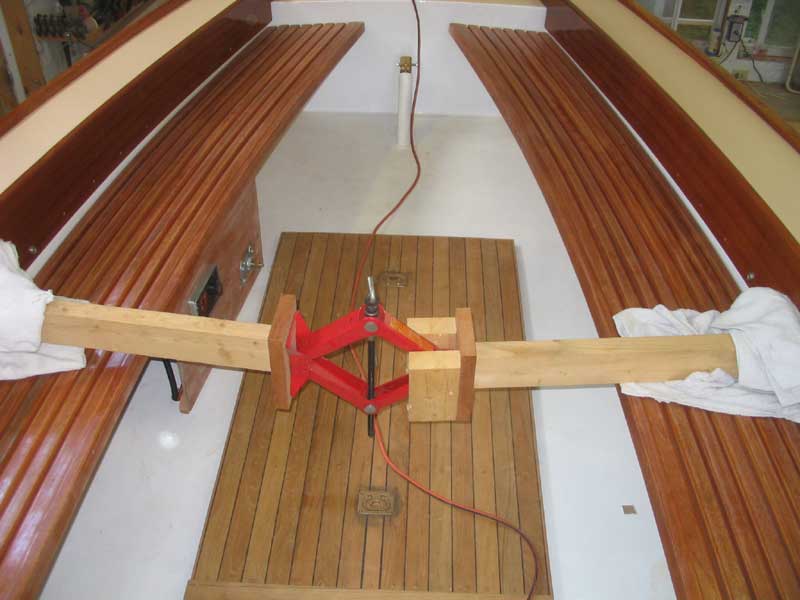 Friday, I removed the tape from the deck painting, and pressed onwards with the
coamings. At long last, with the sidedecks painted and major work in the
cockpit complete, I could install the coamings. Not only was I tired of
the coamings being susceptible to damage down on the shop floor, but I was dying
to see them in place, as I felt the boat still looked incomplete without them.
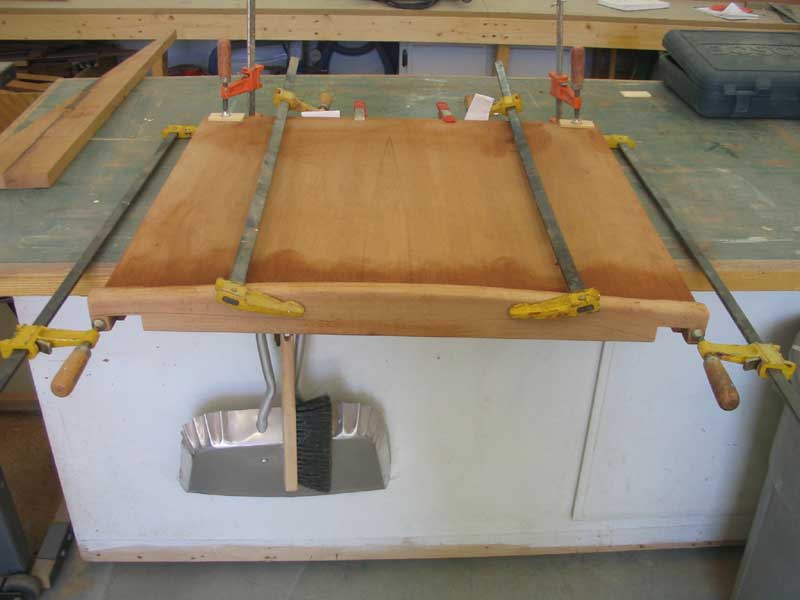
Gingerly, I lifted the huge pieces up on deck and placed them loosely in
position, then rigged up my jacking system (with thick towel protectors at the
ends) to press the coamings into their final position. Friday, I removed the tape from the deck painting, and pressed onwards with the
coamings. At long last, with the sidedecks painted and major work in the
cockpit complete, I could install the coamings. Not only was I tired of
the coamings being susceptible to damage down on the shop floor, but I was dying
to see them in place, as I felt the boat still looked incomplete without them.
Gingerly, I lifted the huge pieces up on deck and placed them loosely in
position, then rigged up my jacking system (with thick towel protectors at the
ends) to press the coamings into their final position. |
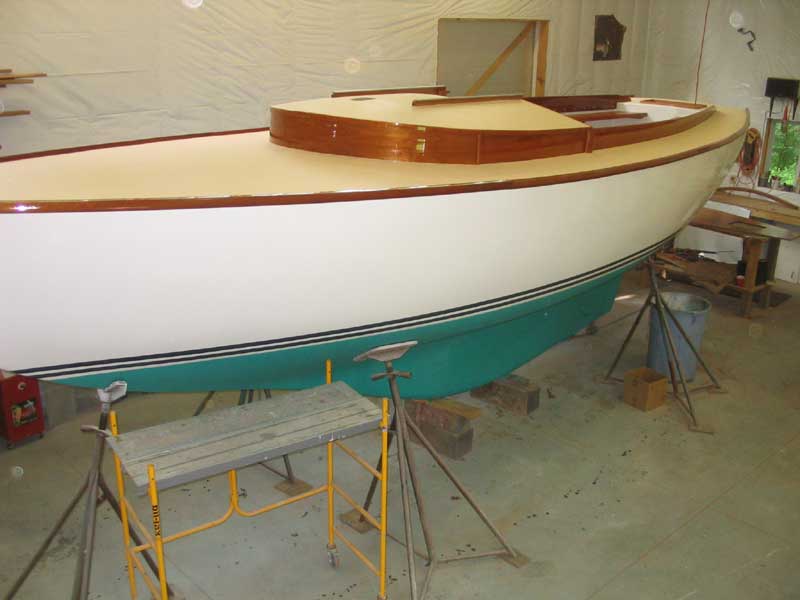
 Finally, I installed all the screws that hold the coamings in place, adding a
thin stainless steel flat washer behind the finish washers to provide extra
support and prevent the sharp edge of the finish washers from damaging the
coamings. Installation took a surprisingly long time, but when complete,
the coamings really pulled the cockpit--and the whole boat--together. Finally, I installed all the screws that hold the coamings in place, adding a
thin stainless steel flat washer behind the finish washers to provide extra
support and prevent the sharp edge of the finish washers from damaging the
coamings. Installation took a surprisingly long time, but when complete,
the coamings really pulled the cockpit--and the whole boat--together. |
|
|
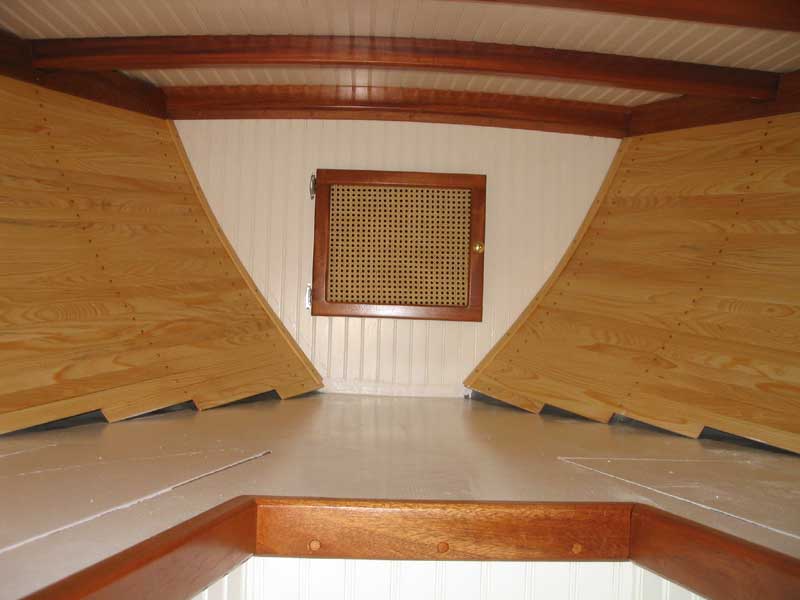
 Also on Friday, I finished up the tung oil on the v-berth ceiling, and applied
the first of two or three coats of white paint to the plywood v-berth surfaces.
Then, I moved down to the shop and worked again on the chainlocker cabinet door,
installing some pre-woven cane material in the opening. Also on Friday, I finished up the tung oil on the v-berth ceiling, and applied
the first of two or three coats of white paint to the plywood v-berth surfaces.
Then, I moved down to the shop and worked again on the chainlocker cabinet door,
installing some pre-woven cane material in the opening.Click here for more on the chainlocker door. Finally, I finished up with more varnishing in the cabin, on deck, and in the shop before calling it quits for the day--and for the week, as I had other plans Saturday that would keep me out of the shop all day. I planned more work on Sunday. |
|
Log for the Week Ending July 24, 2005 Well, Sunday, instead of working on the boat, I worked outside and dismantled the temporary lean-to next to the shop, moving the Lyman 23 that had been stored there into the shop. This, and other chores, occupied the day. Then, Monday was another day involved in other activities, so it wasn't until Tuesday that I got back to work. With only a few days till I departed on a much-anticipated cruise, things were really winding down. |
|
The punch list was as long as ever, but the jobs had become less and less urgent. I had already come to terms with the fact that certain minor interior trim pieces and the like would simply not be done by the end of the week (or even before the boat's launching in August), so I ignored several of the items on the list entirely, knowing that they'd get done eventually. |
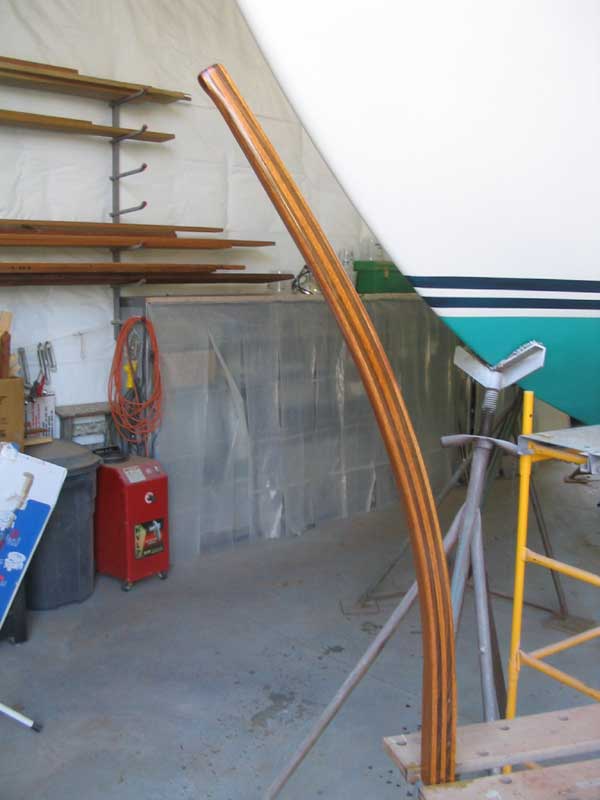 First on my list was the new tiller. Last week, I glued up the laminated
blank, and now it was time to finish shaping. I began at the planer,
running the blank through until it was exactly 1-3/4" thick, equal to the inside
measurement of my bronze tiller strap. Then, I trimmed the butt end and,
with the blank temporarily fitted into the tiller strap, test fit the tiller in
the cockpit, not only to see how it looked but also to determine the final
length. Then, I cut the blank to the final length, and used a variety of
sanding tools to shape the piece as needed. I reduced the thickness at the
forward end to allow for a comfortable handhold, and also created a nicely
rounded shape with a router, but did not overly manipulate the tiller, nor did I
overly reduce the thickness in any area, as I preferred a somewhat beefier
design in this case. First on my list was the new tiller. Last week, I glued up the laminated
blank, and now it was time to finish shaping. I began at the planer,
running the blank through until it was exactly 1-3/4" thick, equal to the inside
measurement of my bronze tiller strap. Then, I trimmed the butt end and,
with the blank temporarily fitted into the tiller strap, test fit the tiller in
the cockpit, not only to see how it looked but also to determine the final
length. Then, I cut the blank to the final length, and used a variety of
sanding tools to shape the piece as needed. I reduced the thickness at the
forward end to allow for a comfortable handhold, and also created a nicely
rounded shape with a router, but did not overly manipulate the tiller, nor did I
overly reduce the thickness in any area, as I preferred a somewhat beefier
design in this case. |
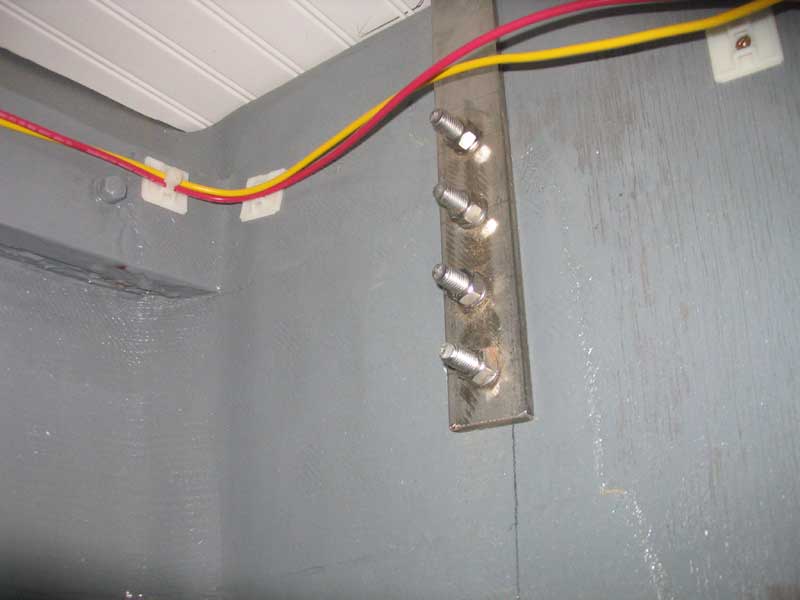 Next, I fabricated and installed the backstay chainplate, eking the last
performance out of my drill bits in the stainless steel. I also bolted the
upper shroud chainplates in place on the main bulkhead, completing that chore.
I wasn't ready to besmirch the new deck paint with sealant, so for the moment I
avoided installing the bronze lower chainplates and other deck hardware. Next, I fabricated and installed the backstay chainplate, eking the last
performance out of my drill bits in the stainless steel. I also bolted the
upper shroud chainplates in place on the main bulkhead, completing that chore.
I wasn't ready to besmirch the new deck paint with sealant, so for the moment I
avoided installing the bronze lower chainplates and other deck hardware. |
 I fabricated backing plates for the mooring cleats and bronze chainplates, and
installed hinges and a knob on the chainlocker door, completing its installation
(save for a door latch). I also applied a second coat of white paint to
the v-berth, completing that job as well. I fabricated backing plates for the mooring cleats and bronze chainplates, and
installed hinges and a knob on the chainlocker door, completing its installation
(save for a door latch). I also applied a second coat of white paint to
the v-berth, completing that job as well. |
 Finally, I masked off the cockpit sole and applied the first of two coats of
nonskid paint there. The next day, I applied the second coat--another
project crossed off the list with a big "DONE" stamp. Finally, I masked off the cockpit sole and applied the first of two coats of
nonskid paint there. The next day, I applied the second coat--another
project crossed off the list with a big "DONE" stamp. |
|
Wrapping Things Up Amazing as it may seem--both to you, dear reader, and to me--the project is truly reaching the final stages. I spent much time during the week finalizing those details that were more or less beyond my control. I followed up with my vendors about the new sails, interior cushions, roller furling, and standing rigging, all of which would be in the hands of others over the next few weeks. I managed to finally get hold of my boat hauler and schedule a firm launch date: Friday, August 26. There's no going back now.
|
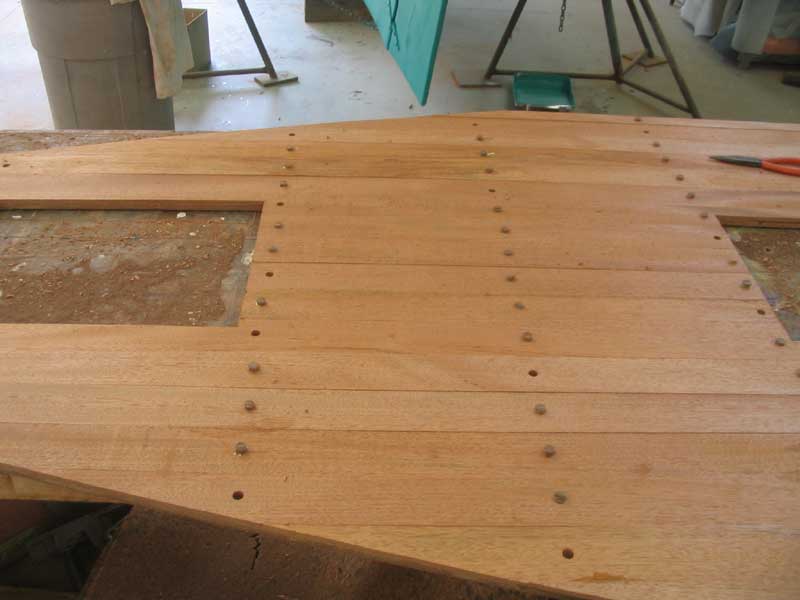
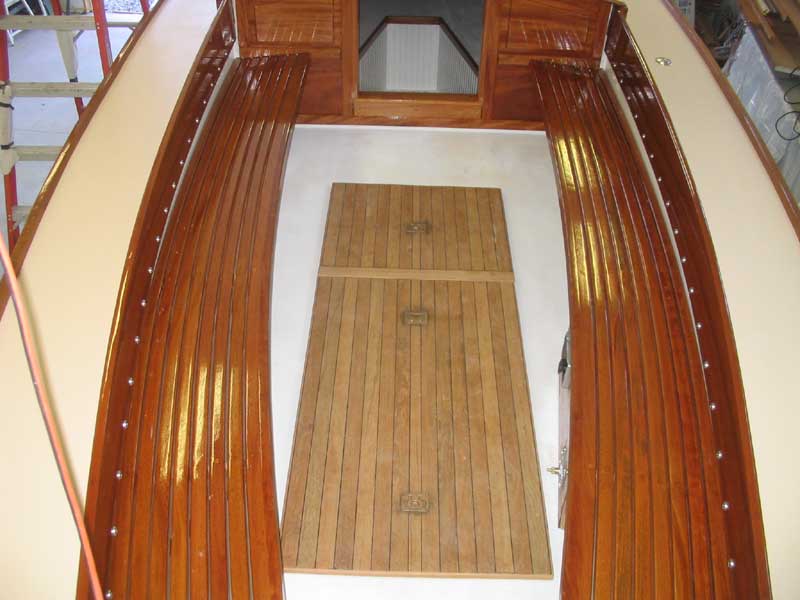
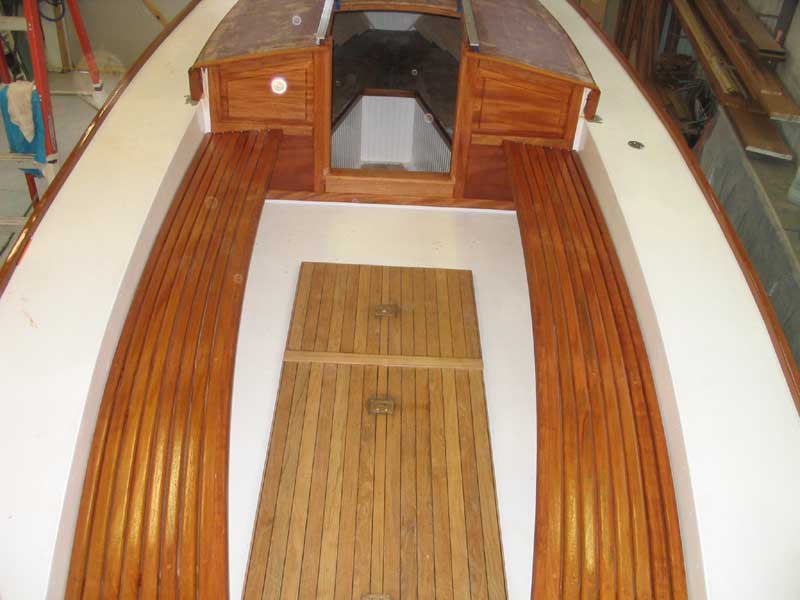
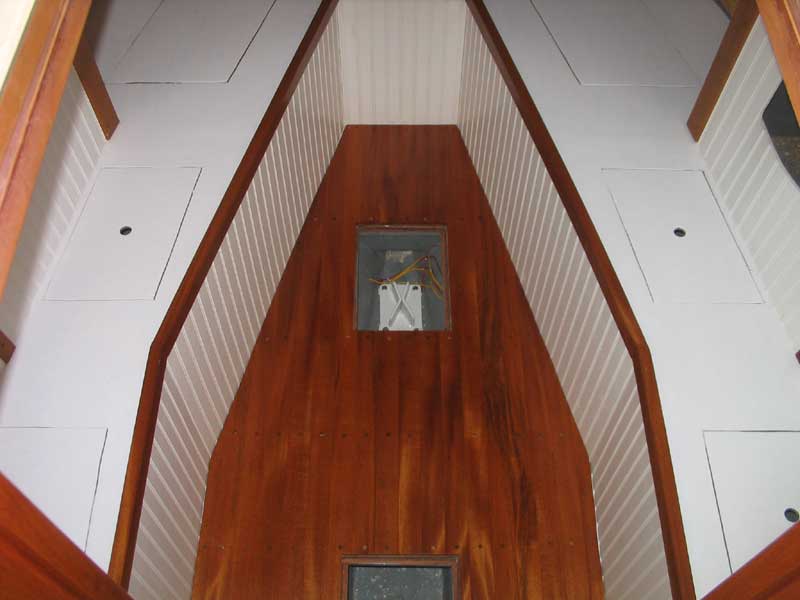 Late in the week, I turned my attention to the cabin sole installation, securing
the new sole in the cabin with construction adhesive and screws. Then, I
plugged the remaining screw holes in the sole with more walnut plugs, and shaved
them carefully flush when the glue cured. A little dab of varnish over
each plug, and they blended right in. Late in the week, I turned my attention to the cabin sole installation, securing
the new sole in the cabin with construction adhesive and screws. Then, I
plugged the remaining screw holes in the sole with more walnut plugs, and shaved
them carefully flush when the glue cured. A little dab of varnish over
each plug, and they blended right in. |
 I also installed the bits of deck hardware that I needed for the boat to be
launchable: mooring cleats, chocks, and the deck-mounted bronze
chainplates. Installation was a relatively simple affair requiring tapping
the previously-drilled bolt holes to accept the proper bolts, and fastening the
hardware in place with plenty of sealant. Masking and cleaning up the
sealant took the bulk of the time involved. I also installed the bits of deck hardware that I needed for the boat to be
launchable: mooring cleats, chocks, and the deck-mounted bronze
chainplates. Installation was a relatively simple affair requiring tapping
the previously-drilled bolt holes to accept the proper bolts, and fastening the
hardware in place with plenty of sealant. Masking and cleaning up the
sealant took the bulk of the time involved. |
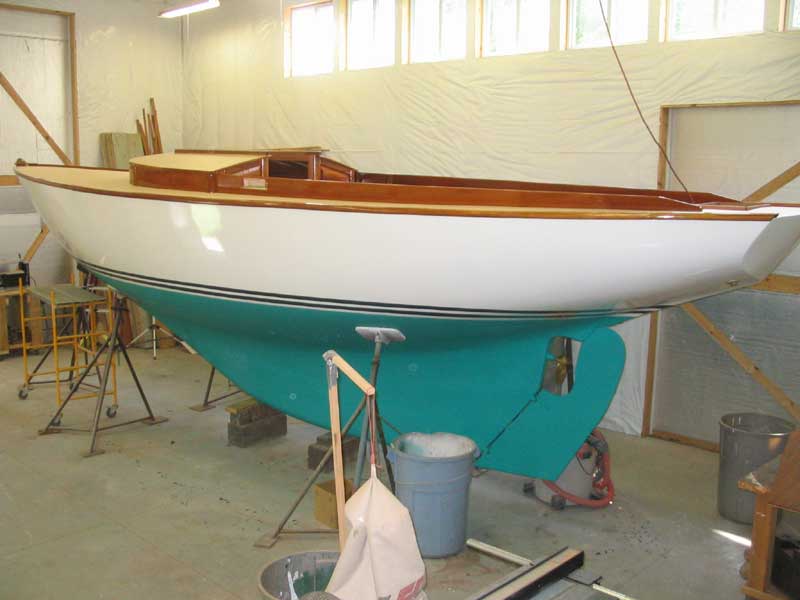
 With that, there was little remaining for me to do
before taking what, to me, seemed a well-deserved vacation. While the
basic completion of the boat occurred later than I had hoped, I had met
my goal of having the boat be ready for launch before I departed for cruising.
It took plenty of work and long hours to get here. Building this boat has
been an incredibly rewarding, challenging, enjoyable, at times blindly
frustrating, and enormously satisfying experience. With that, there was little remaining for me to do
before taking what, to me, seemed a well-deserved vacation. While the
basic completion of the boat occurred later than I had hoped, I had met
my goal of having the boat be ready for launch before I departed for cruising.
It took plenty of work and long hours to get here. Building this boat has
been an incredibly rewarding, challenging, enjoyable, at times blindly
frustrating, and enormously satisfying experience. |
 I conceived this project shortly after completing the restoration of
Glissando in 2001.
I forget exactly when the idea came to me, but the concept began its long
journey to reality in December 2002, when I purchased the hull that would become
what you see here. I chose to do this project for the benefit of my own
experience, enjoyment, and fulfillment. That said, I always planned for
the boat to be available for sale at the end. And she is
available, complete and ready for sailing fun. I conceived this project shortly after completing the restoration of
Glissando in 2001.
I forget exactly when the idea came to me, but the concept began its long
journey to reality in December 2002, when I purchased the hull that would become
what you see here. I chose to do this project for the benefit of my own
experience, enjoyment, and fulfillment. That said, I always planned for
the boat to be available for sale at the end. And she is
available, complete and ready for sailing fun. |
|
There is, of course, more to come on this project. Launching, rigging, and sailing the boat will occur in August and September, and I will continue to post weekly updates as soon as I return from cruising. There are also those final details and installations, all of which will occur in the near future. For the next few weeks, though, there will be no updates on Sunday. But don't go away yet: the fun is just beginning. See you soon. And thanks for your interest these past many months! |
|
Log for the Week Ending July 31, 2005 There is no progress to report for this week; I was away cruising. |