|
|
~MENU~ |
| Home |
| The Concept |
| The Boat |
| Bringing Her Home |
|
Weekly Progress Log |
|
Daysailor Projects |
| The Boat Barn |
| Resources |
| Other Sites |
| Email Tim |
|
|
| Progress Report: 2005 Archives |
|
January February March April May June July August September October November December |
|
Reports from June 2005 6/5/05 6/12/05 6/19/05 6/26/05 |
|
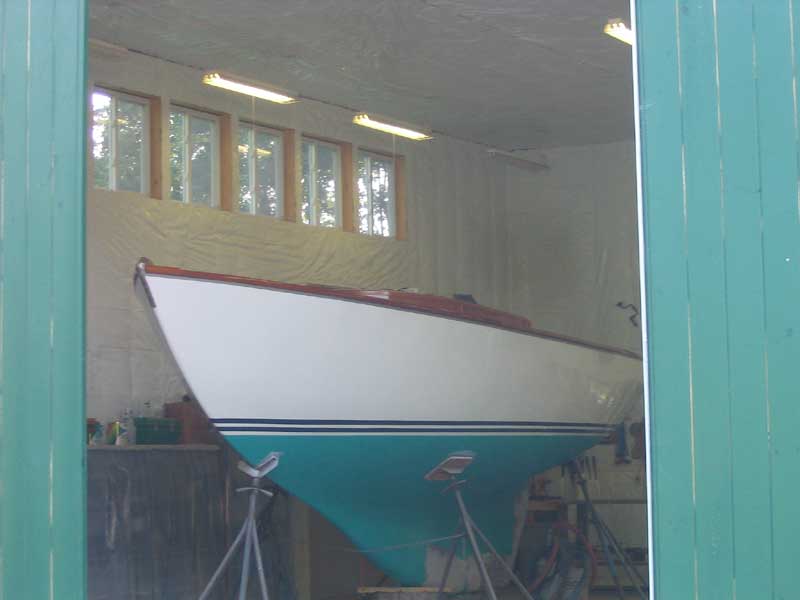
Log for the Week Ending June 5, 2005 Sunday and Monday, I dabbled here and there in the shop and around, but didn't really accomplish much of note. Mostly, I prepared the boat for Tuesday's scheduled test launching by removing tools and gear, and making sure the boat was ready in all other ways. I spent some frustrating time changing the planer blades for new; one of the screws (out of 14 total) securing one of the two blades was frozen solid, and I could not move it; in fact, I quickly rounded over the nut, to my great annoyance, and ended up, after many attempts to otherwise remove it, grinding the nut out of the small groove with a cutting disc. |
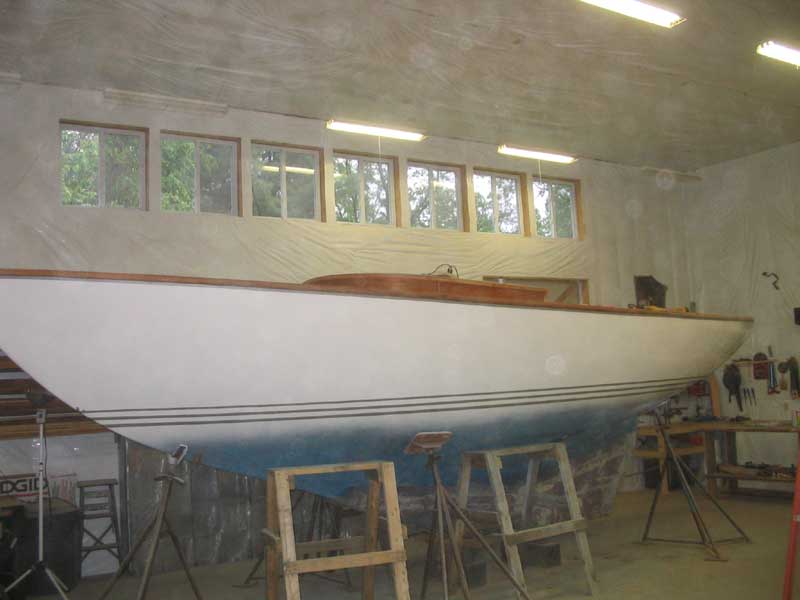
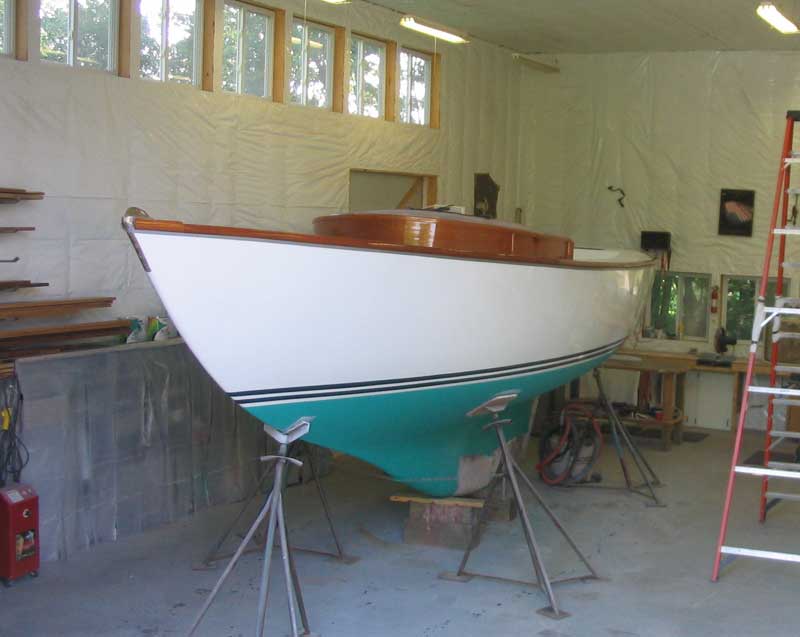
 Tuesday morning at 0700, my boat hauler picked the boat up at the shop and
hauled her down to the town landing for a quick in and out so that I could mark
the waterline according how she really floated. I was surprisingly
completely at ease with the process and felt no jitters. It was
interesting seeing the boat outside of the shop for the first time, as she
braved the daylight for a stealthy and rapid launching. Tuesday morning at 0700, my boat hauler picked the boat up at the shop and
hauled her down to the town landing for a quick in and out so that I could mark
the waterline according how she really floated. I was surprisingly
completely at ease with the process and felt no jitters. It was
interesting seeing the boat outside of the shop for the first time, as she
braved the daylight for a stealthy and rapid launching.Please click here for more about the test launching and waterline. |
|
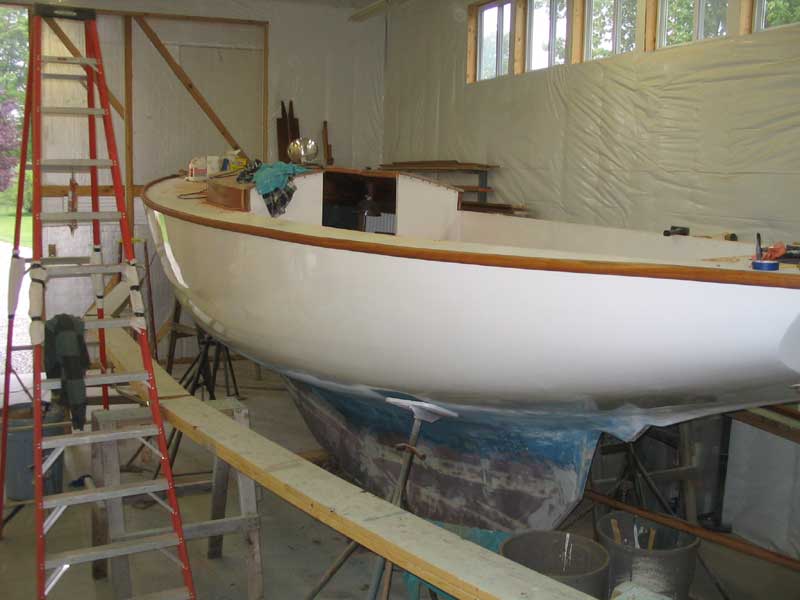
By 0800, the boat was back in the shop, and I spent the rest of the day running around doing errands and other such distractions. I picked up my propeller shaft and coupling and dropped the new tiller strap/cap fitting off at the prop shop so they could ensure a good fit with the new rudder shaft, did several other errands of little note, and picked up some 8/4 mahogany to be used for the boat's toerails. Despite all the mahogany I had in the shop, I needed something thicker to allow the toerails to work the way I intended, and to have the design and shape that I desired.
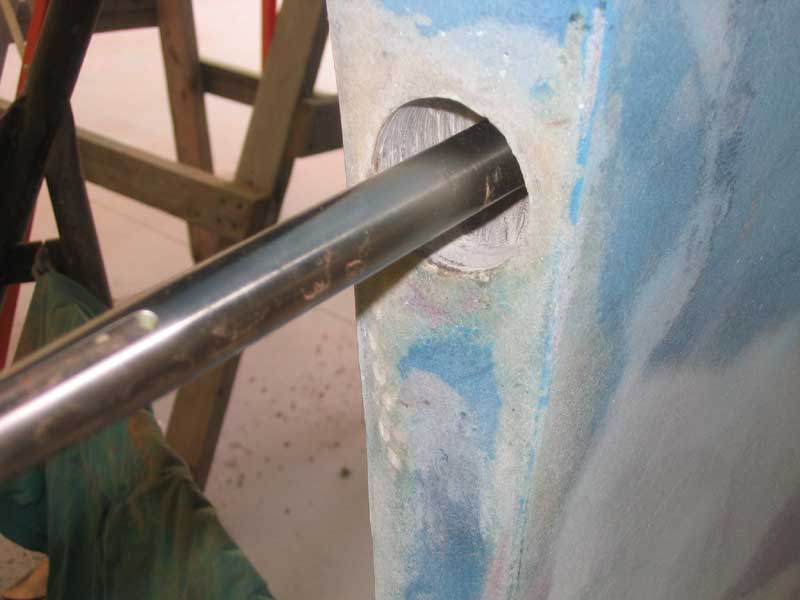
Oops! Edit Sunday Afternoon: My apologies: further investigation showed that the shaft actually did fit properly, with no modifications necessary. It was not pressed all the way into the coupling, and I had for some reason been thinking that the shaft end had to clear a line running straight from the upper part of the aperture to the lower part shown in the photo, when of course the rudder aperture will square this opening off when complete. In any event, the shaft is fine! |
|
|
|
Wednesday was another pre-occupied day, and it wasn't until later in the afternoon that I could return to the shop for more work on the toerails. Over the period of about two hours, I completed the rough milling procedures on the toerail blanks, forming the basic shape required. I set the pieces aside for sanding on another day. |
|
|
|
We had to go away to a wedding for the weekend, leaving Friday afternoon, so I did not get a chance to do any further work this week, unfortunately. I hardly know week to week how things are going to go, but I do hope to get the toerails installed permanently next week, at least. |
|
Log for the Week Ending June 12, 2005
|
|
When that job was finally complete, I set up the staging around the boat again, at the highest level so that I could work on the toerail installation. After last week's test launch, the boat was slightly farther back in the shop, and a bit more to the side, so the staging was tight on the starboard aft side, but it worked. When the staging was up, I played around with one of the toerail sections, trying to get a feel for how the installation would begin--and then how it would continue thereafter. |
|
The Darkening of the Light One by one, inexorably, the lights in the shop are dying. I don't know what is causing the premature death of these fluorescent fixtures, but fully 25% of the lights have stopped working (that's 5 out of 20 total). Things are starting to get pretty dark in the shop. Each day when I arrive, I hold my breath, wondering if yet another light blinked out for the last time the night before.
These fixtures were the middle-of-the-road shop fluorescents from Home Despot, chosen over the ultra-cheap ones because of the larger reflectors. I am very unhappy at this development, and find the failure of these shop lights to be unacceptable. In any event, I am working through the relative darkness for now, until I can dedicate the time for replacement. It is not something I should have to do after less than 2 years' use. Fortunately, with the warmer summer weather, I now usually work with the large doors open, so there is even more natural light at my disposal. |
|
Monday morning, I tackled the toerails. It took me a bit of time to collect the various tools needed, find the right drill bits (counterbore and pilot), and move various pieces and parts to the boat for convenient access. Working alone, I began at the port bow with the first section, feeling my way along as I went, since I wasn't sure how the installation was going to pan out. |
 By 1100, I had the first section dry-fit, and although the process had gone
relatively smoothly, I was feeling rather discouraged at the progress.
Presently, I got into the groove, however, and managed to permanently install
both sides of the toerail (6 sections) by that evening, completing, for all
intents and purposes, the toerail installation. By 1100, I had the first section dry-fit, and although the process had gone
relatively smoothly, I was feeling rather discouraged at the progress.
Presently, I got into the groove, however, and managed to permanently install
both sides of the toerail (6 sections) by that evening, completing, for all
intents and purposes, the toerail installation. |
|
Completing both sides of the toerails--dry fit, removal, and permanent mounting--in a single day was something of a bonus for me, since at best I had hoped to do one side per day. Toerails had been my main goal for the week, though of course I hoped to accomplish much more, but I knew that I had a busy week ahead of me, with other commitments appointments to deal with. Late Tuesday afternoon, with a few hours to work in the shop, I cut 100 mahogany bungs for the toerail fasteners and installed them with resorcinol glue, knowing I would be away all day Wednesday and therefore giving the glue plenty of time to cure before I might be able to return to shave off the excess. |
 Friday, I planned a full day in the shop. I began by shaving the plugs
flush with the rail, using a small block plane. Then, I sanded the rails
and plugs smooth to remove any final roughness and glue residue, using 120 where
needed to get the glue off and finishing up with 220 on everything. Friday, I planned a full day in the shop. I began by shaving the plugs
flush with the rail, using a small block plane. Then, I sanded the rails
and plugs smooth to remove any final roughness and glue residue, using 120 where
needed to get the glue off and finishing up with 220 on everything. |
 I also worked on the engine and shaft log. Now that I had the propeller
shaft on hand (and had determined that it actually was the right
length), the next step was to install it, and then secure the stern tube.
Rather than align the engine to the shaft, I had long ago decided that I would
hold off on stern tube installation until the engine was in place, and then
epoxy the stern tube in place when the shaft was perfectly aligned with the
engine. I also worked on the engine and shaft log. Now that I had the propeller
shaft on hand (and had determined that it actually was the right
length), the next step was to install it, and then secure the stern tube.
Rather than align the engine to the shaft, I had long ago decided that I would
hold off on stern tube installation until the engine was in place, and then
epoxy the stern tube in place when the shaft was perfectly aligned with the
engine. |
|
To finish off Friday, I began to think about laying out and striking the waterline, and the boottop striping. My first step was to determine whether the boat needed leveling after last week's test launching and moving. With a level across first the cockpit sole, then inside the cabin, on two surfaces that I knew to have been leveled according to the way the boat was blocked previously, I determined that only minor adjustments were needed from side-to-side. 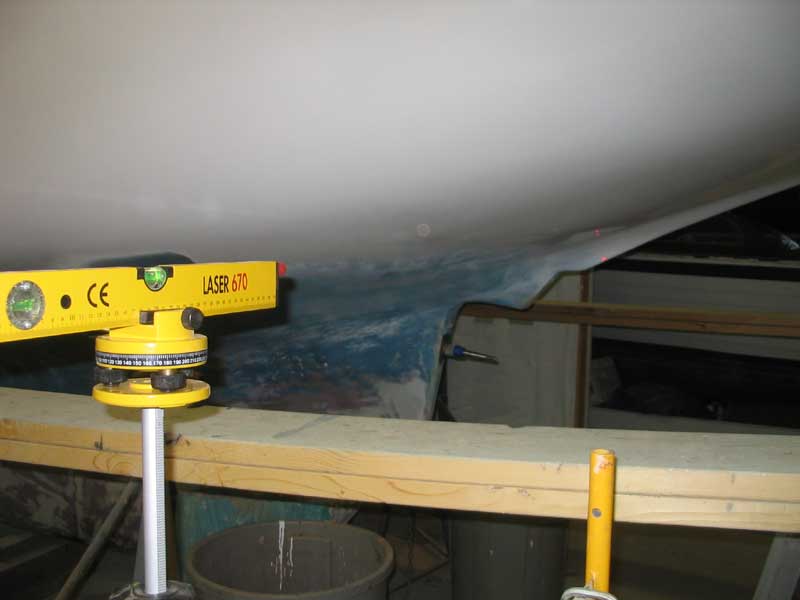 Then, I turned my attention to the longitudinal leveling, always a bit more
tricky. I decided to try using my inexpensive laser level for the job.
Unfortunately, the tripod was not tall enough to allow the beam to reach the
needed height, but I placed the whole unit on top of my rolling staging at its
lowest level, which raised it appropriately and also made it easily mobile.
After leveling the unit, I set the height at the stern waterline that I had
marked with the boat in the water, and then rolled the whole thing forward.
It seemed to align almost perfectly with the marked bow waterline, so I tried
marking out the remainder of the waterline by moving the level off to the far
side of the shop, where it could shoot a beam to all portions of the boat
without moving. Then, I turned my attention to the longitudinal leveling, always a bit more
tricky. I decided to try using my inexpensive laser level for the job.
Unfortunately, the tripod was not tall enough to allow the beam to reach the
needed height, but I placed the whole unit on top of my rolling staging at its
lowest level, which raised it appropriately and also made it easily mobile.
After leveling the unit, I set the height at the stern waterline that I had
marked with the boat in the water, and then rolled the whole thing forward.
It seemed to align almost perfectly with the marked bow waterline, so I tried
marking out the remainder of the waterline by moving the level off to the far
side of the shop, where it could shoot a beam to all portions of the boat
without moving.
This seemed to work at first, but eventually I realized that I was not getting accurate marks, so it looked like I would have to use the level at a closer range and with a more direct beam shot at the boat in all areas. That pretty much ended the day, though I stayed in the shop to wait out a powerful thunderstorm that rolled through, turning day into night. It was fun watching the storm in the safety of the shop, though with the large front doors open I felt as if I was truly experiencing the storm. More on the waterline later. |
 Saturday
afternoon, with a few hours to spare, I sanded the new trim pieces at the
forward end of the toerails, on the breasthook, and then applied masking tape to
the inside and outside of the rails on the hull and deck in preparation for
varnish. I also sanded the varnish inside the cabin so that I could apply
another coat there. Over the next several days and weeks, I planned to
continue applying varnish to the toerails whenever possible to build up the base
I wanted, and also to finish up the varnishing in the cabin once and for all. Saturday
afternoon, with a few hours to spare, I sanded the new trim pieces at the
forward end of the toerails, on the breasthook, and then applied masking tape to
the inside and outside of the rails on the hull and deck in preparation for
varnish. I also sanded the varnish inside the cabin so that I could apply
another coat there. Over the next several days and weeks, I planned to
continue applying varnish to the toerails whenever possible to build up the base
I wanted, and also to finish up the varnishing in the cabin once and for all. |
 My hopeful completion and launching schedule seems to bear no relationship to
actual reality. At this point, all I can do is keep working as much as
time allows and keep my eye on the goal. However, with no mast in sight
yet (return calls pending), full rigging construction ahead (only after the mast
arrives on site) and substantial work remaining on deck, it is extremely
difficult to predict when things might be done enough to consider launching for
sea trials. Trying too hard to meet an impossible deadline, imposed
only by me, runs the risk not only of ultimate failure anyway, but also taking
the fun out of the process. My hopeful completion and launching schedule seems to bear no relationship to
actual reality. At this point, all I can do is keep working as much as
time allows and keep my eye on the goal. However, with no mast in sight
yet (return calls pending), full rigging construction ahead (only after the mast
arrives on site) and substantial work remaining on deck, it is extremely
difficult to predict when things might be done enough to consider launching for
sea trials. Trying too hard to meet an impossible deadline, imposed
only by me, runs the risk not only of ultimate failure anyway, but also taking
the fun out of the process. |
|
It seems clear to me that the boat will not be ready for launch by the end of June, as I had hoped. I will continue plugging away as efficiently as I can, one project at a time. |
|
Log for the Week Ending June 19, 2005 After a day off Monday to work on, and sail, Glissando, I returned to the shop looking forward to a productive week. With few significant plans to draw me away from work, and lousy weather predicted for most of the week, I hoped to knock many items off my most recent to-do list. Every so often, I'll write out a realistic list of chores on my board in the shop to help me stay on track. |
|
I began by addressing the trim around the top of the cabin trunk, to cover the seam left by the plywood coachroof. I wanted to get this done so that I could begin varnishing the cabin trunk in earnest, along with the multiple coats required on the toerail. I'd been postponing serious varnish work for too long, and now it was time to make an effort.
|
 While the epoxy cured, I moved on to other tasks. I next turned my
attention to the waterline and boottop, which I had tentatively approached last
week and again over the weekend. Now, it was time to get these lines
struck properly, particularly since I knew that painting the boottop and bottom
would add a needed look of completeness to the boat--and I was excited to see
how she would look. While the epoxy cured, I moved on to other tasks. I next turned my
attention to the waterline and boottop, which I had tentatively approached last
week and again over the weekend. Now, it was time to get these lines
struck properly, particularly since I knew that painting the boottop and bottom
would add a needed look of completeness to the boat--and I was excited to see
how she would look. |
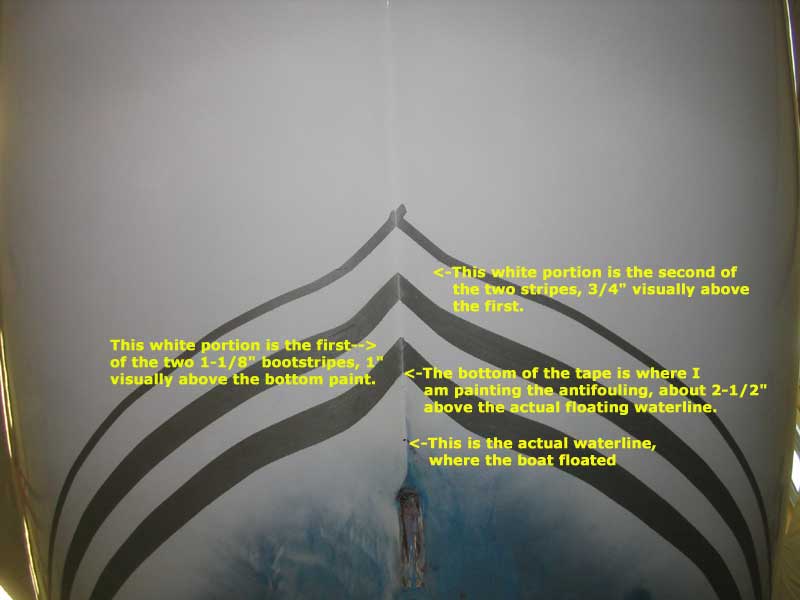 Since I planned on a double boot stripe, laying out the myriad lines was quite
time consuming--it took most of two full days, in fact, before the final tape
was in place. With the taping complete, I moved on to some sanding and
preparation before applying Flag Blue Awlgrip to the stripes, using three coats
to obtain a satisfactory finish. Since I planned on a double boot stripe, laying out the myriad lines was quite
time consuming--it took most of two full days, in fact, before the final tape
was in place. With the taping complete, I moved on to some sanding and
preparation before applying Flag Blue Awlgrip to the stripes, using three coats
to obtain a satisfactory finish. |
|
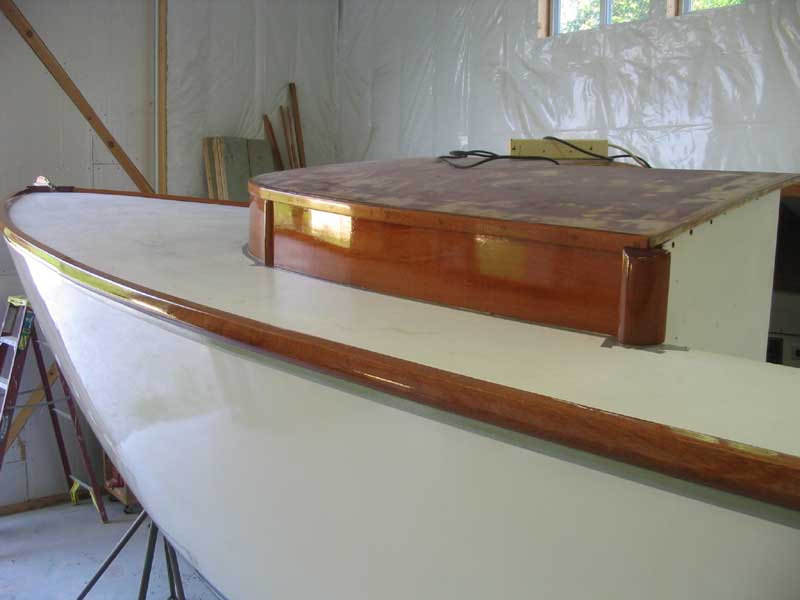
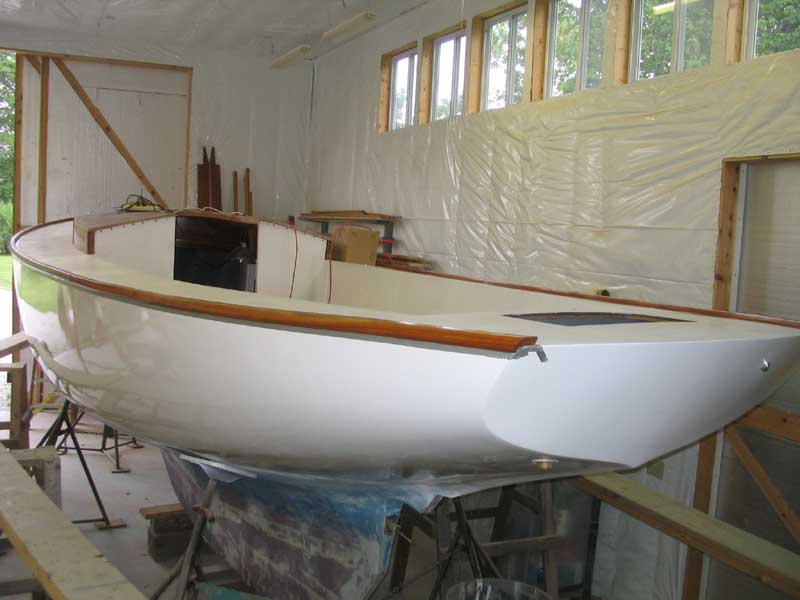
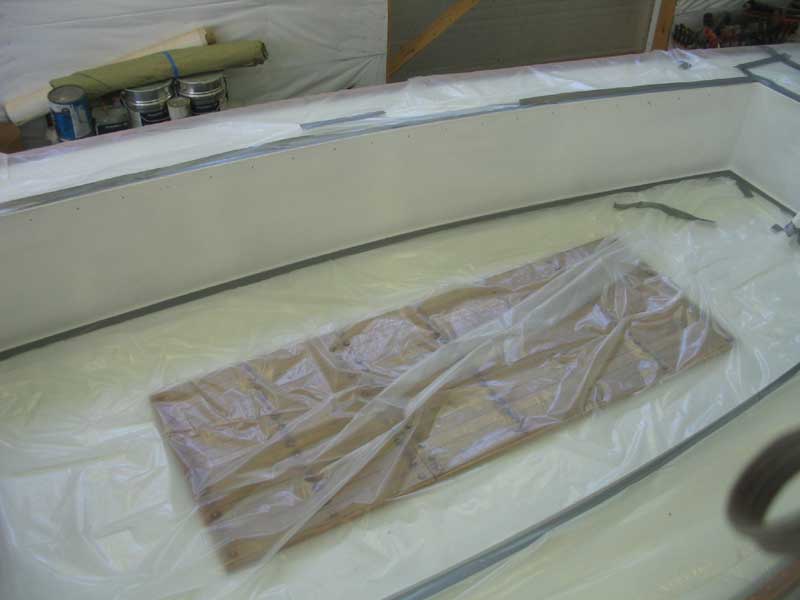
Marking, taping, prepping, and painting the waterline, along with some additional work on the new cabin trunk trim and varnishing on the toerail and cabin trunk, took up the bulk of the work week. Finish work is so important, but everything takes a very long time. In between sanding, prepping and painting the boottop, I removed the temporary screws from the cabin trunk trim and installed bungs to hide the holes, and cleaned up and slightly shaped the new trim to finish it off. Then, the new trim was ready for varnish. I also installed permanently the two after coaming blocks that I had built some time ago, so that they could be incorporated seamlessly with the cabin trunk varnish. |
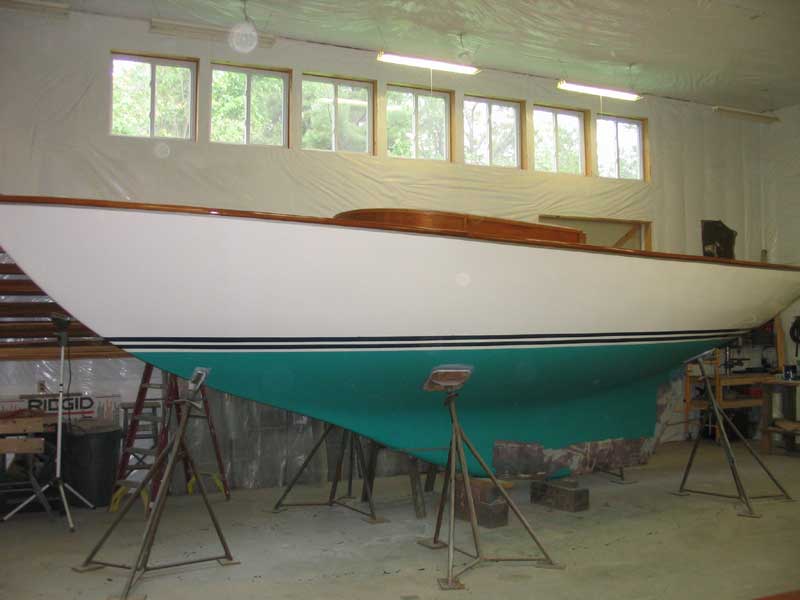 By the end of the week, however, the boat had taken broad steps towards a more
complete look--an gave me an important psychological edge. The existing
wooden trim on deck--cabin trunk and toerails--began to glow beneath new
varnish, and the completed boottop and bottom paint looked great. I looked
forward to jumping into some major woodworking next week. By the end of the week, however, the boat had taken broad steps towards a more
complete look--an gave me an important psychological edge. The existing
wooden trim on deck--cabin trunk and toerails--began to glow beneath new
varnish, and the completed boottop and bottom paint looked great. I looked
forward to jumping into some major woodworking next week. |
|
Log for the Week Ending June 26, 2005 I just had to take Monday off to go sailing. It was one of those perfect days, so I treated myself, with the caveat that I would push myself the remainder of the week; it was to be a short week, as we were going away Friday and Saturday, so I needed to get as much done as possible.
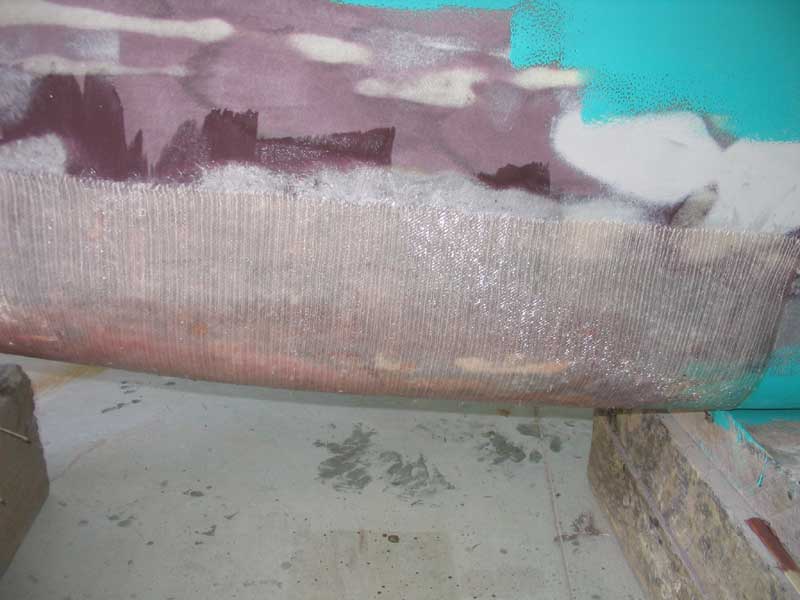
I also secured the stern tube with additional fiberglass, and wrapped fiberglass around the outside of the tube as well for some additional thickness. The fiberglass work cured so quickly in the heat of the day that I was able to apply a coat of fairing compound to the new work by the end of the day, speeding along the process. |
 Tuesday morning, I also sanded all the brightwork, inside and out, in
preparation for the ongoing varnish process. Then, I continued work on
the teak-covered engine hatches, which I had placed aside a week or two earlier.
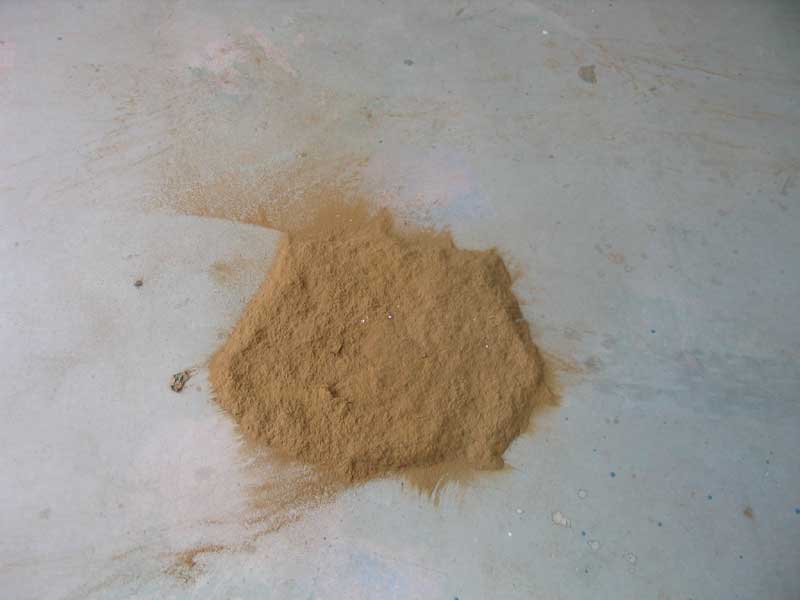
Now, I pulled them out and sanded the surface to remove the excess polysulfide
and smooth out any unevenness between the planks, creating a very expensive pile
of teak sawdust at the end. Tuesday morning, I also sanded all the brightwork, inside and out, in
preparation for the ongoing varnish process. Then, I continued work on
the teak-covered engine hatches, which I had placed aside a week or two earlier.
Now, I pulled them out and sanded the surface to remove the excess polysulfide
and smooth out any unevenness between the planks, creating a very expensive pile
of teak sawdust at the end.With that out of the way, I prepared to mill up some wood for the final woodworking projects on board, including the cockpit seating areas. I had an appointment in the middle of the afternoon, which really cut into the day, but when I returned to the shop afterwards I managed to get all the rough-cut wood through the planer, smoothing it and reducing its thickness to 7/8". With about 10 boards, each 12 feet in length, this took a few hours; cleaning up the chips afterwards seemed to take equally as long! |
 Wednesday, I straightened one side of the boards--a laborious, dusty process
using a long straightedge and circular saw. I hate this. I'd give
anything for D3S lumber, but I can't complain with the wood and the delivery, so
it is what it is. With the boards finally planed smooth and with one
straight edge, I could begin milling them into slats for the cockpit.
After determining that about 14" was a good width for the seats, I milled four
3" slats for each side, planning on 1/4" between each slat, plus an edge band
for an additional 7/8", bringing the total width to nearly 14". Wednesday, I straightened one side of the boards--a laborious, dusty process
using a long straightedge and circular saw. I hate this. I'd give
anything for D3S lumber, but I can't complain with the wood and the delivery, so
it is what it is. With the boards finally planed smooth and with one
straight edge, I could begin milling them into slats for the cockpit.
After determining that about 14" was a good width for the seats, I milled four
3" slats for each side, planning on 1/4" between each slat, plus an edge band
for an additional 7/8", bringing the total width to nearly 14".With that, the rough work was out of the way, but I still needed to conceive exactly how I was going to design and build the supports for the seats. I wanted to build laminated arched supports that would avoid the need for vertical legs at the outer edge of the seats. Over the course of the week, this conception managed to get pushed temporarily aside, so look for more next week. |
 With the new fiberglass work on the stern tube and keel cured, I sanded the
fairing compound and cleaned up the areas. The stern tube was now ready
for final installation of the Cutless bearing, so I took care of that simple
job. With the new fiberglass work on the stern tube and keel cured, I sanded the
fairing compound and cleaned up the areas. The stern tube was now ready
for final installation of the Cutless bearing, so I took care of that simple
job. |
|
Thursday, I built a blank for the new rudder, using four pieces of 1" thick mahogany that I glued together to make a large panel. I planned a slightly different shape for the new rudder, compared to the old crescent-shaped version, but I thought that traditional solid wood construction, with excellent adhesive and drift pins, would certainly be an adequate choice. I had dreams of foam and carbon fiber, but then I came back to reality. Next boat... |
|
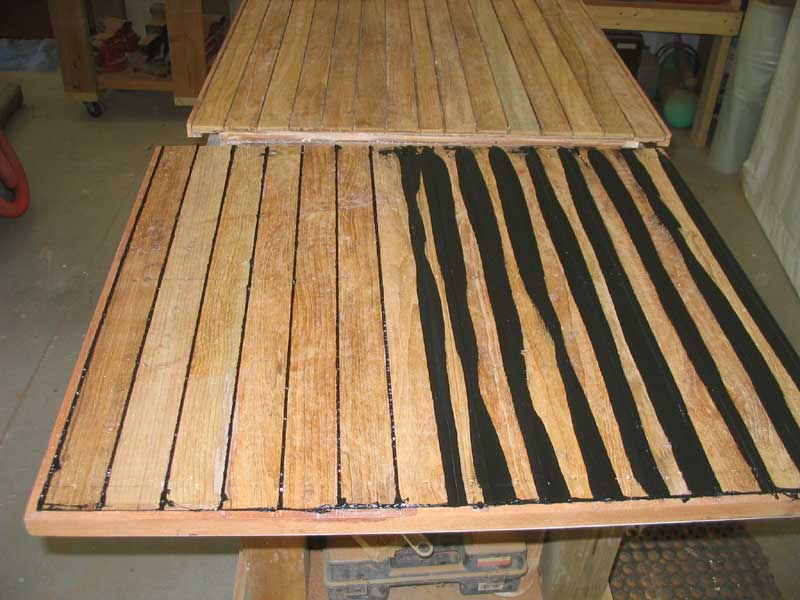
I  continued work on the engine hatches by boring
3/8" counterbores with a Forstner bit at each hole left by the installation
screws (which I had previously removed), and then installing teak bungs to fill
the holes. I used resorcinol glue leftover from gluing up the rudder
blank. In all, there were 120 holes to be plugged. continued work on the engine hatches by boring
3/8" counterbores with a Forstner bit at each hole left by the installation
screws (which I had previously removed), and then installing teak bungs to fill
the holes. I used resorcinol glue leftover from gluing up the rudder
blank. In all, there were 120 holes to be plugged. |
 With most of the significant raw wood preparation complete, I turned my
attention once more to the cockpit. The sides of the cockpit well needed
to be painted with Alexseal. While most of the deck would eventually be
covered with nonskid, the vertical sides of the cockpit would not, so I began to
prepare to finally apply the finish paint to those areas. Since we planned
to be away for two days, I thought this was the perfect opportunity to apply the
paint and allow it to cure for a couple days, which would get it past the
initial cure stage and help prevent unwanted damage to the paint during later
construction steps. With most of the significant raw wood preparation complete, I turned my
attention once more to the cockpit. The sides of the cockpit well needed
to be painted with Alexseal. While most of the deck would eventually be
covered with nonskid, the vertical sides of the cockpit would not, so I began to
prepare to finally apply the finish paint to those areas. Since we planned
to be away for two days, I thought this was the perfect opportunity to apply the
paint and allow it to cure for a couple days, which would get it past the
initial cure stage and help prevent unwanted damage to the paint during later
construction steps. |
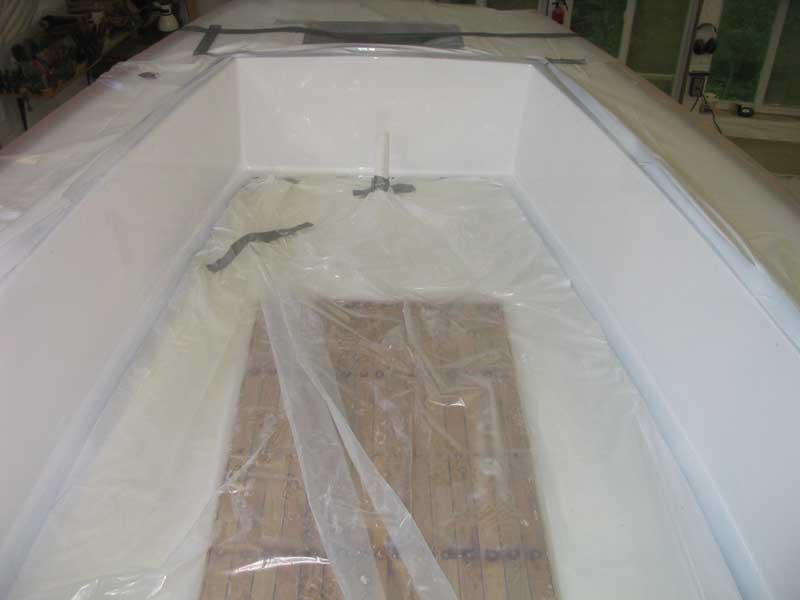 I swept up the shop, and then blew down the walls, surfaces, shelves, and
corners, extracting large quantities of dust, debris, and wood chips. It
certainly was easier to clean the shop with only one boat inside! Once
that was done, I vacuumed the boat, inside and out, and masked off the areas to
be painted, and then covered the entire remainder of the deck in plastic, to be
sure that no overspray got on any of the brightwork or other areas. I swept up the shop, and then blew down the walls, surfaces, shelves, and
corners, extracting large quantities of dust, debris, and wood chips. It
certainly was easier to clean the shop with only one boat inside! Once
that was done, I vacuumed the boat, inside and out, and masked off the areas to
be painted, and then covered the entire remainder of the deck in plastic, to be
sure that no overspray got on any of the brightwork or other areas. |
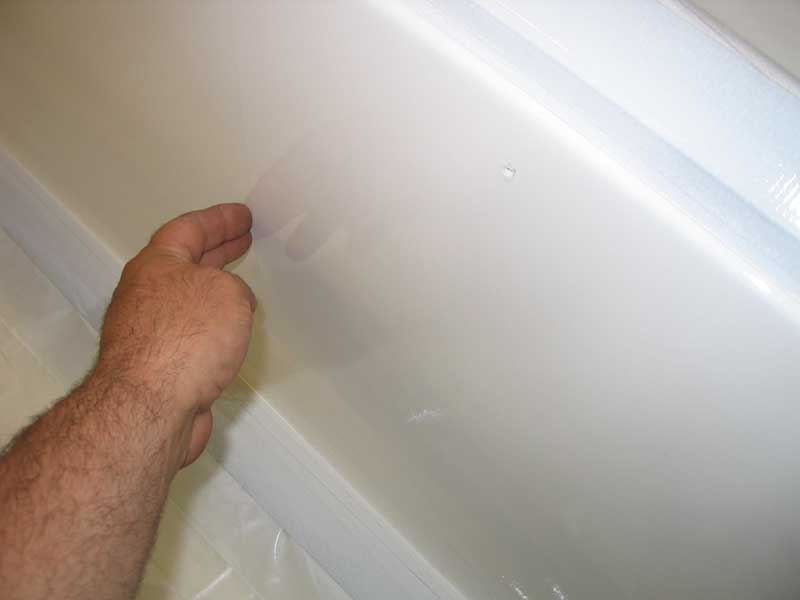 Finally, late in the day, I applied, by spray, two
coats of Alexseal snow white. It was an easy job, complicated only by the
significant setup and preparation time. The two coats covered adequately
and left pleasing depth and gloss. Finally, late in the day, I applied, by spray, two
coats of Alexseal snow white. It was an easy job, complicated only by the
significant setup and preparation time. The two coats covered adequately
and left pleasing depth and gloss. |
 Saturday,
after removing the plastic and masking tape from Thursday's painting, I worked
on the varnish. With a clean shop on hand, it was the perfect time to
apply a clean coat to all surfaces. For some time, the interior had been
sanded and awaited a coat of satin varnish, so I began there. Afterwards,
I varnished the cabin trunk, toerail, and coamings, closing in on the buildup I
wanted for each section. Saturday,
after removing the plastic and masking tape from Thursday's painting, I worked
on the varnish. With a clean shop on hand, it was the perfect time to
apply a clean coat to all surfaces. For some time, the interior had been
sanded and awaited a coat of satin varnish, so I began there. Afterwards,
I varnished the cabin trunk, toerail, and coamings, closing in on the buildup I
wanted for each section. |
|
|
 Things are slowly
shaping up. With the myriad delays and the "everything takes longer than
expected" syndrome that plagues all projects, I re-evaluated my proposed
completion and launching schedule, and now planned to complete the boat by the
last week in July, prior to my departure on a Glissando cruise, and to launch
and rig the boat in August, after cruising. Things are slowly
shaping up. With the myriad delays and the "everything takes longer than
expected" syndrome that plagues all projects, I re-evaluated my proposed
completion and launching schedule, and now planned to complete the boat by the
last week in July, prior to my departure on a Glissando cruise, and to launch
and rig the boat in August, after cruising.All I'll need then is an enthusiastic buyer for her!
|
 T
T