|
|
~MENU~ |
| Home |
| The Concept |
| The Boat |
| Bringing Her Home |
|
Weekly Progress Log |
|
Daysailor Projects |
| The Boat Barn |
| Resources |
| Other Sites |
| Email Tim |
|
|
| Progress Report: 2005 Archives |
|
January February March April May June July August September October November December |
|
Reports from May 2005 5/1/05 5/8/05 5/15/05 5/22/05 5/29/05 |
|
Log for the Week Ending May 1, 2005 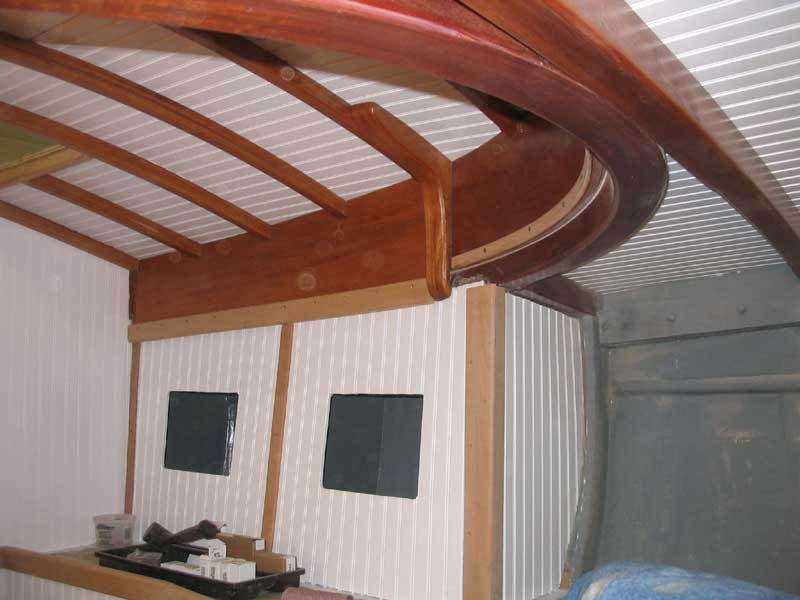 I
spent most of Sunday working towards the clear goal of completing the bulk of
the trim installation in the cabin, which I had started over the previous couple
days. With this focus, I managed to complete the installation, except for
the v-berth ceiling (coming soon), and a few small trim pieces required to cover
seams on the overhead; I did cut the bulk trim for this purpose, but wanted to
apply several coats of varnish to the longer pieces before I began cutting it to
fit in the spaces between the deck beams. I
spent most of Sunday working towards the clear goal of completing the bulk of
the trim installation in the cabin, which I had started over the previous couple
days. With this focus, I managed to complete the installation, except for
the v-berth ceiling (coming soon), and a few small trim pieces required to cover
seams on the overhead; I did cut the bulk trim for this purpose, but wanted to
apply several coats of varnish to the longer pieces before I began cutting it to
fit in the spaces between the deck beams. |
 Monday,
after my usual early week late s tart thanks to errands and administrative
tasks, I set up the planer for more surface planing of the remaining wood in the
shop--mahogany for the toerails, cypress for the v-berth ceiling, and some black
walnut for accents and the tiller. As usual, this devoured a hefty chunk
of time. At the end of it all, I realized that I would not have close to
enough mahogany to finish the project, and would have to place yet another
order. This boat sure has used a lot of mahogany! Monday,
after my usual early week late s tart thanks to errands and administrative
tasks, I set up the planer for more surface planing of the remaining wood in the
shop--mahogany for the toerails, cypress for the v-berth ceiling, and some black
walnut for accents and the tiller. As usual, this devoured a hefty chunk
of time. At the end of it all, I realized that I would not have close to
enough mahogany to finish the project, and would have to place yet another
order. This boat sure has used a lot of mahogany! |
|
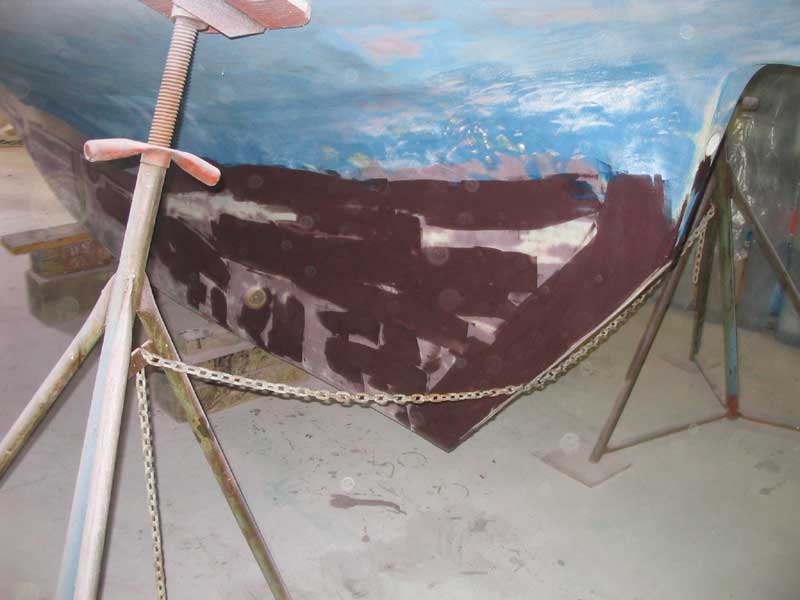
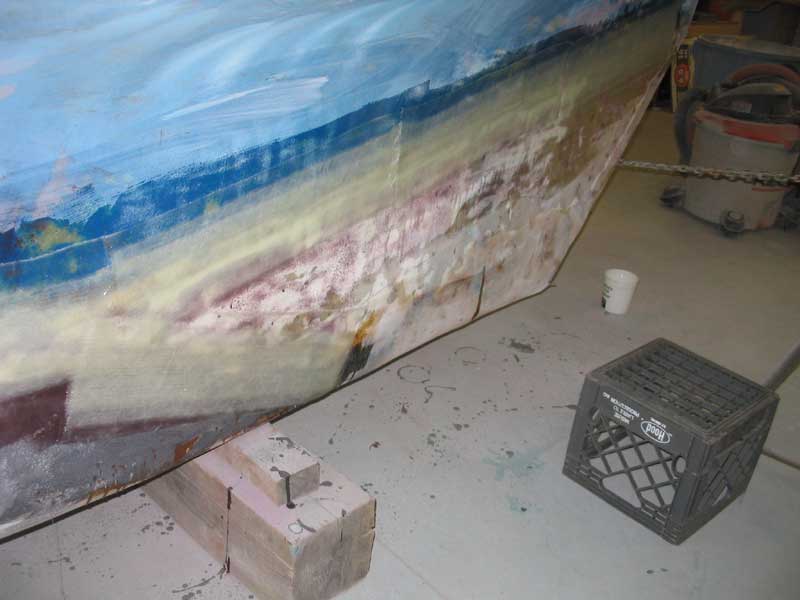
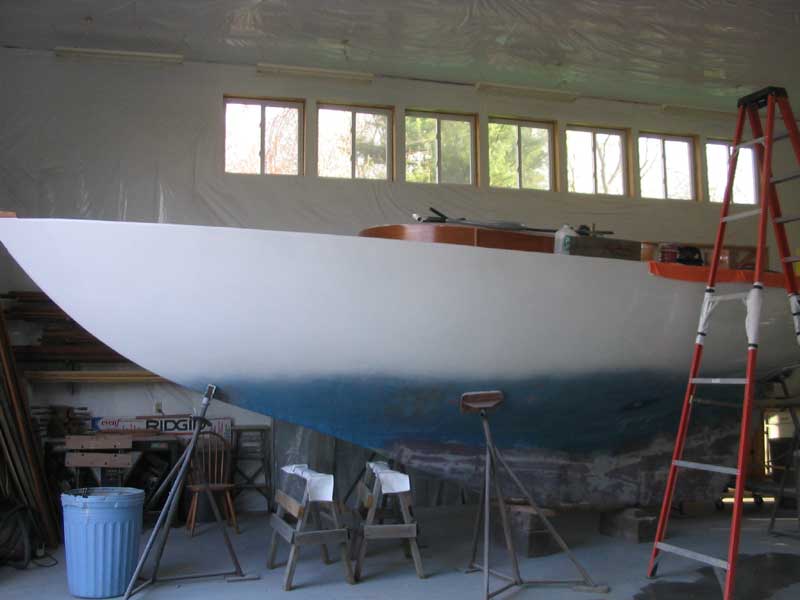
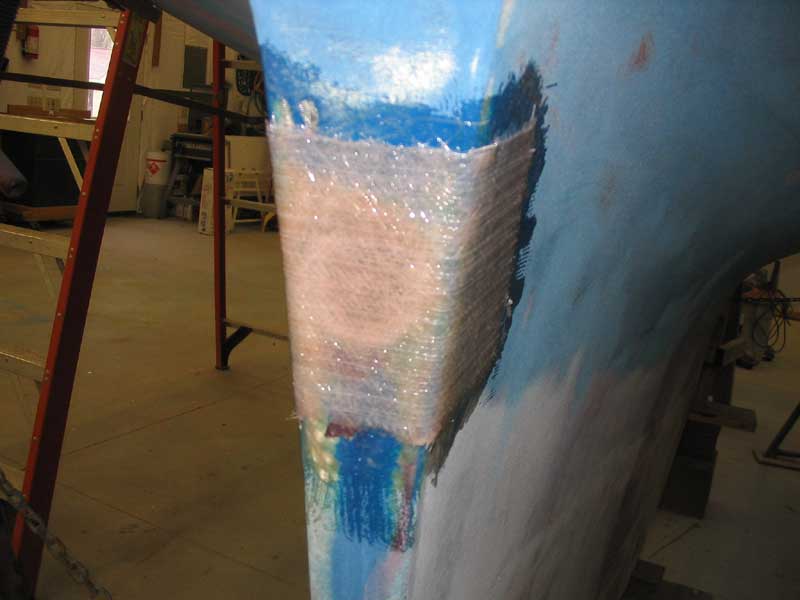
After some thought, I decided to turn my attention at last to the bottom of the boat--specifically the keel. Much earlier in the process, during the unbuilding stage, I had removed all the bottom paint, but had not touched the area since. Now, with the end of the project becoming ever near, I realized the time had come to deal with the keel (hey, I'm a poet and don't know it...). One reason driving my change in focus was that I needed to think about test-launching the boat in the relatively near future. Why? With no other means of determining where the boat would truly float--all the more so since Tritons, in general, seem to float in wide variety of locations, but almost never at the designed waterline--I needed the test launch so that I could accurately mark the waterline fore and aft, so that I could continue with striping and bottom-painting. Before I could accomplish this test, however, I needed to address the keel repairs. |
 I
began by grinding off some Awlgrip and Alexseal test patches that I had sprayed
willy-nilly on the bottom during several other projects earlier on, and also
ground off some loose fiberglass and filler from some long-ago repair attempt.
In particular, the seam between external ballast and fiberglass hull required
attention, as did the foam-filled keel deadwood. I
began by grinding off some Awlgrip and Alexseal test patches that I had sprayed
willy-nilly on the bottom during several other projects earlier on, and also
ground off some loose fiberglass and filler from some long-ago repair attempt.
In particular, the seam between external ballast and fiberglass hull required
attention, as did the foam-filled keel deadwood. |
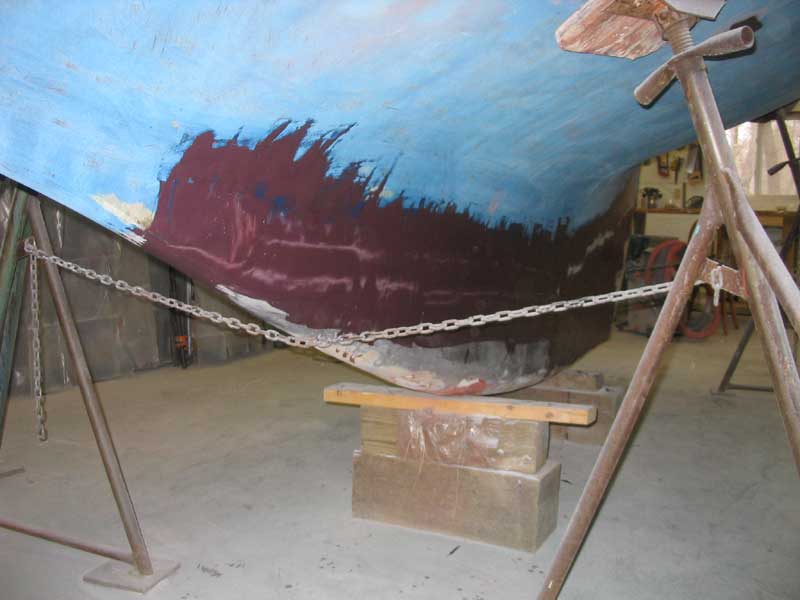 And
so it continued throughout the week. Honestly, I don't know where all the
time went. I spent a fair bit of time each day on the keel repairs,
usually grinding yesterday's work in preparation for the next step of filling or
fiberglassing. By Thursday afternoon, the bulk of the glasswork was
complete, with only final fairing still ahead. And
so it continued throughout the week. Honestly, I don't know where all the
time went. I spent a fair bit of time each day on the keel repairs,
usually grinding yesterday's work in preparation for the next step of filling or
fiberglassing. By Thursday afternoon, the bulk of the glasswork was
complete, with only final fairing still ahead. |
|
With day upon day of rain, I took advantage of a clear afternoon here and there to take care of some other projects outside the shop--projects that required decent weather to complete, such as some mast work on Glissando, which I was preparing for launch in a few weeks; I even took Saturday off to work on Glissando. |
|
Log for the Week Ending May 8, 2005
|
|
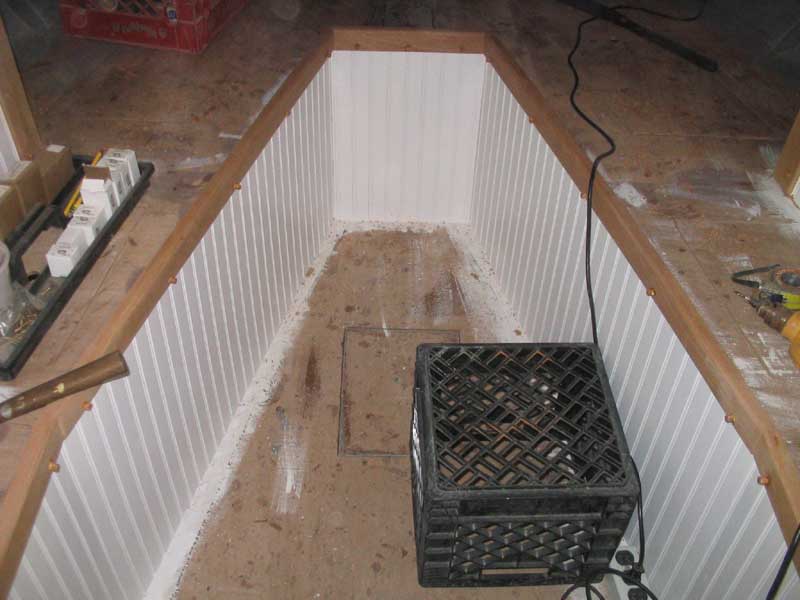
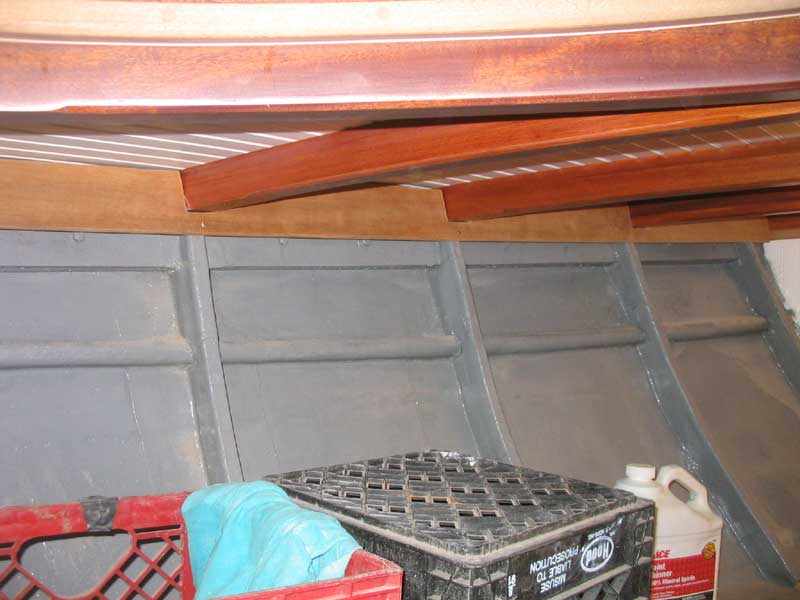
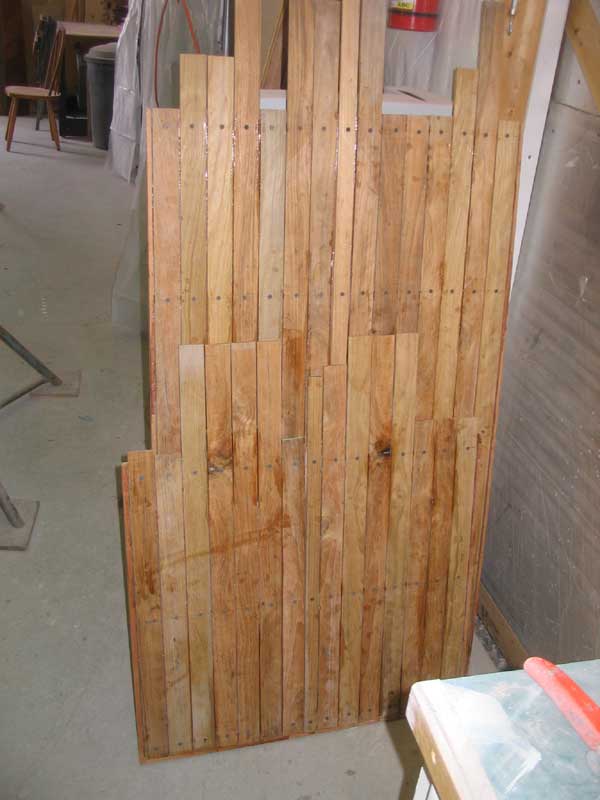
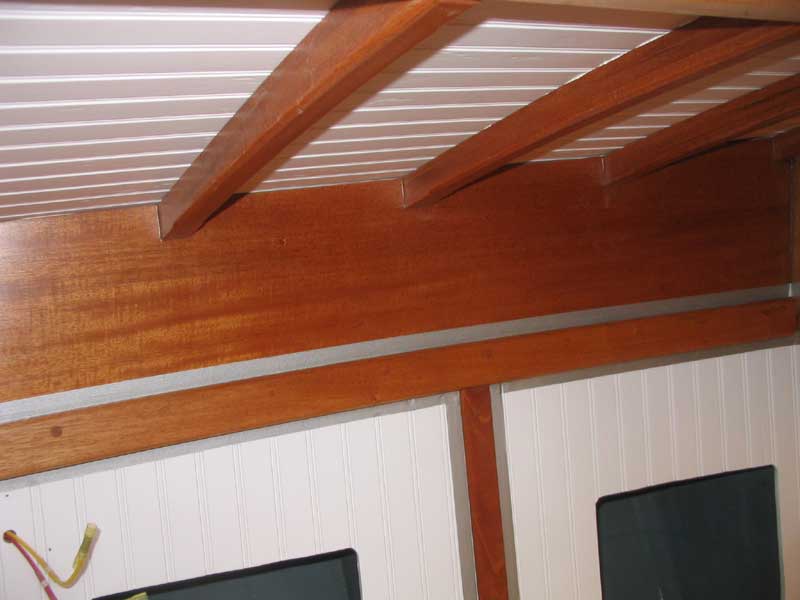
Then, I spent pretty much the rest of the day working on two boards for the ceiling trim in the v-berth, which became increasingly frustrating as time went by without, still, an acceptable fit. The two pieces in question--one on each side--were located at the top of the exposed hull, against the deck and deck beams. My goal was to fit a wider board here, with cutouts around the deck beams, to hide this area before getting into the nitty gritty of the ceiling installation |
|
This proved to be more challenging than expected, and the second board fought me every step of the way--so much so that in the end, I stepped back and decided to call it quits for the day at 1500, with only one of the two boards cut and properly fit. Fortunately, a fresh start Monday morning saw the second board complete, which was good. Click here for more about the beginnings of the hull ceiling in the v-berth. |
|
Monday was a scattered day. While it began well enough, I couldn't get focused in the shop, as it seemed each time I would go to begin one project or another, I'd think of some fasteners, or parts, or additional equipment I would need, and would run back into the office to research and place and order--only to repeat this process several times throughout the day. I was ready to begin systems installation, but it was pointless to go far without the proper parts. Chief among th4ese was a fuel tank. I had ordered an aluminum fuel tank for the boat, but when it arrived last week, it was damaged in shipment, and was the wrong tank--the one I was sent was for above decks installation, complete with a removable fill cap. I ordered a replacement, after double-checking the catalog; it seemed I had ordered the right thing, but received something else. |
|
When the replacement tank arrived Monday, I was dismayed to find that it was the wrong thing again--slightly different from the first, but still wrong. This time, the new tank was pretty poor in quality too--I was not impressed. Therefore, I scurried to locate a suitable tank, eventually finding one that looked good in another supplier's catalog; it was even in stock, which meant I'd get it Tuesday morning. The long and the short of it was that Monday was not that productive, though I did accomplish many important steps towards the remainder of the week's work, including getting things set up on board--loading tools and parts. I started some work on a new toerail mockup in the afternoon, but then some new computer equipment I had ordered arrived, so I knocked off early to set that up. |
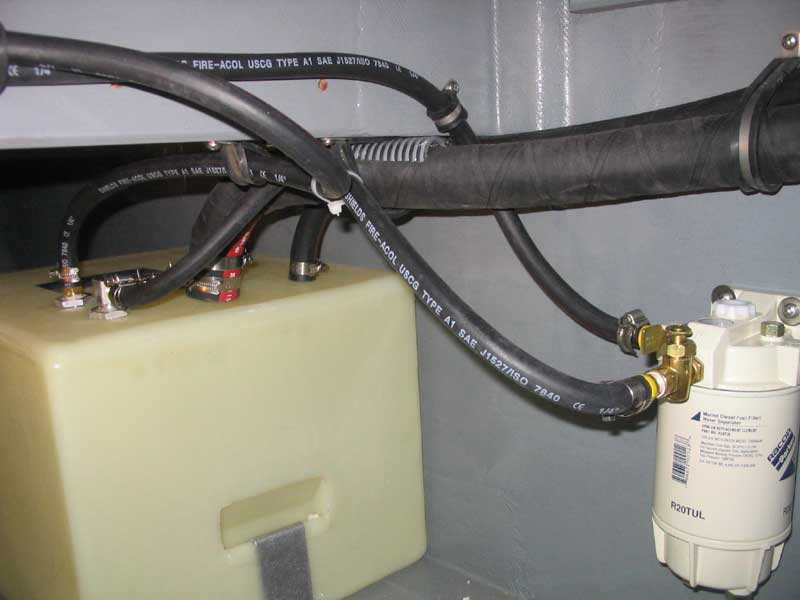 Tuesday, after one more final round of sanding on
the keel work, I got to work on the diesel fuel system. Once the new tank
arrived, it was, in concept, a simple matter to install the tank and run fill,
supply, vent, and return lines. In actuality, the project took the rest of
the day, but it was fun to do and a nice change of pace from the earlier
drudgery of trim installation. Tuesday, after one more final round of sanding on
the keel work, I got to work on the diesel fuel system. Once the new tank
arrived, it was, in concept, a simple matter to install the tank and run fill,
supply, vent, and return lines. In actuality, the project took the rest of
the day, but it was fun to do and a nice change of pace from the earlier
drudgery of trim installation. |
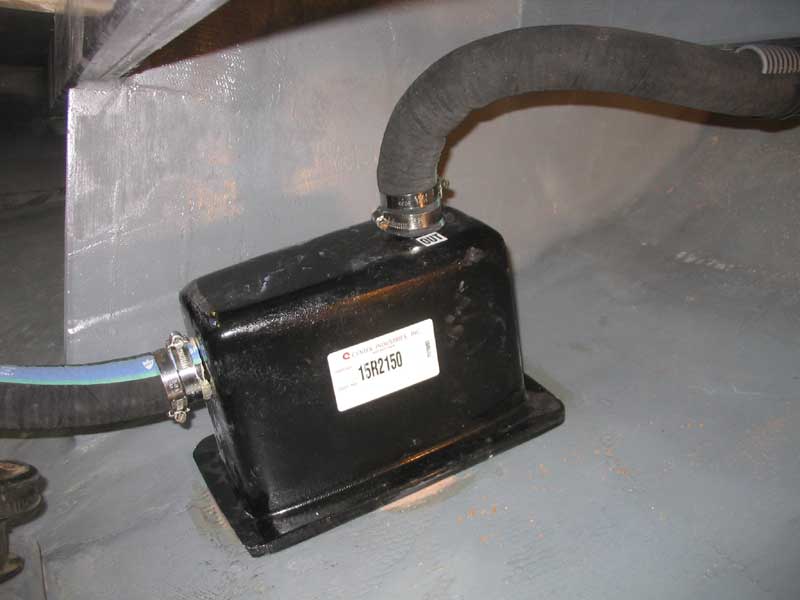 Wednesday, I continued by finishing up the fuel fill, arrangement, and then
moved on to the exhaust system. Configuring the exhaust took a few minutes
of thought to determine the location for the fiberglass waterlift, but after
some consideration and consultation with a few reference sources I chose a
location right next to the engine on the port side. With that done, I
prepared to run the hose and install some fittings. Late in the day, just
before quitting time, I epoxied the waterlift to the inside of the hull to
secure it, and left it till the next day. Wednesday, I continued by finishing up the fuel fill, arrangement, and then
moved on to the exhaust system. Configuring the exhaust took a few minutes
of thought to determine the location for the fiberglass waterlift, but after
some consideration and consultation with a few reference sources I chose a
location right next to the engine on the port side. With that done, I
prepared to run the hose and install some fittings. Late in the day, just
before quitting time, I epoxied the waterlift to the inside of the hull to
secure it, and left it till the next day. |
|
Thursday, I wrapped up some exhaust system final details, and continued systems installation with work on the through hulls. I planned three through hulls for the boat: two cockpit scuppers and one engine raw water intake. Even though the boat would be destined for fair weather, inshore use, I specified full flange bronze seacocks. From inside the boat, I determined the locations for the fittings, after mocking up the hose installations to ensure clear passage for service and accessibility later, and then marked and drilled the holes in the hull for the fittings. If this seems like an insignificant accomplishment for a full day, rest assured that I spent far less than a full day working on the boat, as I had several other outside jobs to take care of while the weather allowed (with more heavy rains scheduled for the weekend), and other commitments on my time that required my attention. Friday continued in a similar fashion, with no work completed on the Daysailor other than to prepare some fiberglass backing pads for the seacocks. |
 Saturday,
I installed the three seacocks and through hulls required, a process that, of
course, took longer than anticipated, mostly because of some ridiculous backing
plates that I built and which ended up becoming some sort of twisted labor of
love. Saturday,
I installed the three seacocks and through hulls required, a process that, of
course, took longer than anticipated, mostly because of some ridiculous backing
plates that I built and which ended up becoming some sort of twisted labor of
love. |
|
Log for the Week Ending May 15, 2005 Unfortunately, I had a disappointing amount of time available this week to spend on the Daysailor, with a number of other commitments that prevented me from working on the boat until Saturday, save for a half hour one afternoon spent attaching the final exhaust hose connection on the engine manifold (I had been awaiting a hose clamp shipment--and yes, it actually took a half hour to wedge the 1-1/2" hose onto the slightly larger outlet!). |
|
Saturday, however, I jumped right in and managed to strike several items from my weekend list--an admittedly aggressive listing of around 10 items. Deciding to hold off on any further woodworking till Dasein departed the shop next week, I moved ahead with systems work and began the electrical wiring. |
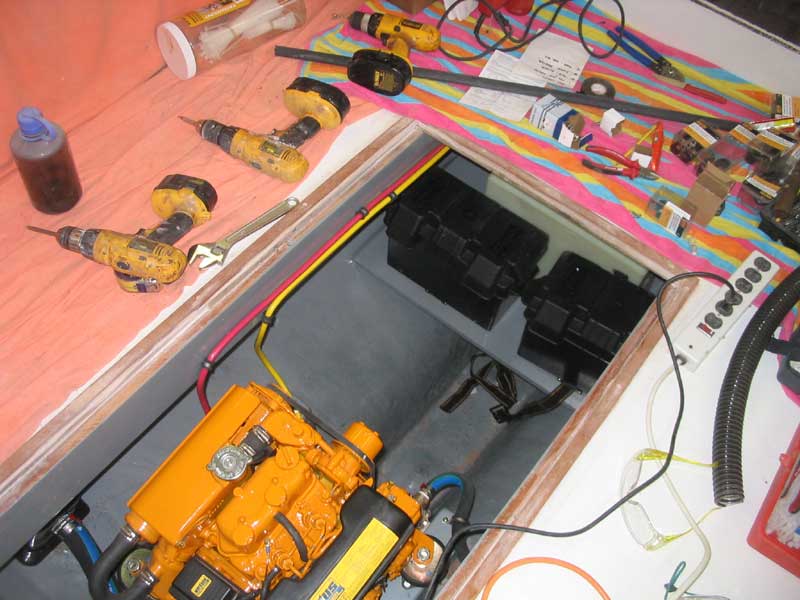 Over
the course of the day, I installed the battery boxes in the engine room, got a
good start on the rough wiring (at least until I ran out of wire...a second reel
I needed was backordered, and I had pilfered some of my other stock earlier in
the week for another project I was working on), and began installing the battery
cables--all of it time consuming, but highly enjoyable. Over
the course of the day, I installed the battery boxes in the engine room, got a
good start on the rough wiring (at least until I ran out of wire...a second reel
I needed was backordered, and I had pilfered some of my other stock earlier in
the week for another project I was working on), and began installing the battery
cables--all of it time consuming, but highly enjoyable. |
 Also
on Saturday, I finally installed the two top pieces of my v-berth ceiling, which
I had built a couple weeks ago. I had waited on their installation so that
I could run wires beneath the ceiling to service the future sidelights at the
bow. Also
on Saturday, I finally installed the two top pieces of my v-berth ceiling, which
I had built a couple weeks ago. I had waited on their installation so that
I could run wires beneath the ceiling to service the future sidelights at the
bow. |
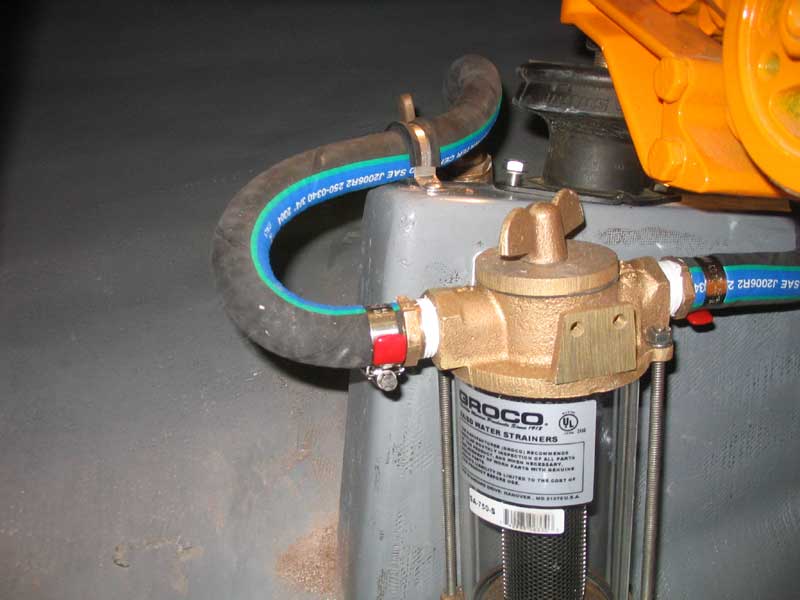 In
between running the bulk wire for the electrical system and the battery cables,
I installed the engine's raw water system, bolting a bronze sea strainer to the
engine foundation and running the two short lengths of hose required. This
job was made overly time consuming by the ridiculous design of the sea strainer;
the mounting bracket (integral with the strainer) was designed in such a way as
to prohibit the insertion of screws or bolts from the strainer side, meaning
that instead the strainer could only be hung from through bolts passing into the
bracket from the other side; there was just enough room to squeeze a nut in
there. I would have returned the strainer in favor of a different one,
after seeing this ridiculous feature, but had already disposed of the box it
came in, as I am wont to do. I got the job done, but what should have been
a 5-minute job turned into a 30-minute one. And so it goes. In
between running the bulk wire for the electrical system and the battery cables,
I installed the engine's raw water system, bolting a bronze sea strainer to the
engine foundation and running the two short lengths of hose required. This
job was made overly time consuming by the ridiculous design of the sea strainer;
the mounting bracket (integral with the strainer) was designed in such a way as
to prohibit the insertion of screws or bolts from the strainer side, meaning
that instead the strainer could only be hung from through bolts passing into the
bracket from the other side; there was just enough room to squeeze a nut in
there. I would have returned the strainer in favor of a different one,
after seeing this ridiculous feature, but had already disposed of the box it
came in, as I am wont to do. I got the job done, but what should have been
a 5-minute job turned into a 30-minute one. And so it goes. |
|
The end must be approaching, as I also ordered interior cushions and sails for the boat. The question is: will I make my self-imposed completion date of the end of June? Your guess is as good as mine. Well, maybe not quite as good... |
|
Log for the Week Ending May 22, 2005 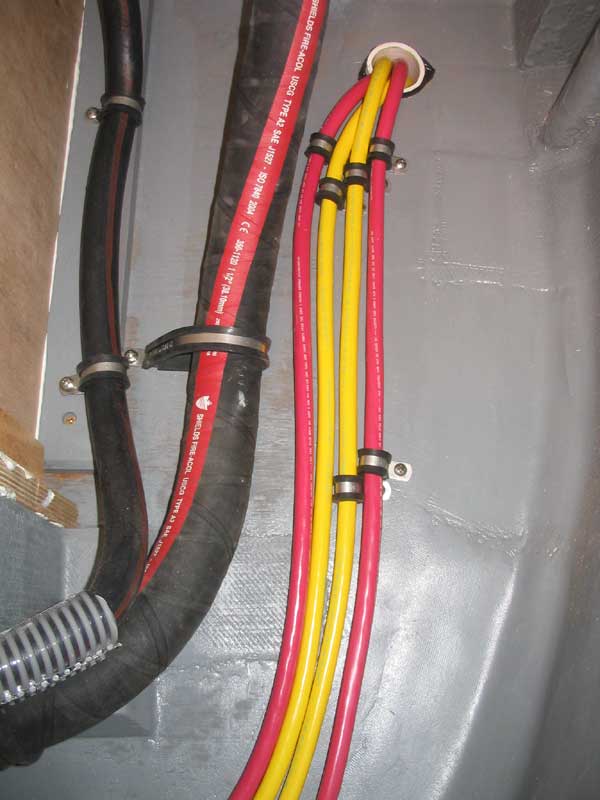 It
was another busy week that left little shop time for construction progress, but
I managed about three full days on board. It
was another busy week that left little shop time for construction progress, but
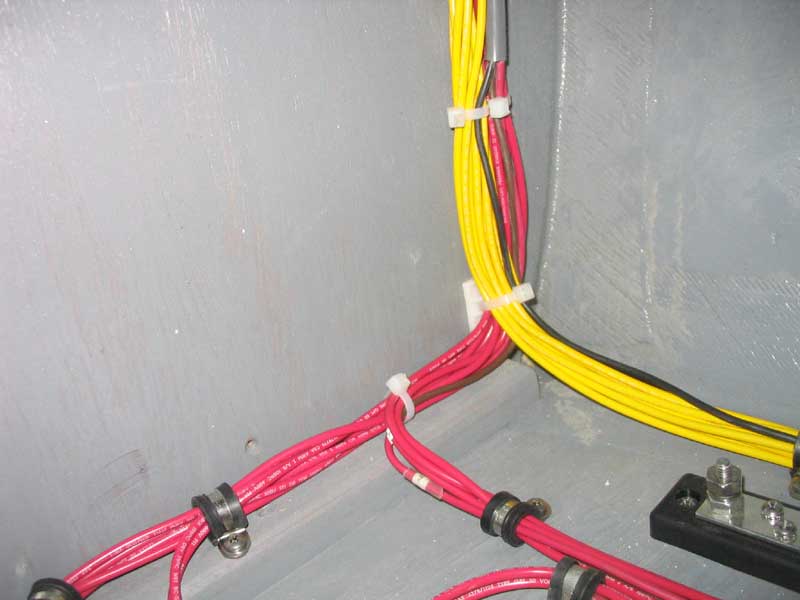
I managed about three full days on board.Sunday was a full day in the shop. I began by picking up where I left off with the battery cables. I had just enough left on the reels to make the two sections required to run between the negative distribution buss (located behind the future electrical panel) and the battery, and also the main positive battery feed. I had to order another reel of each color so that I could make the various jumpers and such required, so I did not work on those at this time. Click here for more about the battery cables and terminal ends. |
 With
the cables complete and permanently installed (but still disconnected from the
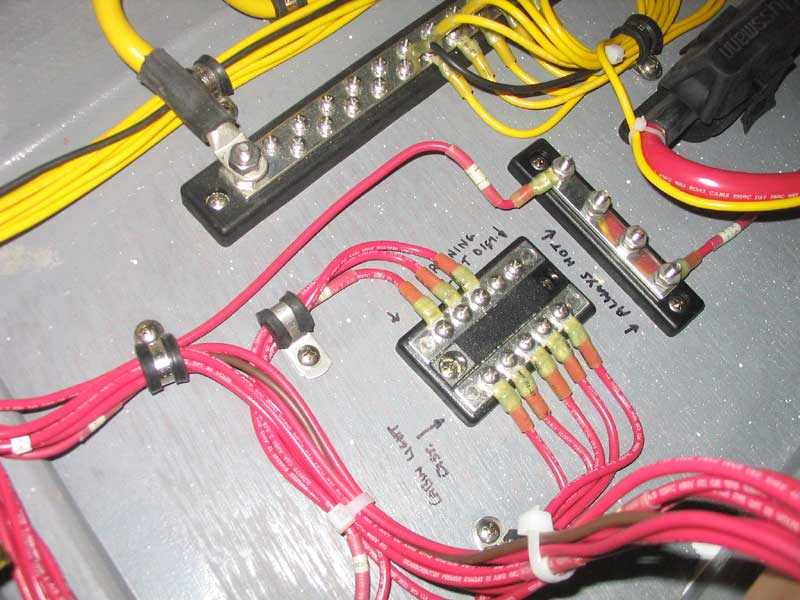
batteries, for now), I continued work on the electrical system. Even
though I was out of primary wire, and therefore couldn't finish the rough wiring
runs yet, I spent some time connecting some of the ground wires to the main
negative distribution buss, and permanently labeled all the existing wires using
small adhesive number labels, which I covered with clear heat shrink tubing. With
the cables complete and permanently installed (but still disconnected from the
batteries, for now), I continued work on the electrical system. Even
though I was out of primary wire, and therefore couldn't finish the rough wiring
runs yet, I spent some time connecting some of the ground wires to the main
negative distribution buss, and permanently labeled all the existing wires using
small adhesive number labels, which I covered with clear heat shrink tubing.Later in the day, I dug the old, decrepit rudder and rudderpost out of storage, and spent some time measuring for the new rudderpost and propeller shaft, as I planned to stop into the local prop shop the next day (since I happened to be going by there) to order these crucial parts. |
|
Finally on Sunday, I turned my attention to the scuppers in the cockpit. I had earlier chosen a set of Spartan bronze scupper fittings for the deck, and now mocked up a few possible locations for the fittings before finally settling on the outboard cockpit corners at the forward end. If you recall, during construction of the cockpit I pitched the sole forward about 3/4" to allow for proper drainage. |
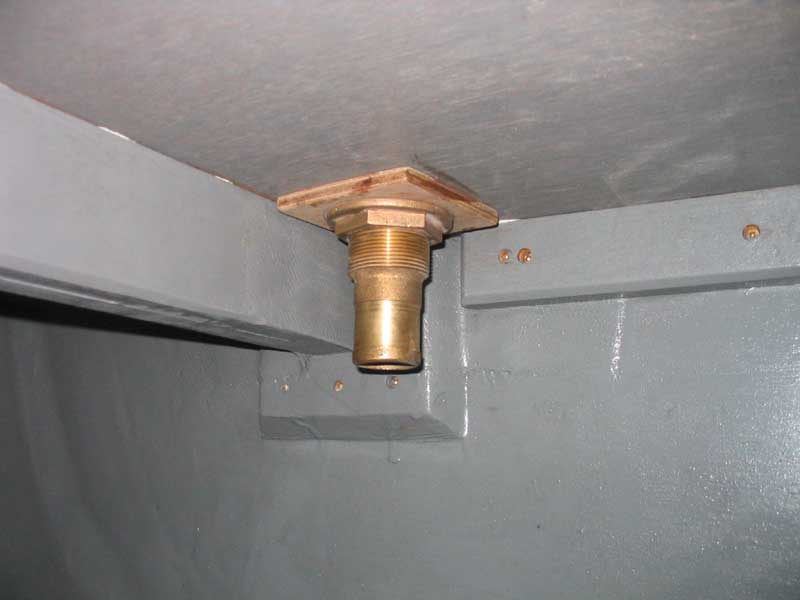 Once
I had the location set, and had double-checked to confirm that there were no
obstructions below, I drilled the holes for the fittings and installed them
permanently; I needed some additional hose before I could finalize the
installation, but when the hose arrived I immediately secured it in place,
completing the scupper installation. Once
I had the location set, and had double-checked to confirm that there were no
obstructions below, I drilled the holes for the fittings and installed them
permanently; I needed some additional hose before I could finalize the
installation, but when the hose arrived I immediately secured it in place,
completing the scupper installation. |
 I
had another full day on Tuesday, with progress slightly slowed during the early
afternoon by a power outage, which meant that I had only natural light from the
doors and windows to work by. This was OK, but a bit tough inside the
cabin, where I happened to be working on wiring. In any event, I ran the
remainder of the rough wiring, wiring for the four cabin lights and stern light.
Because of the convoluted run that the stern light and lights on the port side
of the boat required (with the panel located on the starboard side), this
seemingly simple task took most of the day. After a few days away from the
shop, I was finally able to finish up the rough wiring on Saturday afternoon,
when I ran the final wires required for the electric bilge pump, and finalized
many of the connections in the main wiring area behind the panel location. I
had another full day on Tuesday, with progress slightly slowed during the early
afternoon by a power outage, which meant that I had only natural light from the
doors and windows to work by. This was OK, but a bit tough inside the
cabin, where I happened to be working on wiring. In any event, I ran the
remainder of the rough wiring, wiring for the four cabin lights and stern light.
Because of the convoluted run that the stern light and lights on the port side
of the boat required (with the panel located on the starboard side), this
seemingly simple task took most of the day. After a few days away from the
shop, I was finally able to finish up the rough wiring on Saturday afternoon,
when I ran the final wires required for the electric bilge pump, and finalized
many of the connections in the main wiring area behind the panel location. |
 I
also finally installed some teak strips on the long-neglected cockpit hatches
that cover the engine room. Earlier, I had cut all the 1-1/2"
(approximately) strips for the job, but hadn't installed them. Now, I
finally finished this part of the job. I
also finally installed some teak strips on the long-neglected cockpit hatches
that cover the engine room. Earlier, I had cut all the 1-1/2"
(approximately) strips for the job, but hadn't installed them. Now, I
finally finished this part of the job. |
 I
planned a full day Sunday (as of this writing), and looked forward to several
good working days in the week ahead, though, once again, I had too many other
commitments pulling at my time to dedicate full-time in the shop. I
planned a full day Sunday (as of this writing), and looked forward to several
good working days in the week ahead, though, once again, I had too many other
commitments pulling at my time to dedicate full-time in the shop. |
|
Log for the Week Ending May 29, 2005 Sunday, I worked on the electrical panel. I wanted to locate the main distribution panel, battery switch, and bilge pump switch in a recessed panel that would be hidden from view behind the eventual settee back panels, which would feature upholstered cushions attached to hinged panels. In order to do this, I had to first build some basic cleats to support the panel, then construct a plywood panel into which I could install the various components. I ended up trashing the first panel I made, since I found that I had made it too small to properly accommodate the electrical panel, and made a new, larger panel after enlarging the opening in the settee back to better accommodate things.
|
|
We had a bout of stormy weather during most of the week, which raised many concerns for me about Glissando, now floating on her mooring in exposed Falmouth Foreside. The first several days of the week were filled with numerous boat checks and an overriding worry about her potential fate in 40-knot winds. Eventually, the winds died, and by Thursday afternoon I was able to get aboard and check things out. Despite some minor anchor platform damage, all was well, and I looked forward to concentrating on work once again. |
 During
this period, I did manage to get a few things done, but nothing of particular
note. I whittled away at the wiring and panel construction when I had a
few spare minutes, and then, on a relatively productive day Friday, I completed
the wiring for all intents and purposes; final fixture installation remained,
but the panel was fully wired and ready to be placed into service. During
this period, I did manage to get a few things done, but nothing of particular
note. I whittled away at the wiring and panel construction when I had a
few spare minutes, and then, on a relatively productive day Friday, I completed
the wiring for all intents and purposes; final fixture installation remained,
but the panel was fully wired and ready to be placed into service. |
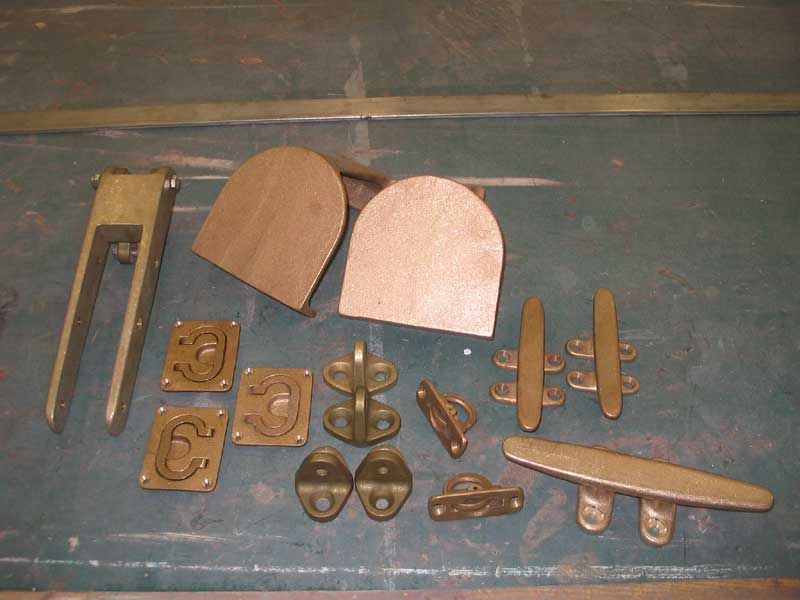 Wednesday
or Thursday, I received a box of goodies from Spartan Marine--it was like
Christmas! I had ordered a number of bronze parts for the boat, including
winch stands, tiller head and strap, flush lifting rings, cleats, and secondary
chainplates. Wednesday
or Thursday, I received a box of goodies from Spartan Marine--it was like
Christmas! I had ordered a number of bronze parts for the boat, including
winch stands, tiller head and strap, flush lifting rings, cleats, and secondary
chainplates. |
 I
also finally secured a date for test-launching the boat to mark the waterline:
next Tuesday, May 31. In preparation for this, I temporarily closed over
the stern tube opening in the aperture, the only remaining opening in the
bottom, since my shaft had not arrived and I had not installed the stern tube
permanently. I simply applied a single layer of fiberglass tape over the
opening. I
also finally secured a date for test-launching the boat to mark the waterline:
next Tuesday, May 31. In preparation for this, I temporarily closed over
the stern tube opening in the aperture, the only remaining opening in the
bottom, since my shaft had not arrived and I had not installed the stern tube
permanently. I simply applied a single layer of fiberglass tape over the
opening. |
 Late
Friday, I masked off the remaining wooden trim in the interior so that I could
begin applying varnish to the bare pieces, and then vacuumed the interior and
applied the first, thinned coat of varnish to the bare wood. Late
Friday, I masked off the remaining wooden trim in the interior so that I could
begin applying varnish to the bare pieces, and then vacuumed the interior and
applied the first, thinned coat of varnish to the bare wood. |
|