|
|
~MENU~ |
| Home |
| The Concept |
| The Boat |
| Bringing Her Home |
|
Weekly Progress Log |
|
Daysailor Projects |
| The Boat Barn |
| Resources |
| Other Sites |
| Email Tim |
|
|
| From a Bare Hull: Bulkheads (Page 5) |
|
Hull Leveling | Basic Layout | Chainplate Bulkhead | Mid Bulkhead | After Bulkhead | Fillets & Tabbing | Limbers |
Fillets and Tabbing With all the main bulkheads tacked in place with small pieces of tabbing, my next step was to prepare for installing the three layers of final tabbing that would hold them securely in place permanently. The foam bulkhead fillet trapezoids that I installed beneath each bulkhead were generally good enough that I could probably have gotten a successful lamination of the tabbing with no significant air pockets or hard spots, but there were some gaps and slight misalignments that I worried might be an impedance to the best quality job. So I decided to create epoxy fillets as necessary to smooth the various transitions between bulkhead, foam fillet, and hull.
|
 I
tabbed the bulkheads in place with three layers of material: a layer
of 4" biaxial tape (22 oz.), a layer of 6" biaxial tape (22
oz.), and a final smoothing layer of 12" fiberglass cloth (9
oz.). To prepare for the job, I precut all the fabrics to a variety
of lengths--36", 24", and 12", since the curvature of the
hull meant that each section of tabbing needed to be made from a few
shorter lengths in order to avoid puckering and
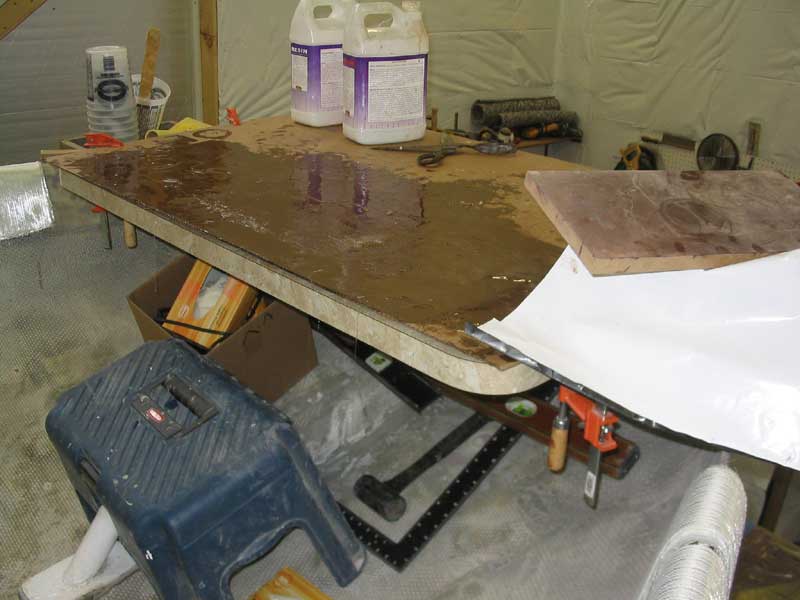
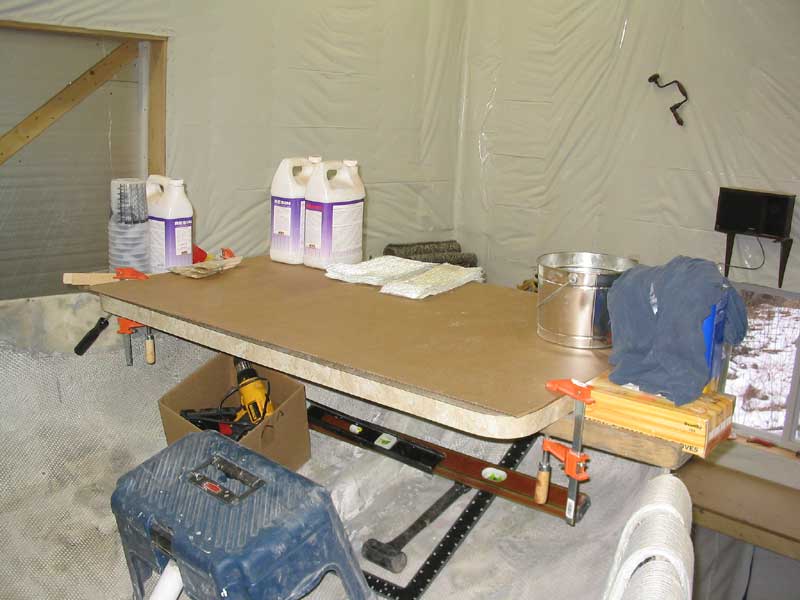
wrinkles. At the stern of the boat, I set up a large
flat table, which I covered with cardboard, where I could wet out the
strips of material before installation. I collected various
supplies--resin, hardener, rollers, brushes, etc.--and arranged the
different widths and lengths of fiberglass conveniently at hand. I
tabbed the bulkheads in place with three layers of material: a layer
of 4" biaxial tape (22 oz.), a layer of 6" biaxial tape (22
oz.), and a final smoothing layer of 12" fiberglass cloth (9
oz.). To prepare for the job, I precut all the fabrics to a variety
of lengths--36", 24", and 12", since the curvature of the
hull meant that each section of tabbing needed to be made from a few
shorter lengths in order to avoid puckering and
wrinkles. At the stern of the boat, I set up a large
flat table, which I covered with cardboard, where I could wet out the
strips of material before installation. I collected various
supplies--resin, hardener, rollers, brushes, etc.--and arranged the
different widths and lengths of fiberglass conveniently at hand. |
 It
took me about 4 hours, spread over two sessions, to complete the bulk of
the tabbing. For each section, I chose the appropriate length of
material (depending on the extremity of the hull curvature at any given
point), and wet out all three pieces on my work table, beginning with the
4" strip on the bottom and followed with the 6" and 12"
material. Then, with the material sufficiently wetted, I picked the
gooey strip off my board and carried it to its final location, where I
spent some number of minutes pressing the material into place and working
the air out with a brush and notched aluminum air roller. I repeated
this process over and over, until all the tabbing was done. It
took me about 4 hours, spread over two sessions, to complete the bulk of
the tabbing. For each section, I chose the appropriate length of
material (depending on the extremity of the hull curvature at any given
point), and wet out all three pieces on my work table, beginning with the
4" strip on the bottom and followed with the 6" and 12"
material. Then, with the material sufficiently wetted, I picked the
gooey strip off my board and carried it to its final location, where I
spent some number of minutes pressing the material into place and working
the air out with a brush and notched aluminum air roller. I repeated
this process over and over, until all the tabbing was done. |
|
|
 In
the first session, I finished all the tabbing in the aft portion of the
hull, from the aft side of the main (midships) bulkhead to the two smaller
bulkheads located closer to the transom. I had had enough after
working on that, so I called it good for the day and repeated the whole
event the next day, only in the forward sections of the hull.
Rather than move my whole wetout station--which would have been difficult
to set up in the narrow, angled bow sections-I laid a piece of
cardboard about 16" wide and 5 feet long on top of the table and wet
my material out on this relatively portable piece, which I could carry to
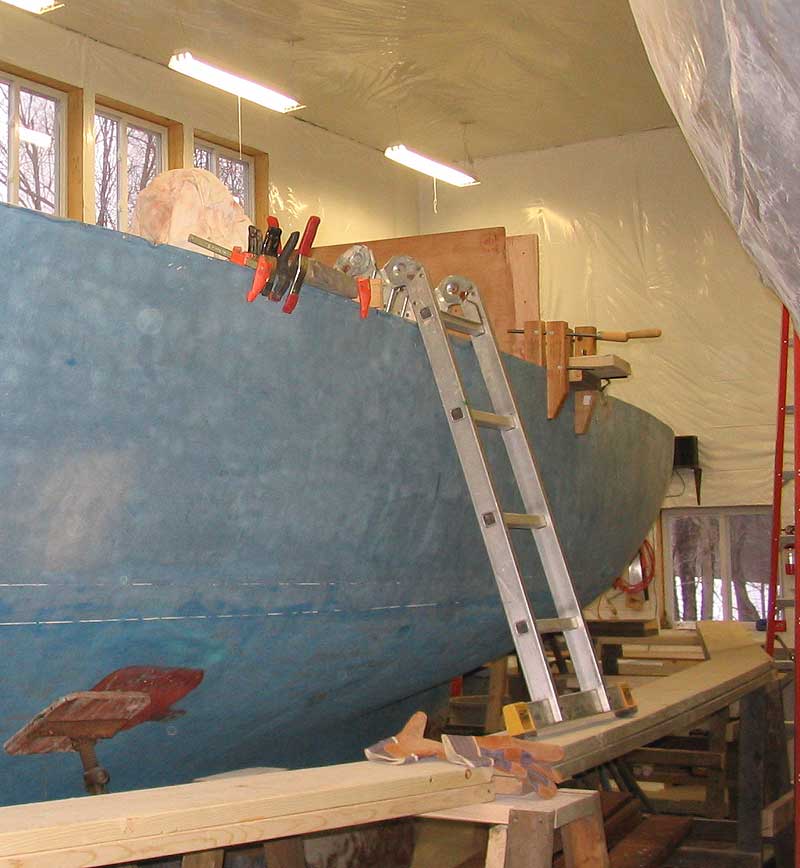
the bow section. Note that the only way to get access to the area
forward of the amidships bulkhead at this time was to climb down onto the
staging outside the boat, walk forward, and climb a small ladder into the
hull, since the large bulkhead effectively blocked through-access.
As deck and cockpit framing continues, I will create an opening in the
bulkhead, of course. That's a bit later on in the process. In
the first session, I finished all the tabbing in the aft portion of the
hull, from the aft side of the main (midships) bulkhead to the two smaller
bulkheads located closer to the transom. I had had enough after
working on that, so I called it good for the day and repeated the whole
event the next day, only in the forward sections of the hull.
Rather than move my whole wetout station--which would have been difficult
to set up in the narrow, angled bow sections-I laid a piece of
cardboard about 16" wide and 5 feet long on top of the table and wet
my material out on this relatively portable piece, which I could carry to
the bow section. Note that the only way to get access to the area
forward of the amidships bulkhead at this time was to climb down onto the
staging outside the boat, walk forward, and climb a small ladder into the
hull, since the large bulkhead effectively blocked through-access.
As deck and cockpit framing continues, I will create an opening in the
bulkhead, of course. That's a bit later on in the process. |
|
|
|
|
 Several weeks later,
I completed the last of the bulkhead tabbing. I had left the topmost
portion of each of the three sets of bulkheads untabbed during the initial
process, since I wanted to wait until the deck framing was in place so
that I could tie all the applicable members together with
fiberglass. At the time of the bulkheads' initial installation, none
of the deck framing had been installed; knowing that I wanted to tie the
sheer clamps and beams directly into the bulkheads, I had left the
uppermost portions untabbed for the time being. Several weeks later,
I completed the last of the bulkhead tabbing. I had left the topmost
portion of each of the three sets of bulkheads untabbed during the initial
process, since I wanted to wait until the deck framing was in place so
that I could tie all the applicable members together with
fiberglass. At the time of the bulkheads' initial installation, none
of the deck framing had been installed; knowing that I wanted to tie the
sheer clamps and beams directly into the bulkheads, I had left the
uppermost portions untabbed for the time being.
|
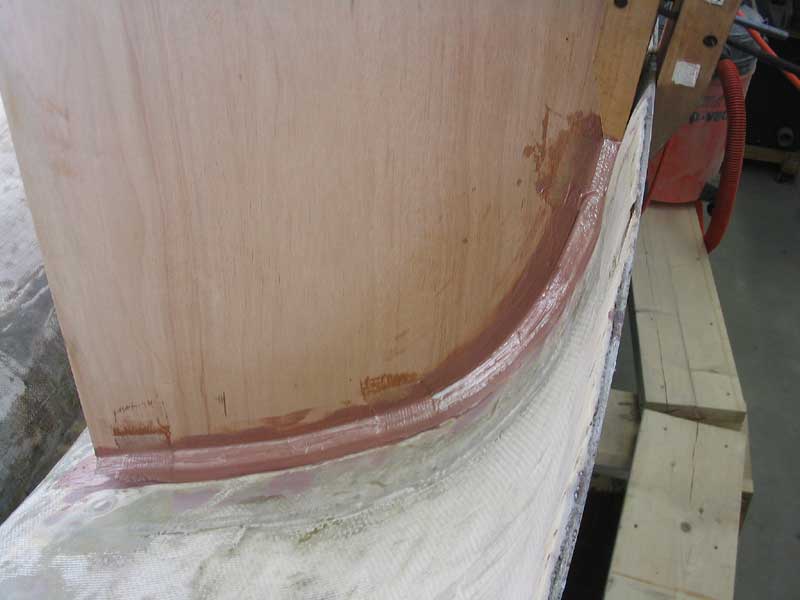
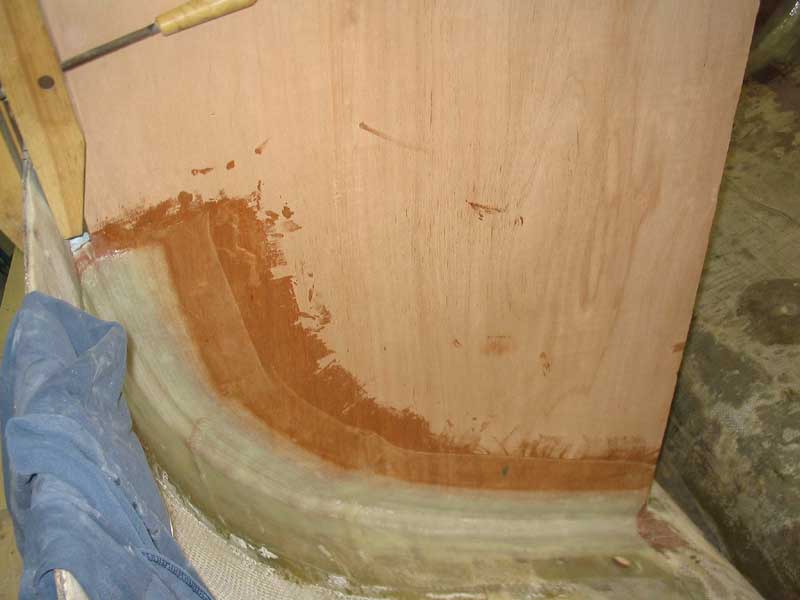
 When I could put the job off no longer, I
prepared the bulkheads by cleaning the areas in question thoroughly.
Then, I began by mixing up a stiff filleting mix with epoxy, microbaloons,
and cabosil, which I used to create the necessary fillets in the gaps
above where the foam fillets ended. After allowing the epoxy to cure
for an hour or two, I continued by installing strips of fiberglass of
various widths to the remaining areas, as needed. When I could put the job off no longer, I
prepared the bulkheads by cleaning the areas in question thoroughly.
Then, I began by mixing up a stiff filleting mix with epoxy, microbaloons,
and cabosil, which I used to create the necessary fillets in the gaps
above where the foam fillets ended. After allowing the epoxy to cure
for an hour or two, I continued by installing strips of fiberglass of
various widths to the remaining areas, as needed.
|
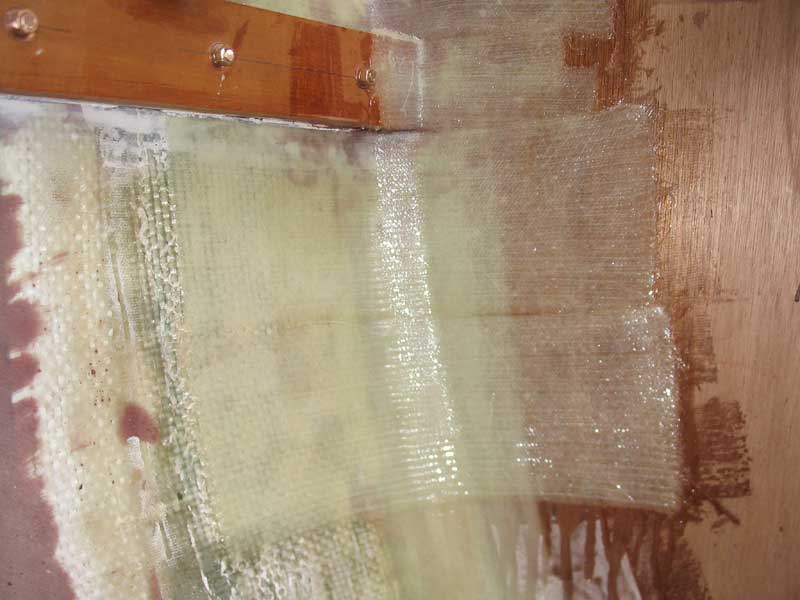
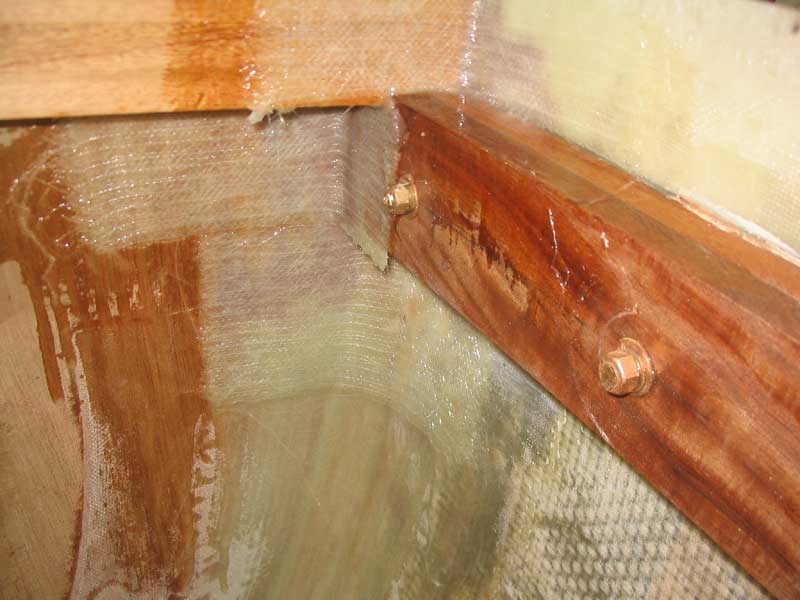
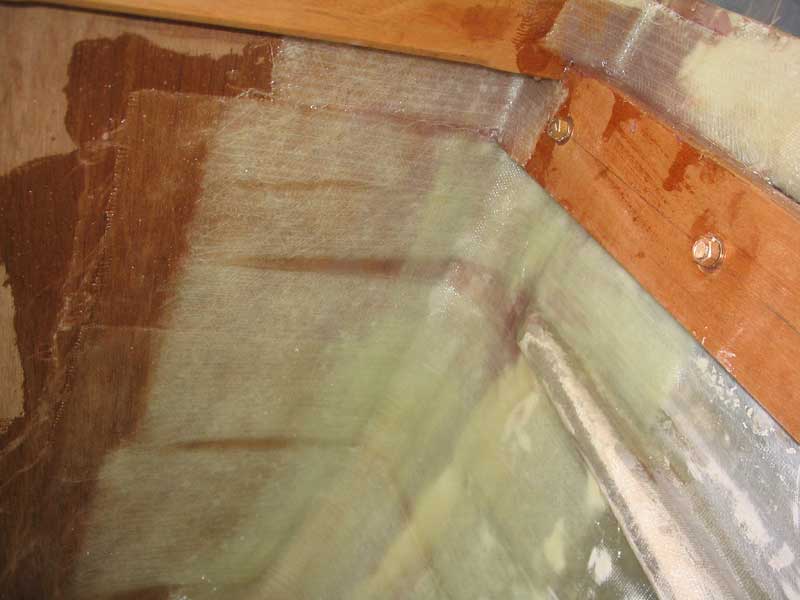 The most critical
area requiring reinforcement was the pair of chainplate bulkheads forward;
to help secure these for their eventual task, I not only tabbed all areas
to the adjacent structural members and hull, I also added additional
strips of 24 oz. 6" biaxial cloth that I ran out 12" in either
direction--onto the bulkheads and onto the hull, all designed to tie the
anticipated loads into a wide area of the hull and bulkhead. I used
two of these strips on each side of the bulkhead, plus an additional
4" strip on the forward sides, since an original longitudinal
stiffener was in the way; the narrower strip fit nicely in the space
between the stiffener and the sheer clamp, while the two wider strips took
care of the area below the stiffener. The most critical
area requiring reinforcement was the pair of chainplate bulkheads forward;
to help secure these for their eventual task, I not only tabbed all areas
to the adjacent structural members and hull, I also added additional
strips of 24 oz. 6" biaxial cloth that I ran out 12" in either
direction--onto the bulkheads and onto the hull, all designed to tie the
anticipated loads into a wide area of the hull and bulkhead. I used
two of these strips on each side of the bulkhead, plus an additional
4" strip on the forward sides, since an original longitudinal
stiffener was in the way; the narrower strip fit nicely in the space
between the stiffener and the sheer clamp, while the two wider strips took
care of the area below the stiffener.
|
|
|
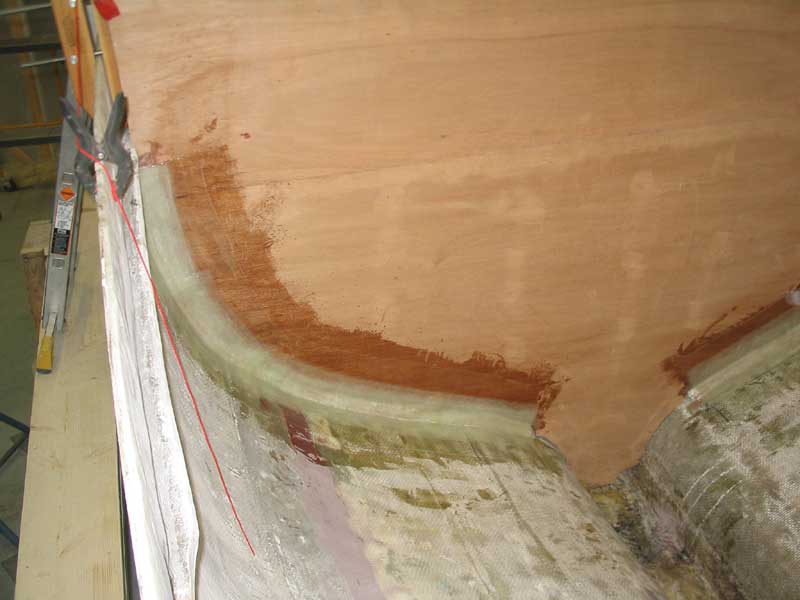
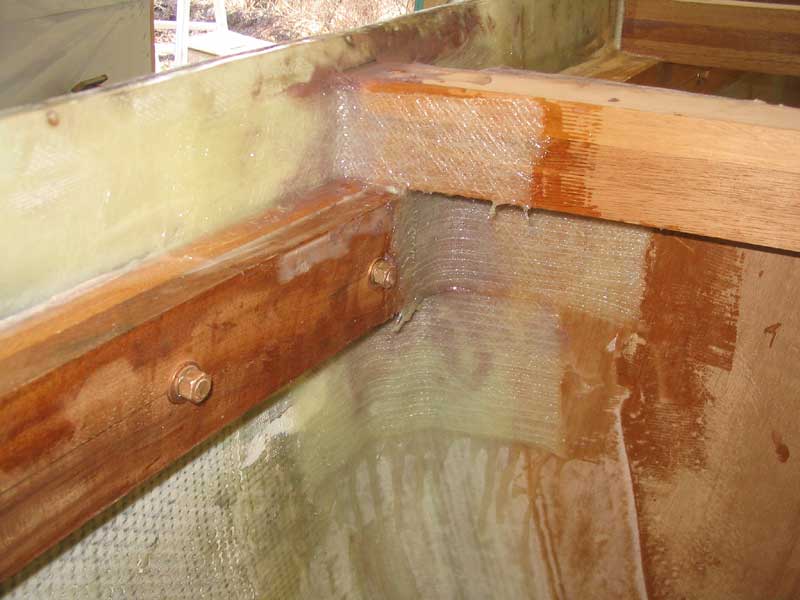 For the midships and after bulkheads, less
reinforcement was needed, and in these areas I simply completed the
tabbing at the topmost portion, securing lengths of tabbing to the hull,
bulkhead, and deck framing as called for in each case. The final
tabbing I installed was sort of the "icing on the cake", as the
bulkheads were already securely tabbed in place, and none of the
additional reinforcement was probably strictly necessary. For the midships and after bulkheads, less
reinforcement was needed, and in these areas I simply completed the
tabbing at the topmost portion, securing lengths of tabbing to the hull,
bulkhead, and deck framing as called for in each case. The final
tabbing I installed was sort of the "icing on the cake", as the
bulkheads were already securely tabbed in place, and none of the
additional reinforcement was probably strictly necessary.
|
 When all was complete, each bulkhead was
secured with fiberglass to any adjacent structural member, including the
sheer clamps and deck beams, as applicable. This job took the better
part of an entire day to complete; after a one-day hiatus from shop work,
I returned to give the new tabbing a coarse sanding to remove the
unavoidable resin
drips and rough edges. When all was complete, each bulkhead was
secured with fiberglass to any adjacent structural member, including the
sheer clamps and deck beams, as applicable. This job took the better
part of an entire day to complete; after a one-day hiatus from shop work,
I returned to give the new tabbing a coarse sanding to remove the
unavoidable resin
drips and rough edges.
|
|
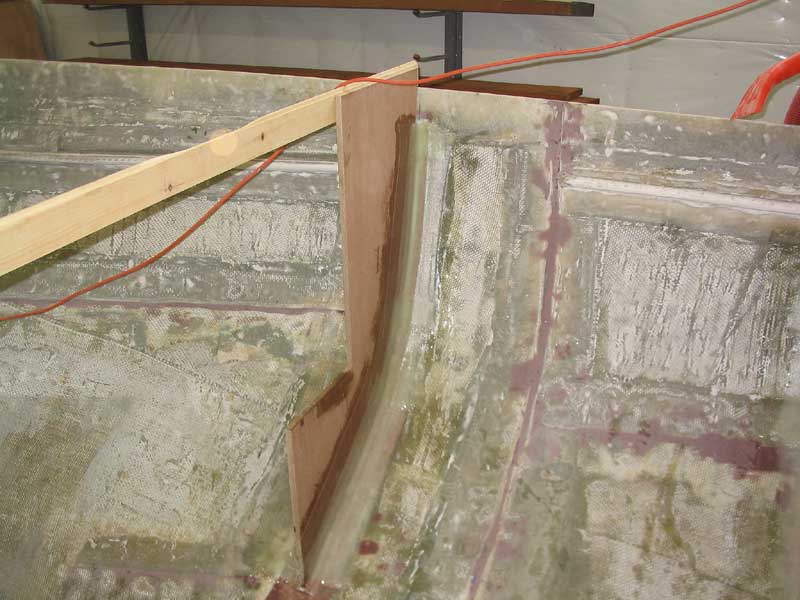
Limbers I ran the midships bulkhead all the way into the bottom of the bilge, since I wanted complete separation between the cabin space and the open/machinery space beneath the cockpit. When fabricating the bulkhead, I left openings on each side of the lower section to allow for limbers to be installed. Limbers are the openings that allow free passage of bilge water between 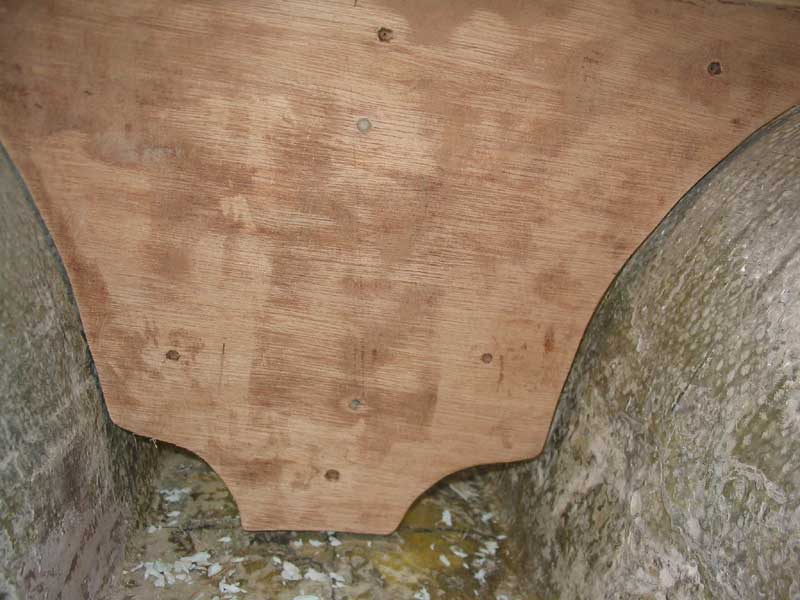 compartments,
and are generally desirable to ensure that water does not become trapped
in a closed compartment. I placed the openings on the sides of the
bulkhead because the bilge area is higher in the centerline than on the
sides. compartments,
and are generally desirable to ensure that water does not become trapped
in a closed compartment. I placed the openings on the sides of the
bulkhead because the bilge area is higher in the centerline than on the
sides.
Playing it safe, I had left the cutouts overlarge, since it would be easier to fill a larger hole than it would be to enlarge a too-small one once the bulkhead was installed. With the bulkhead mostly tabbed in place, I turned to the bilge section to complete the tabbing and install the limbers. |
|
When installing limbers, it's critical that the opening be completely sealed off from the wooden (or other) structure. At best, bilges are damp; at worst, they are full of nasty water. Many structural floors and bulkheads have been ruined throughout the course of boating history because simple openings in damp areas have allowed water to penetrate the wood and begin rot. To install limbers the right way takes more time, which is why production builders don't seem to normally do a good job--it might (gasp!) cut into their profit margin or something. But it's such a small, easy step to take, a step that has significant effect on the overall quality and 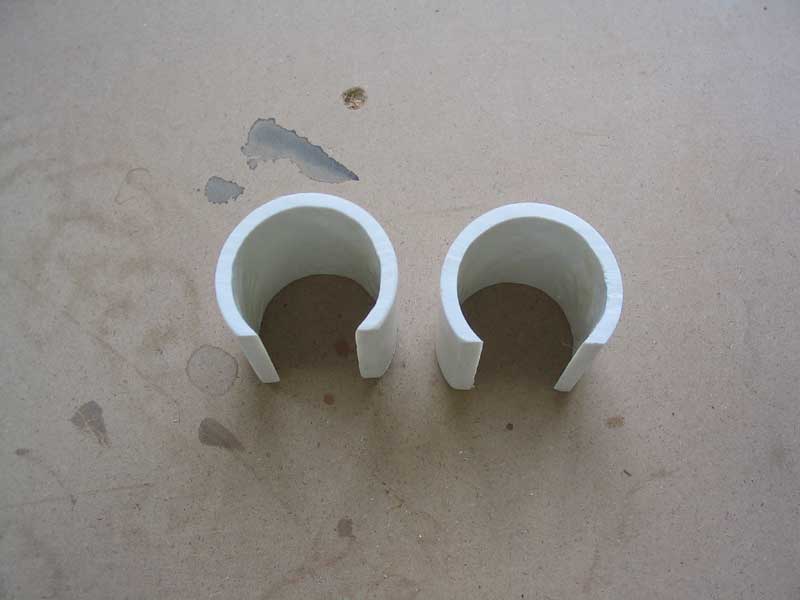 longevity
of the boat and her component parts. longevity
of the boat and her component parts.
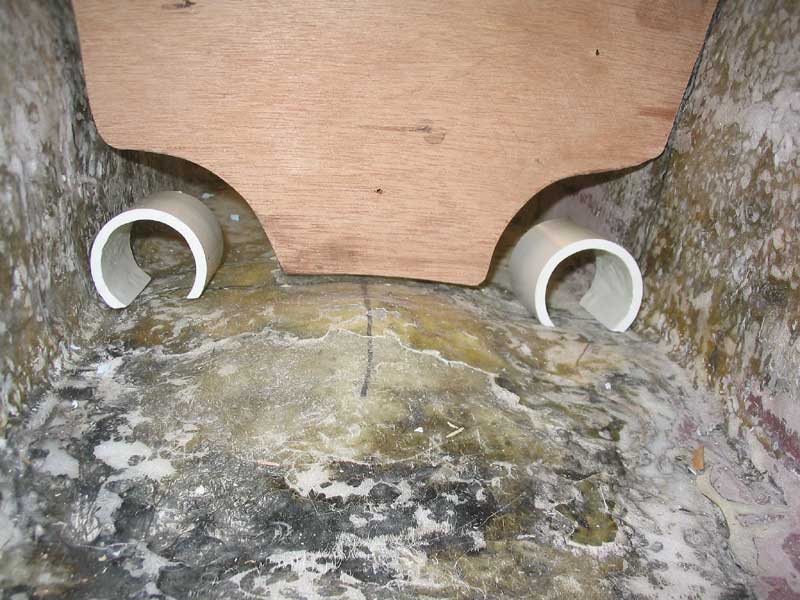
I began by preparing two short lengths of 1-1/2" PVC pipe, which I planned to use to "line" the bulkhead openings. To allow the freest passage of water, I cut off one side of the PVC on my table saw, then cut two 2" pieces, one for each side. I sanded off any burrs or rough edges, then washed the pieces in acetone. |
|
|
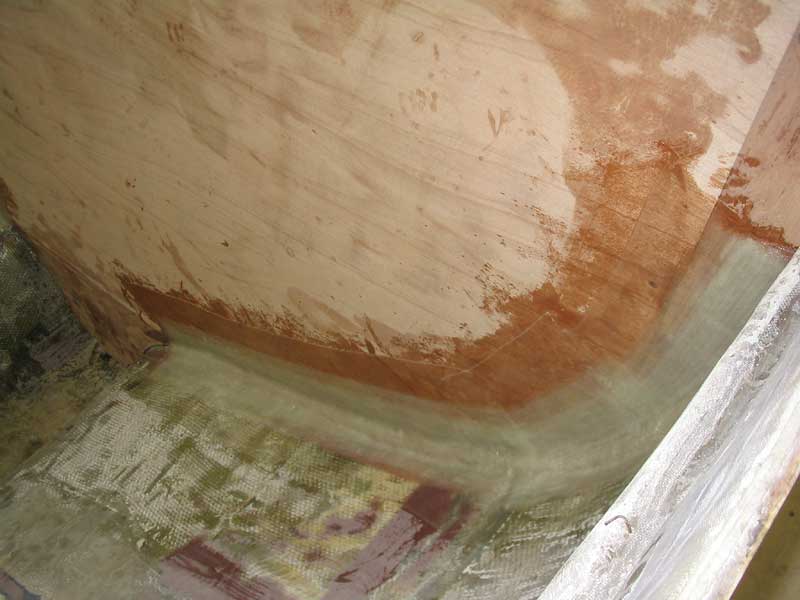
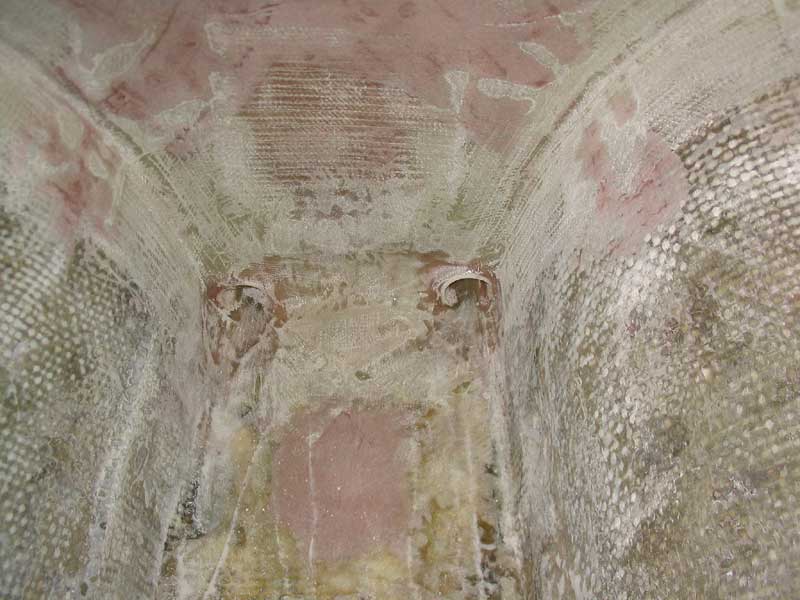
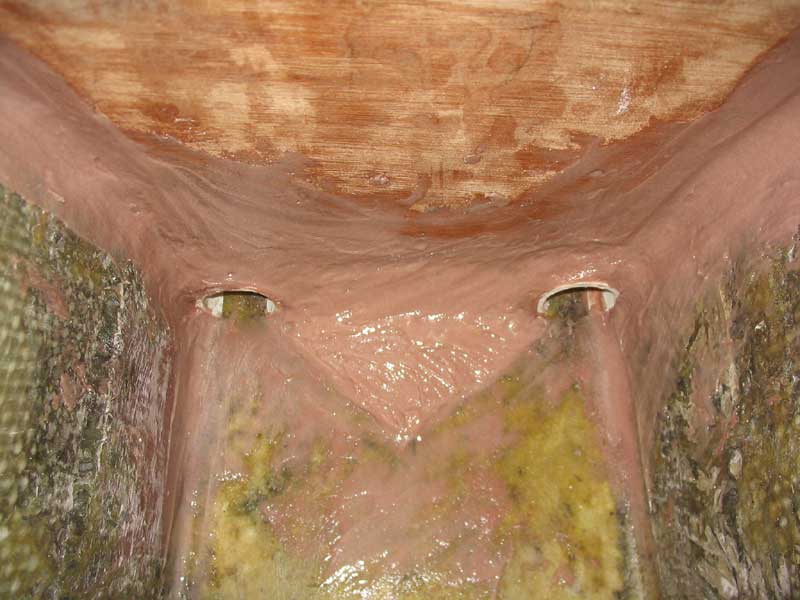 I
placed the pipes in their respective openings beneath the bulkhead,
ensuring that they projected evenly on each side, and then secured them in
place with thickened epoxy, which I also used to seal the exposed plywood
edges and to create the necessary fillets around the limbers, the base of
the bulkhead, and the bulkhead edges up to the turn of the bilge, mating
with the section that was already tabbed in place. It took two
applications of epoxy putty to prepare the areas on each side (fore and
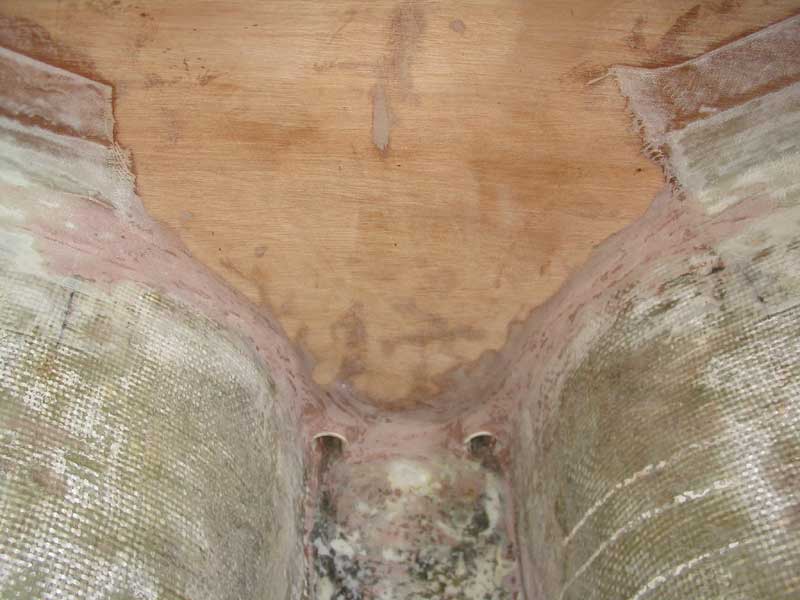
aft) of the bulkhead. On the forward side of the bulkhead, I
created a V-shaped wedge in the center, to channel any water to the sides
and the limbers, preventing any possibility of pooling against the
bulkhead. When the fillets were cured, I sanded the material as
smooth as possible, and prepared for tabbing. I
placed the pipes in their respective openings beneath the bulkhead,
ensuring that they projected evenly on each side, and then secured them in
place with thickened epoxy, which I also used to seal the exposed plywood
edges and to create the necessary fillets around the limbers, the base of
the bulkhead, and the bulkhead edges up to the turn of the bilge, mating
with the section that was already tabbed in place. It took two
applications of epoxy putty to prepare the areas on each side (fore and
aft) of the bulkhead. On the forward side of the bulkhead, I
created a V-shaped wedge in the center, to channel any water to the sides
and the limbers, preventing any possibility of pooling against the
bulkhead. When the fillets were cured, I sanded the material as
smooth as possible, and prepared for tabbing. |
|
|
|
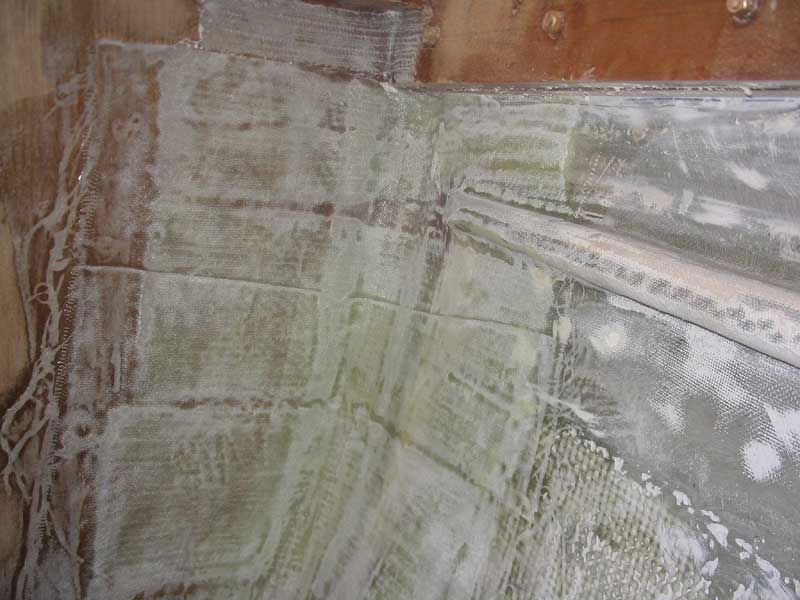
I tabbed the lower sections in with layers of 4" and 6" biaxial tape (22 oz. each). I dispensed with the 12" cloth in the bilge area, but used several small pieces of cloth to create smooth transitions between some of the tabbed areas; the lighter cloth laid down better, and allowed me to get smoother edges. I tabbed the lower part of the bulkhead, between the limbers, to the bilge with 4" tape, and added additional tape on the bulkhead above and between the other 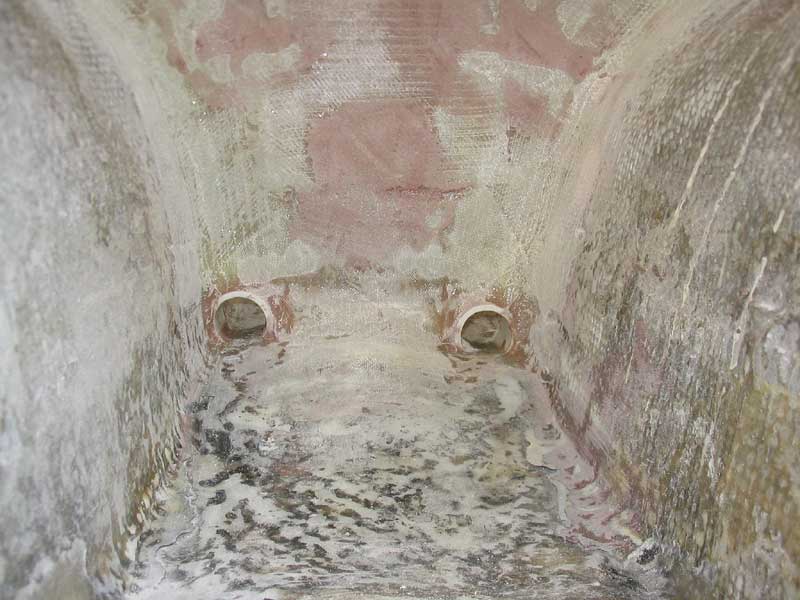 tabbing, just to provide water resistant protection for
the wood. I installed some lightweight cloth over the exposed epoxy
filler around the limbers to seal it--being careful, of course, not to
obscure the limber openings in any way. Later in the day, when the
fiberglass had cured to a semi-hard state, I applied some thickened epoxy
filler to some of the edges, purely for looks when all is said and
done. When I sanded the cured tabbing after a day or two, I ended up
with a smooth surface. Yes, it's the bilge, but the devil is in the
details. And a smoother surface in the bilge translates to ease of
cleaning and maintenance down the road. tabbing, just to provide water resistant protection for
the wood. I installed some lightweight cloth over the exposed epoxy
filler around the limbers to seal it--being careful, of course, not to
obscure the limber openings in any way. Later in the day, when the
fiberglass had cured to a semi-hard state, I applied some thickened epoxy
filler to some of the edges, purely for looks when all is said and
done. When I sanded the cured tabbing after a day or two, I ended up
with a smooth surface. Yes, it's the bilge, but the devil is in the
details. And a smoother surface in the bilge translates to ease of
cleaning and maintenance down the road. |
|
|