|
|
~MENU~ |
| Home |
| The Concept |
| The Boat |
| Bringing Her Home |
|
Weekly Progress Log |
|
Daysailor Projects |
| The Boat Barn |
| Resources |
| Other Sites |
| Email Tim |
|
|
| From a Bare Hull: Bulkheads (Page 3) |
|
Hull Leveling | Basic Layout | Chainplate Bulkhead | Mid Bulkhead | After Bulkhead | Fillets & Tabbing | Limbers |
Midships Bulkhead The mid bulkhead is located 4' aft of the chainplate bulkheads, and is a critical one because it provides the demarcation between the cockpit and interior, as well as the machinery space from the interior. I located the sides of the bulkhead using the same measuring method as before, on the chainplate bulkheads. Refresh your memory on the layout. The mid bulkhead presented more of a challenge to build and install, mainly because of its large size and location. As it happened, its location was just at maximum beam, which meant that the width would be over eight feet (or wider than a sheet of plywood). In addition, the mid bulkhead was to extend all the way to the bilge, effectively isolating the cabin from the machinery space aft, and was also to extend far enough above the deck to form the basis for the bulkhead at the aft end of the eventual cabin trunk and forward end of the cockpit. These factors, when combined, meant a very large bulkhead that would have to be made from several pieces of plywood. |
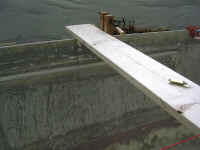 I began by templating both sides of the
bulkhead with a tick strip, as before. For this single large
bulkhead that extended all the way across the boat, I used the centerline
of the boat as my reference point, and chose a level line near the turn of
the bilge, which equated with a point one foot outboard of center on each
side, for the bottom reference point (and the bottom of the first sheet of
plywood used in the bulkhead). I set the plywood template strip up
so that one edge was plumb and in line with this centerline, and templated
one side of the bulkhead, then flipped the template board, moved it to the
other side of the centerline, and templated the other side. Because
the hull was over 8' in width at this point, I planned to offset my
plywood "centerline" so that one side would extend all the way
to the curvature of the hull. Therefore, I measured from the hull to
the centerline of the boat and made note of the reading for the next
step. I began by templating both sides of the
bulkhead with a tick strip, as before. For this single large
bulkhead that extended all the way across the boat, I used the centerline
of the boat as my reference point, and chose a level line near the turn of
the bilge, which equated with a point one foot outboard of center on each
side, for the bottom reference point (and the bottom of the first sheet of
plywood used in the bulkhead). I set the plywood template strip up
so that one edge was plumb and in line with this centerline, and templated
one side of the bulkhead, then flipped the template board, moved it to the
other side of the centerline, and templated the other side. Because
the hull was over 8' in width at this point, I planned to offset my
plywood "centerline" so that one side would extend all the way
to the curvature of the hull. Therefore, I measured from the hull to
the centerline of the boat and made note of the reading for the next
step.
|
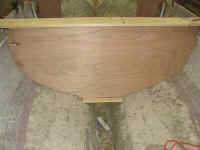 With that done, I prepared a sheet of
3/8" marine Meranti plywood by drawing a line through the sheet at
the measurement from the step above. This meant that the line was
some inches off the actual center of the sheet, which is what I
wanted. In order to span the full width of the hull at this point, I
needed to piece the plywood together to make the proper width of about
8'-4". Once the line was marked, I tacked the plywood template
board in place along the line, first on one side then the other, and transferred
the tick strip measurements to the sheet. After connecting the dots,
I cut the contours with my jigsaw, and then used a piece of scrap to cut a
small piece to make up the missing portion on the port side, bringing the
first sheet to full hull width as needed. I used some small blocks
to temporarily secure the small piece in place, and lugged the sheet into
the boat to test the fit and continue with the next step. With that done, I prepared a sheet of
3/8" marine Meranti plywood by drawing a line through the sheet at
the measurement from the step above. This meant that the line was
some inches off the actual center of the sheet, which is what I
wanted. In order to span the full width of the hull at this point, I
needed to piece the plywood together to make the proper width of about
8'-4". Once the line was marked, I tacked the plywood template
board in place along the line, first on one side then the other, and transferred
the tick strip measurements to the sheet. After connecting the dots,
I cut the contours with my jigsaw, and then used a piece of scrap to cut a
small piece to make up the missing portion on the port side, bringing the
first sheet to full hull width as needed. I used some small blocks
to temporarily secure the small piece in place, and lugged the sheet into
the boat to test the fit and continue with the next step. |
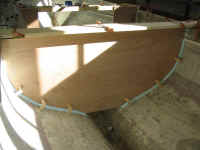 After aligning the bulkhead properly, I used a scrap of the 1" foam
that I planned to use for fillets and cushioning to mark a new scribe mark
on the plywood, and then removed it to trim off the excess. While
the first piece was out of the boat, I installed the foam fillets in place
with some hot melt glue, as before. With that done, I returned with
the trimmed bulkhead to check the fit and perform further steps. It
fit nicely, and after aligning it once more I glued in some inverted
L-shaped blocks on each side to hold it in position--now and later during
final installation. I didn't bother with running the foam down into
the bilge area, seeign no reason to worry about it in that
area.
 |
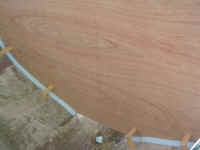 I wanted this bulkhead to extend all the way into the bilge, so I used my tick
strip to mark out the contours of the bilge area directly on the sheet of
plywood that was already in place. Once that was done, I made note
of how high the first sheet of plywood extended--just an inch or two above
deck level--so that I could figure how much higher I needed to run the
bulkhead. This bulkhead needed to run quite high above the sheer
level, since it would eventually form the aft end of the small cabin
trunk, which could be more than a foot above the sheer height in the
center, allowing for the crown. I planned to run the bulkhead even
higher than that, just to be on the safe side.
 |
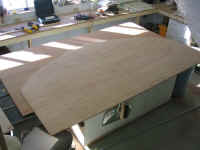 Out came the bulkhead again, this time being
the last one needed before final installation. Now it was time to
cut the various pieces of plywood that would help make up the extra height
and width as needed, as well as increase the total thickness of the
bulkhead to 3/4" (since I was using 3/8" by design).
Laying a new sheet on the bench, I covered it with my already-cut sheet,
and aligned things so that it overlapped, allowing me to mark out the
additional bilge area that I templated in the step above. Then I
traced the top layer onto the bottom, and cut out the second sheet.
I made some additional cuts in the lower section to accommodate some
plastic limber pipes that I planned to install in the bilge (more on this
later). Out came the bulkhead again, this time being
the last one needed before final installation. Now it was time to
cut the various pieces of plywood that would help make up the extra height
and width as needed, as well as increase the total thickness of the
bulkhead to 3/4" (since I was using 3/8" by design).
Laying a new sheet on the bench, I covered it with my already-cut sheet,
and aligned things so that it overlapped, allowing me to mark out the
additional bilge area that I templated in the step above. Then I
traced the top layer onto the bottom, and cut out the second sheet.
I made some additional cuts in the lower section to accommodate some
plastic limber pipes that I planned to install in the bilge (more on this
later).
|
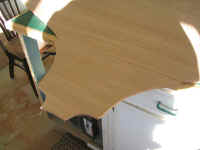 I finished up the bulkhead by adding a
second section to the bottom layer, which extended the bulkhead upwards by
another couple feet. Finally, I cut the remaining smaller pieces
needed here and there to complete both layers. I finished up the bulkhead by adding a
second section to the bottom layer, which extended the bulkhead upwards by
another couple feet. Finally, I cut the remaining smaller pieces
needed here and there to complete both layers. |
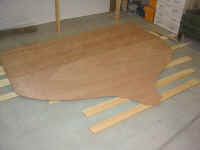
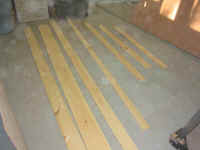 I planned to laminate the two
overlapping layers together with thickened epoxy as an adhesive.
Ideally, I would have loved to have vacuum-bagged the assembly together,
but wasn't set up for that and wasn't about to begin in this case.
(Maybe another time...) I spent some time preparing a section of the
shop floor for the large assembly; I rolled benches and tools out of the
way, and laid some scrap pine on the floor to raise the plywood off to
allow drywall screws to be used to screw it together during the gluing
process. (The screws were 1-1/4" long, while the plywood
assembly was only 3/4" thick.) I laid the two large bottom
layers down on the boards, being careful to properly align them, and
prepared to epoxy all the pieces together. I planned to laminate the two
overlapping layers together with thickened epoxy as an adhesive.
Ideally, I would have loved to have vacuum-bagged the assembly together,
but wasn't set up for that and wasn't about to begin in this case.
(Maybe another time...) I spent some time preparing a section of the
shop floor for the large assembly; I rolled benches and tools out of the
way, and laid some scrap pine on the floor to raise the plywood off to
allow drywall screws to be used to screw it together during the gluing
process. (The screws were 1-1/4" long, while the plywood
assembly was only 3/4" thick.) I laid the two large bottom
layers down on the boards, being careful to properly align them, and
prepared to epoxy all the pieces together. |
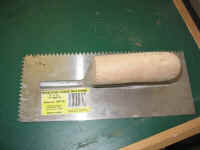 To spread the epoxy, I planned to use a
notched spreader, normally used for laying tile or other floor
coverings. The tool leaves a set amount of adhesive, making it
convenient and efficient to cover large areas. I knew I
wouldn't have a lot of time to fool around, covering such a large area
with time-sensitive epoxy, so I made sure everything was laid out and
ready to go, and mixed up a large batch of epoxy, which I thickened to a
ketchup consistency with silica. Quickly, I dumped it out on the
plywood and began spreading it. Unfortunately, I hadn't mixed
enough--I needed double the amount. As fast as I could (the hardener
flowed very sluggishly from its container, which drove me crazy), I mixed
a second batch, and hurried back to continue spreading. (No pictures
of this, sorry.) To spread the epoxy, I planned to use a
notched spreader, normally used for laying tile or other floor
coverings. The tool leaves a set amount of adhesive, making it
convenient and efficient to cover large areas. I knew I
wouldn't have a lot of time to fool around, covering such a large area
with time-sensitive epoxy, so I made sure everything was laid out and
ready to go, and mixed up a large batch of epoxy, which I thickened to a
ketchup consistency with silica. Quickly, I dumped it out on the
plywood and began spreading it. Unfortunately, I hadn't mixed
enough--I needed double the amount. As fast as I could (the hardener
flowed very sluggishly from its container, which drove me crazy), I mixed
a second batch, and hurried back to continue spreading. (No pictures
of this, sorry.)
|
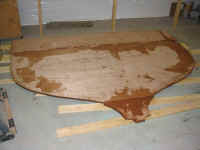 When I had the first section covered, I
laid down the top section of plywood, aligned it on all edges, and then
secured it in place with a number of drywall screws, ensuring that I
pressed the pieces together tightly for a good bond. Once the first
large section was in place, I mixed more epoxy and finished gluing up the
top sections, and other small sections, which went smoothly with no
problems. I screwed everything together securely, cleaned up some
excess epoxy, and booted the heat in the shop up to 70° to ensure quick
and adequate curing by the next morning. When I had the first section covered, I
laid down the top section of plywood, aligned it on all edges, and then
secured it in place with a number of drywall screws, ensuring that I
pressed the pieces together tightly for a good bond. Once the first
large section was in place, I mixed more epoxy and finished gluing up the
top sections, and other small sections, which went smoothly with no
problems. I screwed everything together securely, cleaned up some
excess epoxy, and booted the heat in the shop up to 70° to ensure quick
and adequate curing by the next morning. |
