|
| |
| Barn
Home Page
|
Rolling Barn Doors
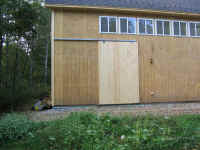
After weeks of wondering
and worrying, the time finally came for me to start building the large
barn doors. The 18' wide front opening will be covered with three
rolling doors (more on that later), and the 10' x 6' side door on the
south wall gets a similar door. I decided to begin with the
"small" side door to test my construction technique and figure
out the rolling door hardware.
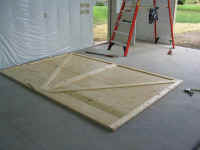 I
built the door out of 8" v-matched (tongue and groove) pine boards,
with a 3/4" pine frame screwed to the backs of the boards. On
the shop floor, I laid out the boards, face down, beginning with a full
board spanning the centerline and working outwards to the proper
width. For the two edge boards, I trimmed them to the proper width
as needed, which also removed the outer tongue (or groove), leaving a
clean, straight edge. With all boards laid out and the tongues fit
into the grooves, I began securing the frame pieces to the back, screwing
them into the boards. Of course I made sure the door was square
before securing the framework pieces. The frame consisted of a basic
3-1/2" wide frame around the perimeter, with a 5-1/2" board
across the middle of the door (horizontally), and two angled braces
running from the top and bottom corners to the center. I
built the door out of 8" v-matched (tongue and groove) pine boards,
with a 3/4" pine frame screwed to the backs of the boards. On
the shop floor, I laid out the boards, face down, beginning with a full
board spanning the centerline and working outwards to the proper
width. For the two edge boards, I trimmed them to the proper width
as needed, which also removed the outer tongue (or groove), leaving a
clean, straight edge. With all boards laid out and the tongues fit
into the grooves, I began securing the frame pieces to the back, screwing
them into the boards. Of course I made sure the door was square
before securing the framework pieces. The frame consisted of a basic
3-1/2" wide frame around the perimeter, with a 5-1/2" board
across the middle of the door (horizontally), and two angled braces
running from the top and bottom corners to the center.
|
|
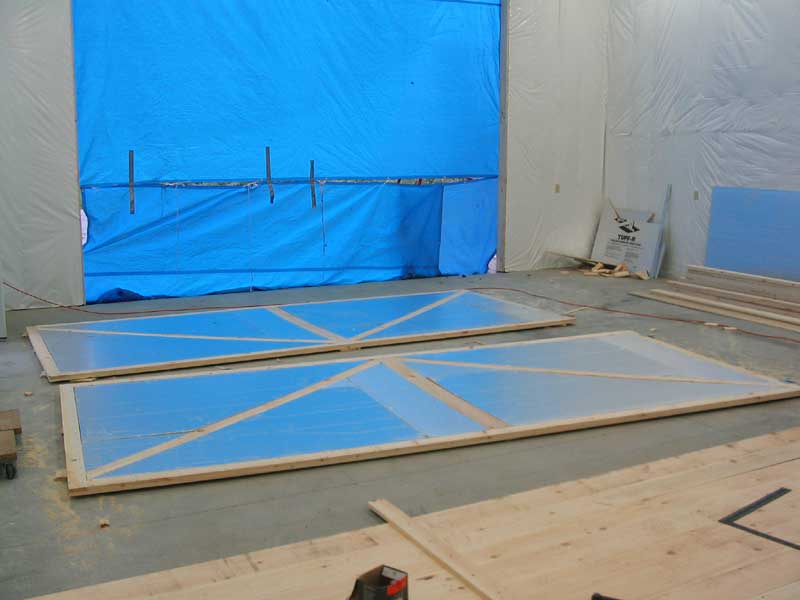
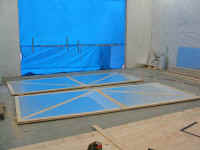
With the frame built, I
filled in the open spaces between the frame members with 3/4"
foam/foil board (polyisocyanurate), which has an R-value of 5.2. I
temporarily secured the foam with drywall screws; later, I'll add some
additional screws with large washers to help hold the foam in place.
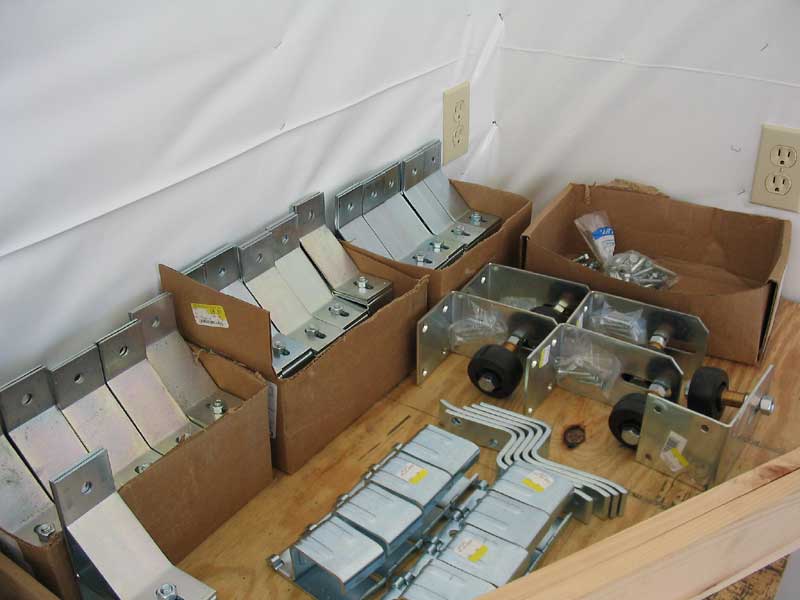
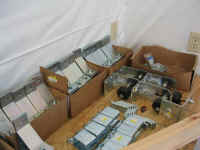 The
rolling door hardware consists of a simple U-shaped track, and a
bewildering array of brackets, rollers, and other unidentifiable
pieces. I scratched my head for some time over the proper
arrangement of these pieces, and how to make it all work properly. I
had never used this sort of hardware before, and since Bob had some
experience with it, I asked his opinion when he arrived Thursday
morning. Even he couldn't puzzle it out correctly, and we wondered
what was wrong: the hardware, or us. The way we were trying to
set it up, we couldn't figure out how a certain nut was going to allow
adjustment, and we even went for a ride on a wild goose chase for a
different sort of hardware. The
rolling door hardware consists of a simple U-shaped track, and a
bewildering array of brackets, rollers, and other unidentifiable
pieces. I scratched my head for some time over the proper
arrangement of these pieces, and how to make it all work properly. I
had never used this sort of hardware before, and since Bob had some
experience with it, I asked his opinion when he arrived Thursday
morning. Even he couldn't puzzle it out correctly, and we wondered
what was wrong: the hardware, or us. The way we were trying to
set it up, we couldn't figure out how a certain nut was going to allow
adjustment, and we even went for a ride on a wild goose chase for a
different sort of hardware.
|
|
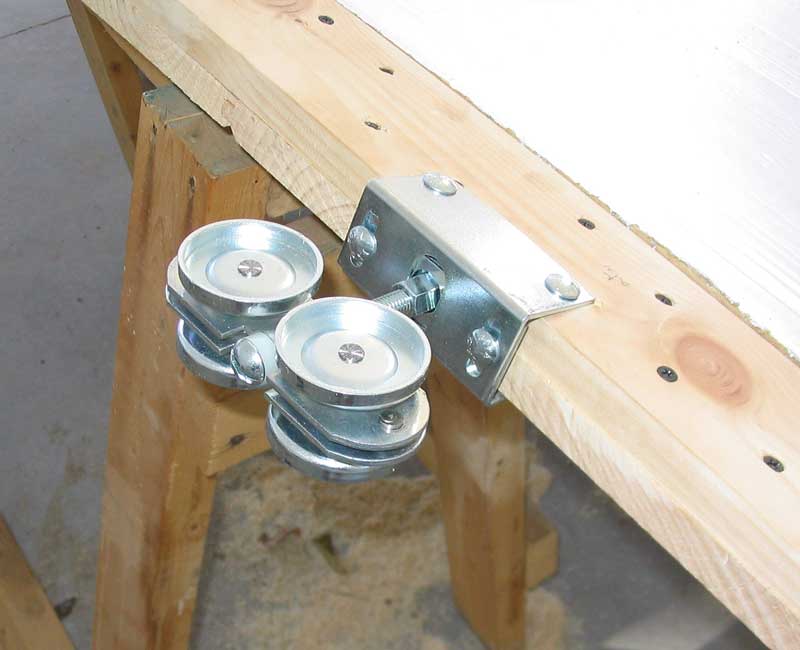
 Later,
after Bob had left (completing his portion of the barn construction), I
sat there, annoyed that I had this hardware but that it was seemingly
unusable. There had to be something missing or incorrect, and as I
looked at some of the pieces, something clicked in my mind--and I figured
it out! I was thrilled, and immediately set to work installing two
sets of the rollers on my newly-completed door. (If you want more
installation details, email me.) Later,
after Bob had left (completing his portion of the barn construction), I
sat there, annoyed that I had this hardware but that it was seemingly
unusable. There had to be something missing or incorrect, and as I
looked at some of the pieces, something clicked in my mind--and I figured
it out! I was thrilled, and immediately set to work installing two
sets of the rollers on my newly-completed door. (If you want more
installation details, email me.)
|
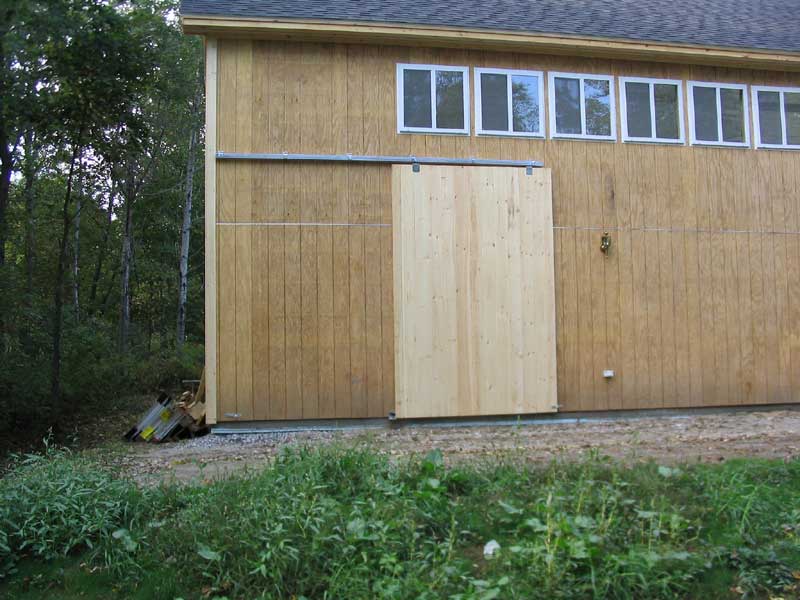
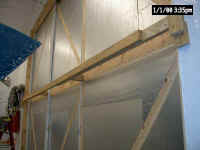
The door track was a snap to install on the outside barn wall. I
installed a 14' section with special brackets spaced every other stud; the
brackets went up quickly with a single lag screw each, which I buzzed in
with my electric impact driver. As I was about to try and install
the door, Bob fortuitously arrived with his utility trailer to pick up the
remaining construction debris, and he gave me a hand. In seconds,
the door was hung.
|
|
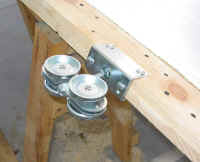
 The
hardware worked very well, and the door rolled easily on the track.
I installed a couple accessories: a metal bracket at the right
(front) side of the door to capture the base and limit movement when
closed, and a roller assembly at the back edge of the door that captures
the bottom of the door when it is rolled open. The
hardware worked very well, and the door rolled easily on the track.
I installed a couple accessories: a metal bracket at the right
(front) side of the door to capture the base and limit movement when
closed, and a roller assembly at the back edge of the door that captures
the bottom of the door when it is rolled open.
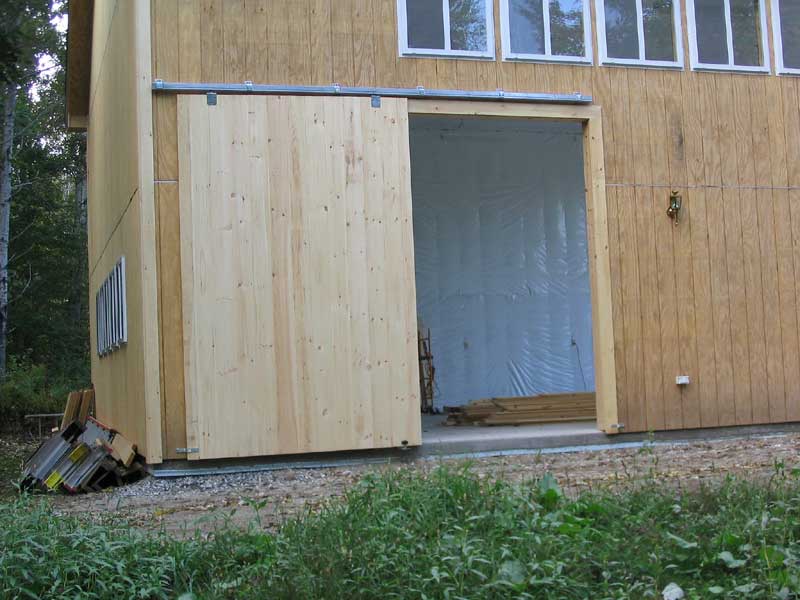
There are still some
finishing details to take care of on this door: trim over the door
track, weatherstripping, an interior handhold to operate the door, a
latching system, etc. But at least one of the large holes in the
wall is filled, bringing the barn one step closer to weathertightness.
|
|
|
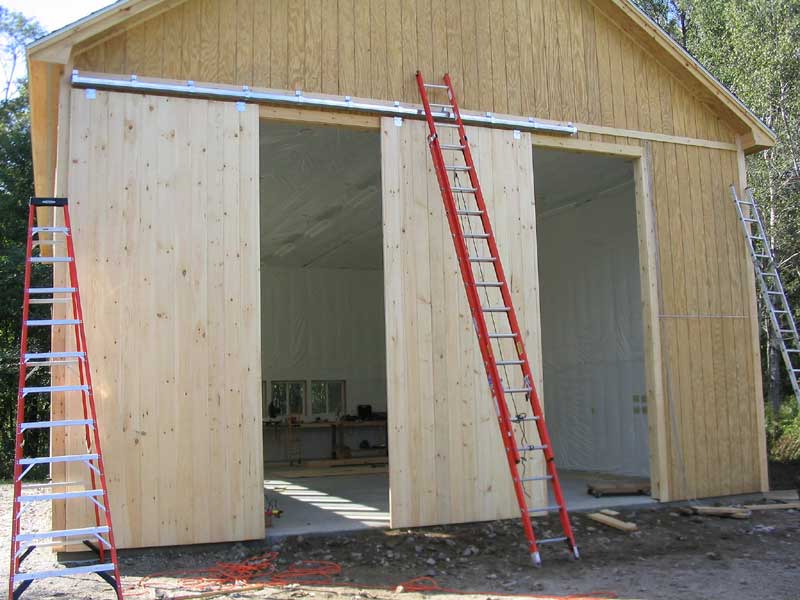
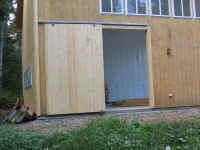
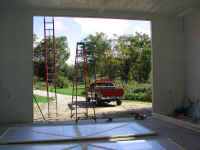
Front Doors
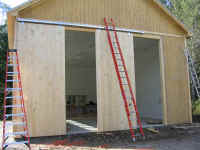
After a series of
measurements and calculations, I determined a size for each of the three
doors required for the large opening on the front of the barn. With
such a wide (18') opening, I was attempting to create doors that would not
only one be too large and unwieldy, but would also be able to be opened
completely without protruding past the sides of the barn. The logical
solution would have been two doors, meeting at the center--but these would
have stuck 3' or more past the sides of the building when opened.
Therefore, I chose three doors--two side sections with a third overlapping
section in the center. Because these doors would be smaller, they'd
be easier to handle. Plus, the three sections would give greater
flexibility in terms of opening various sections according to need.
 Once the door opening was
trimmed out, I measured the opening to determine the size doors
required. With the appropriate overlap, each door section needed to
be 79" wide and 186" tall. I built the doors using the
same construction techniques outlined above. As I laid out the
boards for each door, I realized I was several short of what I needed, so
for the last door I had to substitute some shorter boards (all that I
could obtain locally at the time), with short pieces spliced on at the
end. As it turned out, this was hardly detrimental in the least, and
the splices are not noticeable. When I paint the doors later, I'll
simply caulk the small seam and no one will be the wiser. I also ran
out of the 3/4" foam board insulation on the third door, so I filled
in the top half of the door with what I had left, and left the bottom half
for later. Even with the door hung, insulating this portion of the
door would be easy later on; it was more important to get the doors hung. Once the door opening was
trimmed out, I measured the opening to determine the size doors
required. With the appropriate overlap, each door section needed to
be 79" wide and 186" tall. I built the doors using the
same construction techniques outlined above. As I laid out the
boards for each door, I realized I was several short of what I needed, so
for the last door I had to substitute some shorter boards (all that I
could obtain locally at the time), with short pieces spliced on at the
end. As it turned out, this was hardly detrimental in the least, and
the splices are not noticeable. When I paint the doors later, I'll
simply caulk the small seam and no one will be the wiser. I also ran
out of the 3/4" foam board insulation on the third door, so I filled
in the top half of the door with what I had left, and left the bottom half
for later. Even with the door hung, insulating this portion of the
door would be easy later on; it was more important to get the doors hung.
|
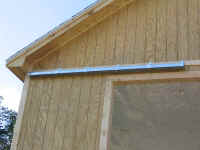
 With all three doors built, I contemplated
installation. The first thing I had to do was install the door
track. I had determined earlier that in order to provide the proper
clearance against the building, the door track brackets needed to be
installed on a 3/4" trim board, so I installed a full-width pine trim
board at the appropriate location above the door opening first, nailing it
into position as required. Next, I installed several of the
brackets; each bracket consists of an L-shaped piece onto which are
bolted, through slotted holes, two U-shaped track holders for the double
track needed for the three doors. Each bracket is secured to the
building with two lag screws, so installation was quite
straightforward. Some years ago, I purchased an electric impact
driver for some other project. It's a tool I use infrequently, but
sure is nice to have for such times as this, and the tool made short work
of driving the lags home. With all three doors built, I contemplated
installation. The first thing I had to do was install the door
track. I had determined earlier that in order to provide the proper
clearance against the building, the door track brackets needed to be
installed on a 3/4" trim board, so I installed a full-width pine trim
board at the appropriate location above the door opening first, nailing it
into position as required. Next, I installed several of the
brackets; each bracket consists of an L-shaped piece onto which are
bolted, through slotted holes, two U-shaped track holders for the double
track needed for the three doors. Each bracket is secured to the
building with two lag screws, so installation was quite
straightforward. Some years ago, I purchased an electric impact
driver for some other project. It's a tool I use infrequently, but
sure is nice to have for such times as this, and the tool made short work
of driving the lags home.
|
|
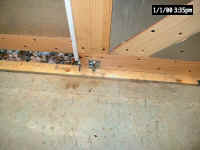
 With several brackets
installed, I slid two10' sections of the track into place in the
parallel brackets. I found it was easier to install the track
through just a few brackets, then to install the remaining brackets around
the track. I continued installing the brackets, approximately
24" on center, and positioned the last bracket so that the splice
between the two adjacent sections of track would be contained
within. Then, I installed the next two 10' sections, so that about
2/3 of the entire width of the opening now had track installed and ready
for use. With several brackets
installed, I slid two10' sections of the track into place in the
parallel brackets. I found it was easier to install the track
through just a few brackets, then to install the remaining brackets around
the track. I continued installing the brackets, approximately
24" on center, and positioned the last bracket so that the splice
between the two adjacent sections of track would be contained
within. Then, I installed the next two 10' sections, so that about
2/3 of the entire width of the opening now had track installed and ready
for use.
|
|
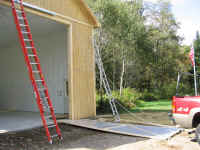
I left the final section of track off for now, so that I could more easily
raise the doors into position and get the rollers inserted into the
track. For weeks, I had been anticipating--with some
foreboding--this moment: the raising of these huge doors. How
would I do it? How much help would I need? Would I suffer a
disaster?
 I have this ridiculous
rolling dolly that I built years ago out of a couple scraps of plywood and
four casters. It's about 3' x 4', and has proved to be invaluable
for so many purposes over the years. I've used it for moving pianos,
engines, dinghies, and myriad other things. Now I pressed it into
service to help me move these large, unwieldy doors around. I lifted
the bottom edge of one of the doors onto the dolly, and then rolled it
outside to the front of the barn, with the door's top edge away from the
building and the bottom edge butted up to the base of the
building. I have this ridiculous
rolling dolly that I built years ago out of a couple scraps of plywood and
four casters. It's about 3' x 4', and has proved to be invaluable
for so many purposes over the years. I've used it for moving pianos,
engines, dinghies, and myriad other things. Now I pressed it into
service to help me move these large, unwieldy doors around. I lifted
the bottom edge of one of the doors onto the dolly, and then rolled it
outside to the front of the barn, with the door's top edge away from the
building and the bottom edge butted up to the base of the
building.
|
|
 To raise the doors, I
installed an eye screw into the header above the right side of the door
opening, far enough away from the termination of the door track to allow
the door to be raised into a vertical position without hitting the
track. I ran a line through the eye and then secured it to a hole
that I drilled through the top of the door. (I'll plug the hole
later.) I had considered tying the line around the two door rollers,
but decided that it would have put an unwanted strain on the hanging bolts
that might have bent them, so I came up with the other solution. To raise the doors, I
installed an eye screw into the header above the right side of the door
opening, far enough away from the termination of the door track to allow
the door to be raised into a vertical position without hitting the
track. I ran a line through the eye and then secured it to a hole
that I drilled through the top of the door. (I'll plug the hole
later.) I had considered tying the line around the two door rollers,
but decided that it would have put an unwanted strain on the hanging bolts
that might have bent them, so I came up with the other solution.
|
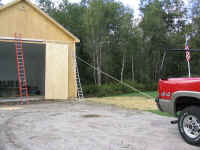 I secured the other end of
the line to my truck, and then slowly drove forward. As I did so,
the line pulled the top of the door skyward, while the bottom of the door
was immobilized by its proximity to the barn. I admit that this
process was easier--and worked better--than I had imagined, and the door
was raised with no drama whatsoever. Once vertical, I found that the
door was very stable and showed no inclination to tip or fall. I secured the other end of
the line to my truck, and then slowly drove forward. As I did so,
the line pulled the top of the door skyward, while the bottom of the door
was immobilized by its proximity to the barn. I admit that this
process was easier--and worked better--than I had imagined, and the door
was raised with no drama whatsoever. Once vertical, I found that the
door was very stable and showed no inclination to tip or fall.
|
|
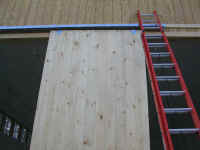 With the door vertical, I raised it on some
scrap blocking until the rollers were roughly in line with the track, and
slid the door sideways to begin engaging the first set of rollers.
It took several trips up and down a ladder, and some shuffling of the door
and its height, to get the rollers started, but once the first set was in
the track, it was relatively simple to get the second set engaged.
It took about 30 minutes to raise the firsts door from start to finish,
what with my general trepidation about the process. The subsequent
two doors went much quicker, once I realized how simple and effective my
technique was. With the door vertical, I raised it on some
scrap blocking until the rollers were roughly in line with the track, and
slid the door sideways to begin engaging the first set of rollers.
It took several trips up and down a ladder, and some shuffling of the door
and its height, to get the rollers started, but once the first set was in
the track, it was relatively simple to get the second set engaged.
It took about 30 minutes to raise the firsts door from start to finish,
what with my general trepidation about the process. The subsequent
two doors went much quicker, once I realized how simple and effective my
technique was.
|
|
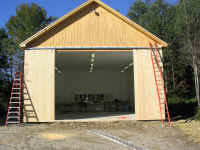
 With the doors installed, I adjusted the hanging rollers as needed to
level and plumb the doors, and to set them at the desired height.
Mission accomplished! Later, I installed the final sections of track
needed to span the entire width of the building, and took care of a few
minor adjustments to allow the doors to operate as intended.
With the doors installed, I adjusted the hanging rollers as needed to
level and plumb the doors, and to set them at the desired height.
Mission accomplished! Later, I installed the final sections of track
needed to span the entire width of the building, and took care of a few
minor adjustments to allow the doors to operate as intended.
|
|
Final work needed to
complete the doors, as of this writing, includes weatherstripping, handles
and latching hardware, and more minor adjustments as needed to provide a
weathertight seal. I will also install some significant trim pieces
to hide the track and enhance the weathertightness of the top
portion. All this is on the way soon.
Click here to
see the trim details.
For the time being, I propped two long 2x4s
along the bottoms of the doors to prevent them from swinging when
closed. A plan for the ultimate securing is coalescing in my mind as
I work on and around the building, and within the next week or two I
should have it all set.
|
|

|
Securing the Doors
The final stage of door
construction involved figuring out a way to hold them tightly closed, to
minimize drafts during the winter and prevent the doors from knocking
around in any wind. The first thing I did (though it was not ever
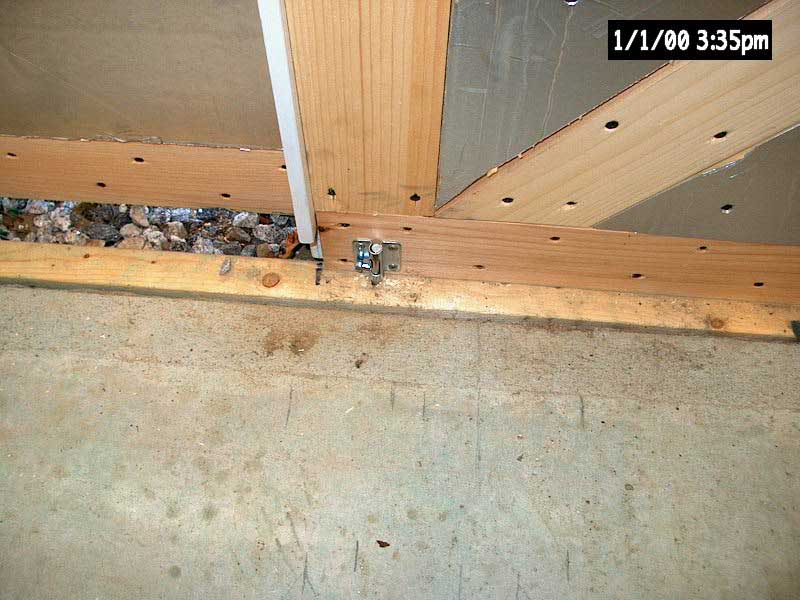
intended to be the only thing) was to install roller guides at the base of
the doors. The guides are installed on angle brackets that I secured
to the door trim on each side. In the center, to guide the middle
section of door, I secured two of the roller guides to a 2x4 that I placed
before the entrance to the slab, beneath the door opening. This
board is simply held in place by the gravel and crushed rock outside the
building, and also serves to span a gap that is required to allow the
doors clearance to roll closed.
|
|
The roller guides were enough to prevent the
doors from flopping around, but as colder weather arrived I had to face
the inevitable task of finding a way to seal the air gaps around the
doors, as well as to better secure them. To begin, I installed some
garage door weatherstrip on the sides of the door opening and on the
center edge of the two side doors. This material features a rubber
flap that helps seal the opening as the doors slide past it. The big
pine doors tended to bend and warp depending on the weather conditions and
humidity, so there was often a good-sized gap about halfway up the doors,
negating the seal. This is fine for warmer weather, but with heating
season underway, I had to take action to get the doors sealed for winter.
 My
first attempt involved some standard hook-eye latches. This was
lousy, and as soon as they were installed I realized it was useless.
It was difficult to get the hooks into the eyes, and impossible to pull
the doors tightly enough together. It did, however, give me the idea
than worked in the end: turnbuckles. I purchases several
turnbuckles from the hardware store, and installed them with hooks and
eyes to the doors: one on each side door, secured to the door frame,
and two on the center door. Since these are adjustable, it makes it
easy to install them, and then pull the door tightly into the
weatherstrip. To hold the two side sections in the proper position
relative to the opening, I installed simple barrel bolts in the center
side of the door. My
first attempt involved some standard hook-eye latches. This was
lousy, and as soon as they were installed I realized it was useless.
It was difficult to get the hooks into the eyes, and impossible to pull
the doors tightly enough together. It did, however, give me the idea
than worked in the end: turnbuckles. I purchases several
turnbuckles from the hardware store, and installed them with hooks and
eyes to the doors: one on each side door, secured to the door frame,
and two on the center door. Since these are adjustable, it makes it
easy to install them, and then pull the door tightly into the
weatherstrip. To hold the two side sections in the proper position
relative to the opening, I installed simple barrel bolts in the center
side of the door.
|
|
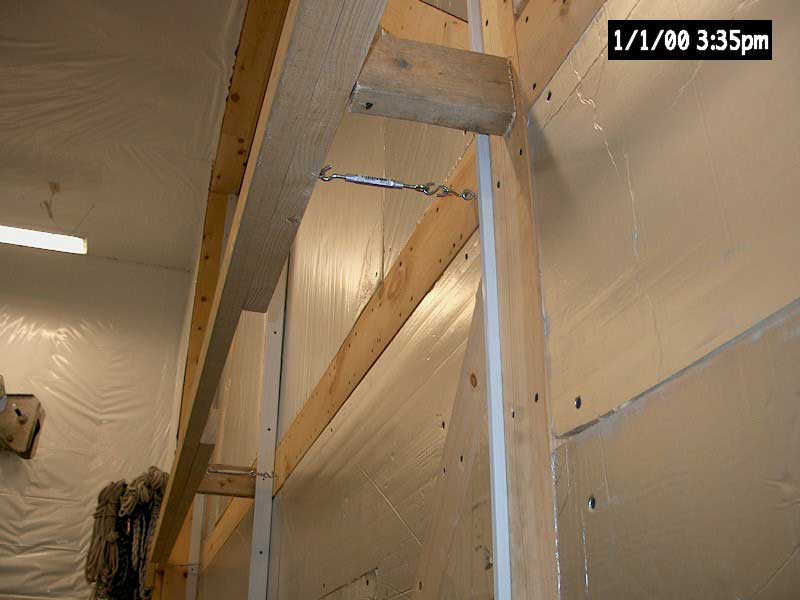
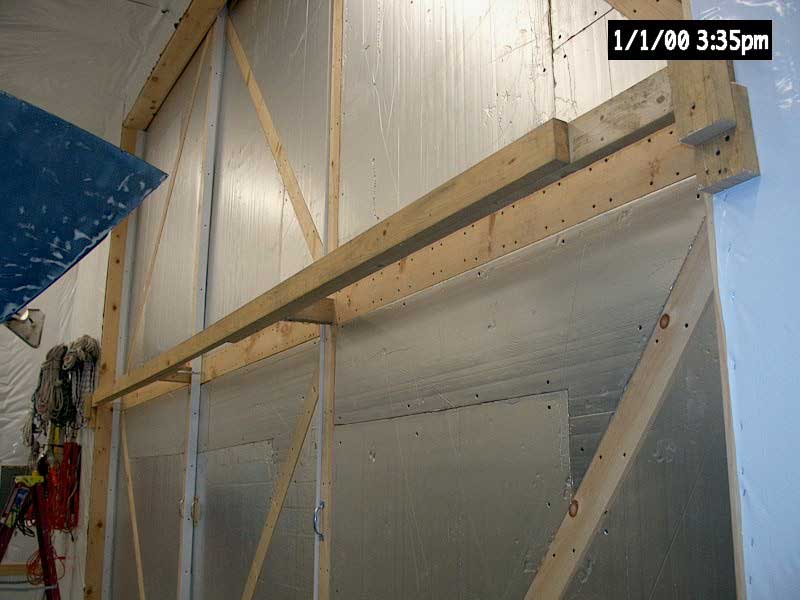
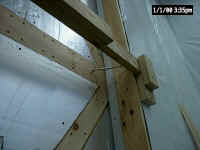 Securing
the center door was a little more interesting, as there was nothing to
secure the turnbuckles to that would hold the door. To get around
this, I built a beam out of three 2x4s that spanned the entire door
width. I built simple brackets to hold the beam in place flush with
the inside of the door frame, about halfway up the door. Then, I
could install turnbuckles from the center door to this cross beam, which
pulled the door in tightly. To prevent the beam from bending towards
the door, I installed spacers against each side door, so that when the turnbuckles
were tightened, it would only pull the center door in. It worked
great. Securing
the center door was a little more interesting, as there was nothing to
secure the turnbuckles to that would hold the door. To get around
this, I built a beam out of three 2x4s that spanned the entire door
width. I built simple brackets to hold the beam in place flush with
the inside of the door frame, about halfway up the door. Then, I
could install turnbuckles from the center door to this cross beam, which
pulled the door in tightly. To prevent the beam from bending towards
the door, I installed spacers against each side door, so that when the turnbuckles
were tightened, it would only pull the center door in. It worked
great.
|
|

|
|
 I
only need these measures during the winter, during which time the big
doors will rarely, if ever, be opened. In the warmer weather, I'll
leave most of this gear off, as the doors will be rolled open frequently. I
only need these measures during the winter, during which time the big
doors will rarely, if ever, be opened. In the warmer weather, I'll
leave most of this gear off, as the doors will be rolled open frequently.
To seal the air gaps at the
bottoms of the doors, I made up the world's largest* draft stopper out of
some leftover 4" insulation batts wrapped in plastic to keep them
clean and dry. This worked less well than I had hoped, so
modifications are under consideration.
|
*Unsubstantiated by Guinness :<)
|
|

 With all three doors built, I contemplated
installation. The first thing I had to do was install the door
track. I had determined earlier that in order to provide the proper
clearance against the building, the door track brackets needed to be
installed on a 3/4" trim board, so I installed a full-width pine trim
board at the appropriate location above the door opening first, nailing it
into position as required. Next, I installed several of the
brackets; each bracket consists of an L-shaped piece onto which are
bolted, through slotted holes, two U-shaped track holders for the double
track needed for the three doors. Each bracket is secured to the
building with two lag screws, so installation was quite
straightforward. Some years ago, I purchased an electric impact
driver for some other project. It's a tool I use infrequently, but
sure is nice to have for such times as this, and the tool made short work
of driving the lags home.
With all three doors built, I contemplated
installation. The first thing I had to do was install the door
track. I had determined earlier that in order to provide the proper
clearance against the building, the door track brackets needed to be
installed on a 3/4" trim board, so I installed a full-width pine trim
board at the appropriate location above the door opening first, nailing it
into position as required. Next, I installed several of the
brackets; each bracket consists of an L-shaped piece onto which are
bolted, through slotted holes, two U-shaped track holders for the double
track needed for the three doors. Each bracket is secured to the
building with two lag screws, so installation was quite
straightforward. Some years ago, I purchased an electric impact
driver for some other project. It's a tool I use infrequently, but
sure is nice to have for such times as this, and the tool made short work
of driving the lags home.
 I secured the other end of
the line to my truck, and then slowly drove forward. As I did so,
the line pulled the top of the door skyward, while the bottom of the door
was immobilized by its proximity to the barn. I admit that this
process was easier--and worked better--than I had imagined, and the door
was raised with no drama whatsoever. Once vertical, I found that the
door was very stable and showed no inclination to tip or fall.
I secured the other end of
the line to my truck, and then slowly drove forward. As I did so,
the line pulled the top of the door skyward, while the bottom of the door
was immobilized by its proximity to the barn. I admit that this
process was easier--and worked better--than I had imagined, and the door
was raised with no drama whatsoever. Once vertical, I found that the
door was very stable and showed no inclination to tip or fall.