Shop Planning
The first step in the process
was to determine a building location. Even with 50
acres at our disposal, we found that there were really only
one or two spots that came close to matching the criteria
for the site location; the building needed to be readily
accessible by truck, of course, and we hoped to keep it more
or less out of site from our chosen house location.
Eventually, we decided that an open area about 400' in the
driveway from the road would be suitable. |
Shop Home Page
Shop
Planning
Phase 1: Site Prep and Foundation
Phase 2: Framing
Phase 3: Finish Work
Phase 4: Shop Setup |
 Next, I had to settle on a
design and layout. With my previous experience
building my
first shop in North Yarmouth a couple years ago, I knew
a few areas that I would like to improve upon.
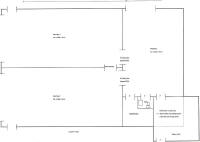
Eventually, I decided upon a 40' wide by 60' deep shop, with
three interior bays: one dedicated shop bay spanning
the back of the shop (20' x 30'), two boat bays accessed
from the front gable end of the building (each 20' x 40'),
and a corner office jutting partially from the back wall of
the shop (15' x 15'). The resulting floor space was
twice that of my existing shop, and the new setup with
individual boat bays and a separate--yet conveniently
located--woodshop would make the new facility more
efficient, easier to clean, and better overall for my
purposes. Next, I had to settle on a
design and layout. With my previous experience
building my
first shop in North Yarmouth a couple years ago, I knew
a few areas that I would like to improve upon.
Eventually, I decided upon a 40' wide by 60' deep shop, with
three interior bays: one dedicated shop bay spanning
the back of the shop (20' x 30'), two boat bays accessed
from the front gable end of the building (each 20' x 40'),
and a corner office jutting partially from the back wall of
the shop (15' x 15'). The resulting floor space was
twice that of my existing shop, and the new setup with
individual boat bays and a separate--yet conveniently
located--woodshop would make the new facility more
efficient, easier to clean, and better overall for my
purposes. |
|
 In
addition, I added a small bathroom with utility sink, a
utility closet for storage and heating equipment, and a
second floor paint storage and clean room above the bathroom
and office in the corner, where I would be able to paint or
varnish small parts, as well as contain all the painting
products in one location. In
addition, I added a small bathroom with utility sink, a
utility closet for storage and heating equipment, and a
second floor paint storage and clean room above the bathroom
and office in the corner, where I would be able to paint or
varnish small parts, as well as contain all the painting
products in one location.
The new building would be
again 16' in framed height, though my builder and I decided
to install a 7" concrete curb around the slab that would
raise the interior height by a similar amount. I
planned two overhead doors for the front of the boat bays,
as well as a large rolling door leading to the woodshop from
outside. |
Other decisions I reached during the planning stages
included the choice of maintenance-free vinyl siding for the
exterior, attic roof trusses to allow for a large storage
area above the bays, more clerestory windows to let in
plenty of light, and radiant floor heating contained within
the slab.With these
basic questions answered, and a building quote in hand, it
was time to move onto the next step in construction:
site preparation and foundation.
Click
here to continue...
This page was originally
posted on October 9, 2005.
|
| |
|