|
|
~MENU~ |
| Home |
| The Concept |
| The Boat |
| Bringing Her Home |
|
Weekly Progress Log |
|
Daysailor Projects |
| The Boat Barn |
| Resources |
| Other Sites |
| Email Tim |
|
|
| From a Bare Hull: Cabin Trunk (Page 2) |
|
Laminating the Curved Forward Section Once I determined from the mockup that my basic cabin trunk design was aesthetically pleasing and practical, I moved forward with the construction of the actual mahogany trunk. For months, I had been mentally anticipating this stage, and looked forward to getting it done--partly to see the result, and partly because I was a bit apprehensive about the bending and laminating process. |
|
I knew the bend was possible, as I had previously bent and laminated narrower strips of wood to create the 2.5' radius of the curved forward carlin during the deck framing process. This time, however, I would be dealing with boards up to 12" in width--more difficult to handle, and more difficult and expensive to replace if anything went wrong. |
 To
begin, I had to build a form against which to bend and support the boards when
laminating together. I started with the old form that I had used for the
carlin, which I had stored for the purpose. However, I couldn't simply use
the old form as is: not only was it not tall enough for the wide boards,
but, more importantly, the radius would need to be slightly different for the
cabin trunk, since in this case the outer edge of the cabin trunk would need to
fit tightly against the inner edge of the curved carlin. To make up for
the anticipated thickness of the cabin trunk lamination, I needed to reduce the
size of the original form. To
begin, I had to build a form against which to bend and support the boards when
laminating together. I started with the old form that I had used for the
carlin, which I had stored for the purpose. However, I couldn't simply use
the old form as is: not only was it not tall enough for the wide boards,
but, more importantly, the radius would need to be slightly different for the
cabin trunk, since in this case the outer edge of the cabin trunk would need to
fit tightly against the inner edge of the curved carlin. To make up for
the anticipated thickness of the cabin trunk lamination, I needed to reduce the
size of the original form. |
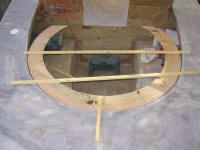
 To
determine the size and shape of the new form, I dismantled the old form and took
one section of the plywood up to the boat, where I suspended it in place inside
the carlin with a couple pine scraps that I screwed to the plywood and
overlapped onto the deck. Once I had the plywood positioned properly, I
scribed a line 3/4" in from the existing carline profile, since I anticipated
that the curved lamination would be approximately 3/4" in thickness. To
determine the size and shape of the new form, I dismantled the old form and took
one section of the plywood up to the boat, where I suspended it in place inside
the carlin with a couple pine scraps that I screwed to the plywood and
overlapped onto the deck. Once I had the plywood positioned properly, I
scribed a line 3/4" in from the existing carline profile, since I anticipated
that the curved lamination would be approximately 3/4" in thickness. |
 Next,
I screwed the two plywood sections from the old form together and cut the new
line. The line wasn't the arc of a perfect circle, since the carlin had
sprung out a bit after being laminated, so I didn't use a circle-cutting jig
this time. Instead, I freehanded the line. Next,
I screwed the two plywood sections from the old form together and cut the new
line. The line wasn't the arc of a perfect circle, since the carlin had
sprung out a bit after being laminated, so I didn't use a circle-cutting jig
this time. Instead, I freehanded the line. |
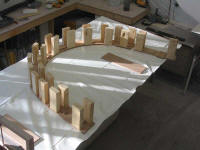
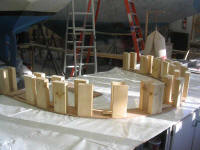
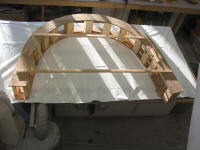 Next,
I decided how tall to build the mold. At the time, I didn't have the wood
I actually would use to build the trunk, so couldn't remember exactly how wide
the boards were. I settled on building the form slightly over 8" high,
which I knew was a safe number. I cut some scrap 2x4 to 8" in length and
screwed them to one of the two cut plywood sections, creating my own little
version of Stonehenge (and, coincidentally, close to the same size as the Spinal
Tap version). Next,
I decided how tall to build the mold. At the time, I didn't have the wood
I actually would use to build the trunk, so couldn't remember exactly how wide
the boards were. I settled on building the form slightly over 8" high,
which I knew was a safe number. I cut some scrap 2x4 to 8" in length and
screwed them to one of the two cut plywood sections, creating my own little
version of Stonehenge (and, coincidentally, close to the same size as the Spinal
Tap version). |
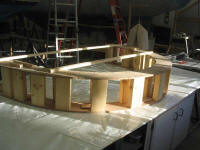 Then,
I screwed the bottom section of the plywood to a full sheet of plywood, which I
had covered with plastic, and attached the top piece of plywood, aligning it so
that it was directly above its lower counterpart. After some additional
bracing and screws, the mold was complete. Then,
I screwed the bottom section of the plywood to a full sheet of plywood, which I
had covered with plastic, and attached the top piece of plywood, aligning it so
that it was directly above its lower counterpart. After some additional
bracing and screws, the mold was complete. |
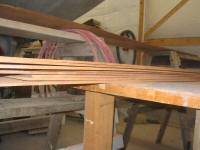 I
had three mahogany boards that I outsourced to be resawn into approximately 1/4"
slabs. It took the shop three weeks to get around to the work, but finally
it was done. The slabs were rough and uneven, so I spent a couple hours at
the planer smoothing them and reducing their thickness to the 1/4" maximum I
needed for the bendable strips. I ended up with 8 usable slabs, and one
that ended up thinner on one edge than the other, attributable to the planer
assembly getting hung up on piles of sawdust inside when I lowered it.
Fortunately, I caught the error after only one board. I
had three mahogany boards that I outsourced to be resawn into approximately 1/4"
slabs. It took the shop three weeks to get around to the work, but finally
it was done. The slabs were rough and uneven, so I spent a couple hours at
the planer smoothing them and reducing their thickness to the 1/4" maximum I
needed for the bendable strips. I ended up with 8 usable slabs, and one
that ended up thinner on one edge than the other, attributable to the planer
assembly getting hung up on piles of sawdust inside when I lowered it.
Fortunately, I caught the error after only one board.I expected to only use four of the slabs, leaving me with several spares that I hoped I wouldn't need. |
|
To begin, I set aside two or three of the nicest boards, those with the most attractive grain and the best texture. I planned to use one of these boards on the outside of the curved cabin trunk, which would be the visible portion from outside the boat. Since I wanted the cabin trunk assembly to overlap slightly the deck edge, I planned to laminate this face board onto the curved assembly in a separate operation, leaving it a bit shy of the bottom of the assembly; this would create a built-in rabbet that would provide the overlap desired. |
|
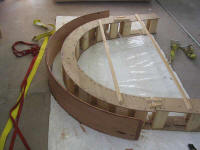
I continued by picking out three boards for bending, leaving a few in reserve. After preparing the mold, I performed a dry bending run, at first to see if the boards would bend at all (they did), and then, with more confidence, to ensure that they bent around the entire mold as needed without breaking. At first, I tried bending and clamping the boards in place using only my regular shop clamps--wooden screw jaws and a variety of other bar clamps--but quickly realized there was a better, safer, and more effective way to provide the even pressure required. I headed to my truck in the yard and pulled out a couple wide ratchet straps that I use for a variety of load-securing, but now planned to use as heavy-duty web clamps. |
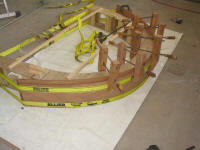 With
the two straps in place, it was easy to slowly bend the boards into position.
Because the nature of these ratchet straps is such that you can only roll a
small amount of the tail into the mechanism as they are tightened, I had to
alternate pressure on the two straps and reset the straps every so often to
allow them to work properly. With the assistance of several screw jaws
along the way, I bent the three boards tightly into position against the mold.
The boards were shorter than I had envisioned when I had built the mold several
days before my resawn slabs arrived back, so the after section of my mold was
unneeded. I had run the straps all the way around this back section, but
the pressure started to deform this relative week section of the mold, so I
stopped just shy of having the boards pulled all the way in. I left the
boards strapped in position for a short while to hopefully "stretch" them out
and make the next round of bending go more easily. With
the two straps in place, it was easy to slowly bend the boards into position.
Because the nature of these ratchet straps is such that you can only roll a
small amount of the tail into the mechanism as they are tightened, I had to
alternate pressure on the two straps and reset the straps every so often to
allow them to work properly. With the assistance of several screw jaws
along the way, I bent the three boards tightly into position against the mold.
The boards were shorter than I had envisioned when I had built the mold several
days before my resawn slabs arrived back, so the after section of my mold was
unneeded. I had run the straps all the way around this back section, but
the pressure started to deform this relative week section of the mold, so I
stopped just shy of having the boards pulled all the way in. I left the
boards strapped in position for a short while to hopefully "stretch" them out
and make the next round of bending go more easily. |
|
Eventually, I could put off the actual laminating process no longer: it was time to glue the boards up and be done with it. I had anticipated this process for many months since the inception of the project concept, with varying amounts of worry and dread. I unclamped the dry run (slowly and carefully), and got everything ready for the laminating stage, laying out glue, clamps, and other materials I might need. With the mold on the floor of the shop, I had easy access all around it. |
|
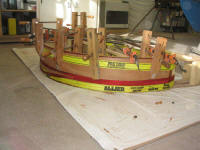
I chose resorcinol glue for the laminating, since not only is it easier to mix, but it has a longer working time than epoxy that I find is useful when laminating large structures alone. Besides, resorcinol is at least as strong and even more waterproof, and is always a good choice when no gap-filling is required. After cleaning the mating surfaces of the boards, I spread glue (using a squeegee and brush) as needed, stacked the boards, and headed for the mold. |
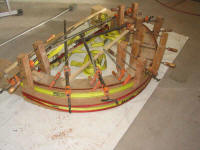 The
bending process went quickly once I had begun to bend the boards sufficiently
around the mold, and the straps were tight. This time, I ran the straps
around the back portion of the main curved part of the mold, which I was sure
would be stronger and also would pull the back ends of the slabs more tightly
into the mold than the dry-run arrangement had. The
bending process went quickly once I had begun to bend the boards sufficiently
around the mold, and the straps were tight. This time, I ran the straps
around the back portion of the main curved part of the mold, which I was sure
would be stronger and also would pull the back ends of the slabs more tightly
into the mold than the dry-run arrangement had.
I had to realign the straps a couple times till I managed to get a few clamps in place that helped hold the upper strap in place. Trying to keep the pressure relatively even between the straps, I pulled the boards tightly into the mold, adding additional clamps on the mold itself as I could. |
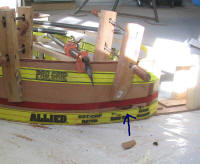 Just
before the final ratcheting to bring the boards tightly in at the aft end, I
mistakenly allowed the lower strap to become slacker than I intended, and with a
bang the outermost slab on the port side cracked, spitting a small chunk of wood
onto the floor. Obviously, this did not particularly please me, but I
tightened the strap to a stable position and went for a closer inspection. Just
before the final ratcheting to bring the boards tightly in at the aft end, I
mistakenly allowed the lower strap to become slacker than I intended, and with a
bang the outermost slab on the port side cracked, spitting a small chunk of wood
onto the floor. Obviously, this did not particularly please me, but I
tightened the strap to a stable position and went for a closer inspection.Since I had planned from the start to add a fourth and final board to the outside of the curved structure when complete, I decided that the damage could probably be salvageable, as long as I could pull the broken edges tightly into the surrounding area so that as much surface as possible would bond. I used a couple smaller ratchet straps to force the pieces in as much as possible, and hoped for the best. Only when I removed the glue-up from the mold would I know for sure whether I would have a usable piece or not. |
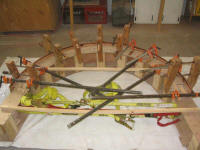 With
that disappointment out of the way, I completed the clamping by ensuring that
the straps were very tight, and added as many clamps to other portions of the
glue-up as I could. I turned the heat up in the shop to 72 to allow better
curing of the resorcinol, and left things alone for the entire next day, before
finally addressing the piece again nearly 48 hours later. With
that disappointment out of the way, I completed the clamping by ensuring that
the straps were very tight, and added as many clamps to other portions of the
glue-up as I could. I turned the heat up in the shop to 72 to allow better
curing of the resorcinol, and left things alone for the entire next day, before
finally addressing the piece again nearly 48 hours later. |
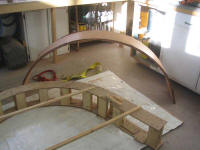
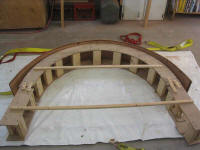 With
some trepidation, I removed the clamps. Nothing traumatic happened, which
was good! There was more springback than I anticipated, probably because
there were only three laminations (typically, more laminations make for a
stronger piece with less springback). The areas that had cracked during
the initial glue-up were relatively well adhered, and it looked like most of the
area in question would actually be cut away later on during final fitting, since
the blank was longer than needed. Overall, it looked like I had a
successful lamination, one that I could and would continue to work with.
The addition of a final lamination on the outside of the blank would add further
strength, and would hide all the ills beneath. With
some trepidation, I removed the clamps. Nothing traumatic happened, which
was good! There was more springback than I anticipated, probably because
there were only three laminations (typically, more laminations make for a
stronger piece with less springback). The areas that had cracked during
the initial glue-up were relatively well adhered, and it looked like most of the
area in question would actually be cut away later on during final fitting, since
the blank was longer than needed. Overall, it looked like I had a
successful lamination, one that I could and would continue to work with.
The addition of a final lamination on the outside of the blank would add further
strength, and would hide all the ills beneath. |
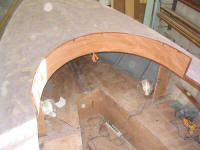
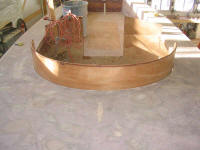 I
brought the blank up on deck and test-fit it in place. Because of the
springback, the after ends were substantially too wide to fit within the
carlins, but I figured I could persuade it to fit. With one of my ratchet
straps, I carefully pulled the curve tighter until it slipped into place between
the carlins for a nice friction fit. I added a temporary clamp at the
forward centerline to hold things in place. I
brought the blank up on deck and test-fit it in place. Because of the
springback, the after ends were substantially too wide to fit within the
carlins, but I figured I could persuade it to fit. With one of my ratchet
straps, I carefully pulled the curve tighter until it slipped into place between
the carlins for a nice friction fit. I added a temporary clamp at the
forward centerline to hold things in place. |
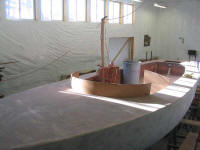 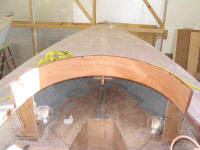 I
spent several minutes contemplating the blank, eying it to determine its final
positioning, how I would eventually secure it, where to cut the blank at the
ends, and how to create a joint between the curved section and the remainder of
the cabin trunk and coaming--all important questions that I had had all along,
but couldn't address until this moment. I left the blank in place and
continued my contemplation, feeling no need to rush forward at this point until
I knew how I would ultimately proceed. I
spent several minutes contemplating the blank, eying it to determine its final
positioning, how I would eventually secure it, where to cut the blank at the
ends, and how to create a joint between the curved section and the remainder of
the cabin trunk and coaming--all important questions that I had had all along,
but couldn't address until this moment. I left the blank in place and
continued my contemplation, feeling no need to rush forward at this point until
I knew how I would ultimately proceed. |
|
|
